Deployment
To run CKEditor AI on your server, you need to have certain services prepared first:
- An SQL database (MySQL and Postgres are supported)
- A Redis database
- Data storage (S3, Azure Blob Storage, filesystem, MySQL, or Postgres)
Besides, you need an Open Container runtime to run CKEditor AI. You can use, among others: Docker, Kubernetes, Amazon Elastic Container Service, or Azure Container Instances.
We also recommend using a load balancer. You can use almost any load balancer you choose, like NGINX, HAProxy, Amazon Elastic Load Balancing, or Azure Load Balancer. Thanks to this, you will be able to create TLS connections and run several cooperating instances of CKEditor AI On-Premises. It will increase the security and the performance of the application.
For a detailed description of the recommended infrastructure, see the Architecture guide.
The SQL database stores persistent data like configurations, conversations, files and documents. It can also be used as a data storage for your files.
The minimum required version of MySQL is 8.0. The database and user should have at least the following privileges: ALTER, CREATE, DELETE, DROP, INDEX, INSERT, SELECT, TRIGGER, UPDATE, LOCK TABLES, REFERENCES.
The database should be created before running CKEditor AI On-Premises. An example database creation script:
CREATE DATABASE `ai-service-on-premises`
  DEFAULT CHARACTER SET utf8mb4
  DEFAULT COLLATE utf8mb4_bin;
If you want to use another SQL database like Microsoft SQL Server, etc., please contact us.
If binary logging is enabled without the SUPER privilege, please make sure that log_bin_trust_function_creators is enabled. Check your configuration, especially when you use a managed database service (DBaaS) like AWS RDS/Aurora, Azure Database, Google Cloud SQL, or DigitalOcean Managed Databases.
The minimum required version of PostgreSQL is 12.0. The database and user should have at least the following privileges: SELECT, INSERT, UPDATE, DELETE, REFERENCES, CREATE, USAGE.
The database with a schema should be created before running CKEditor AI On-Premises. An example database and schema creation script:
CREATE DATABASE "cksource";
\connect "cksource";
CREATE SCHEMA "ai-service-on-premises";
CKEditor AI On-Premises can be integrated with Collaboration Server On-Premises so that both services share a single infrastructure. This means both services connect to the same SQL database instance and the same Redis instance — you do not need separate databases for AI and collaboration.
This integration requires Collaboration Server On-Premises 5.0.0 or newer.
Collaboration Server On-Premises and CKEditor AI On-Premises are released at the same time. Updating them simultaneously and keeping them on the same version is strongly recommended.
Before integrating, make sure you have a working Collaboration Server On-Premises deployment. Refer to the Collaboration Server Quick Start or the Collaboration Server Architecture guide for setup details.
To integrate, configure CKEditor AI On-Premises with the same DATABASE_* and REDIS_* environment variables that your Collaboration Server uses. Both services must point to the same database and Redis hosts:
docker run --init -p 8000:8000 \
    -e LICENSE_KEY=[your license key] \
    -e DATABASE_DRIVER=[mysql|postgres] \
    -e DATABASE_HOST=[same host as Collaboration Server] \
    -e DATABASE_USER=[same user as Collaboration Server] \
    -e DATABASE_PASSWORD=[same password as Collaboration Server] \
    -e DATABASE_DATABASE=[same database as Collaboration Server] \
    -e REDIS_HOST=[same Redis host as Collaboration Server] \
    -e PROVIDERS='{"openai":{"type":"openai","apiKeys":["your-api-key"]}}' \
    -e STORAGE_DRIVER=[s3|azure|filesystem|database] \
    docker.cke-cs.com/ai-service:[version]
The key requirement is that both services share identical database and Redis connection settings. Compare the DATABASE_* and REDIS_* variables between your Collaboration Server and AI service configurations to verify they match.
- Shared environments – All environments and access keys created in the Collaboration Server Management Panel become available to CKEditor AI On-Premises automatically.
- Single management panel – The AI-specific Management Panel is disabled. All configuration for both services is handled through the Collaboration Server Management Panel.
- Shared data layer – Both services read from and write to the same SQL database and Redis instance. You do not create a separate database for AI.
When using both collaboration and AI features, the JWT token should include permissions for both services. Include auth.collaboration for collaboration roles and auth.ai.permissions for AI access in the same token payload:
{
    "aud": "your-environment-id",
    "sub": "user-123",
    "auth": {
        "collaboration": {
            "*": {
                "role": "writer"
            }
        },
        "ai": {
            "permissions": [
                "ai:conversations:*",
                "ai:models:agent",
                "ai:actions:system:*",
                "ai:reviews:system:*"
            ]
        }
    }
}
For more details, see the Token endpoint guide (including the combined example) and the CKEditor AI Permissions guide.
After meeting all infrastructure requirements, you can prepare the CKEditor AI application to run. Follow the steps below to install CKEditor AI On-Premises using the Docker image.
Use the Quick-start checklist to track your progress, or jump straight to the Setup wizard to generate a docker run command for your environment.
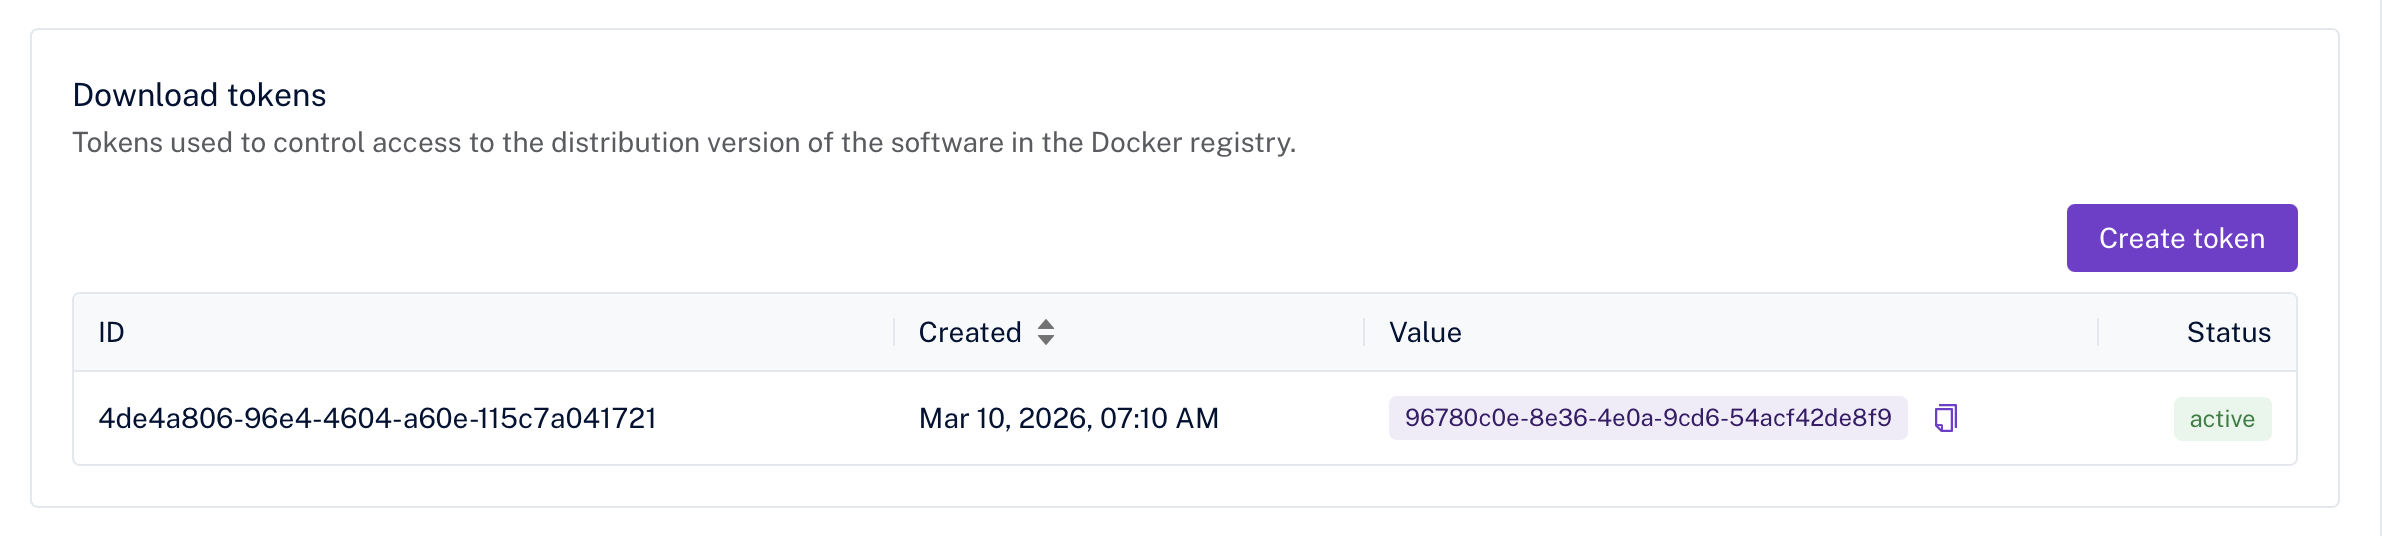
To pull the CKEditor AI On-Premises Docker image, you need a download token.
-
Log in to the Customer Portal.
-
Navigate to Subscription → License keys → CKEditor AI Server.
-
Scroll to the Download tokens section.
-
If no tokens exist, click Create token.
-
Copy and save the token.
If CKEditor AI Server is not visible in your Customer Portal or you cannot create a download token, please contact us to get access.
Use the download token to log into the CKEditor AI On-Premises Docker Registry and pull the image:
docker login -u ai-service -p [DOWNLOAD_TOKEN] https://docker.cke-cs.com
docker pull docker.cke-cs.com/ai-service:latest
Start the container with the required environment variables. You can use the Setup wizard to generate a command tailored to your infrastructure, or use the example below as a starting point. All available options are described in the Configuration section.
docker run --init -p 8000:8000 \
    -e LICENSE_KEY=[your license key from Customer Portal] \
    -e ENVIRONMENTS_MANAGEMENT_SECRET_KEY=[your management secret key used in management panel] \
    -e DATABASE_DRIVER=[mysql|postgres] \
    -e DATABASE_HOST=[your database host] \
    -e DATABASE_USER=[your database user] \
    -e DATABASE_PASSWORD=[your database user password] \
    -e DATABASE_DATABASE=[your database name] \
    -e REDIS_HOST=[your redis host] \
    -e PROVIDERS='{"openai":{"type":"openai","apiKeys":["your-api-key"]}}' \
    -e STORAGE_DRIVER=[s3|azure|filesystem|database] \
    -e STORAGE_ACCESS_KEY_ID=[your AWS access key] \
    -e STORAGE_SECRET_ACCESS_KEY=[your AWS secret key] \
    -e STORAGE_BUCKET=[your S3 bucket name] \
    docker.cke-cs.com/ai-service:[version]
-
Open the Management Panel in your browser. The panel is available at the address where your CKEditor AI On-Premises instance is running (e.g.
http://localhost:8000). -
Enter the
ENVIRONMENTS_MANAGEMENT_SECRET_KEYyou provided to the container. -
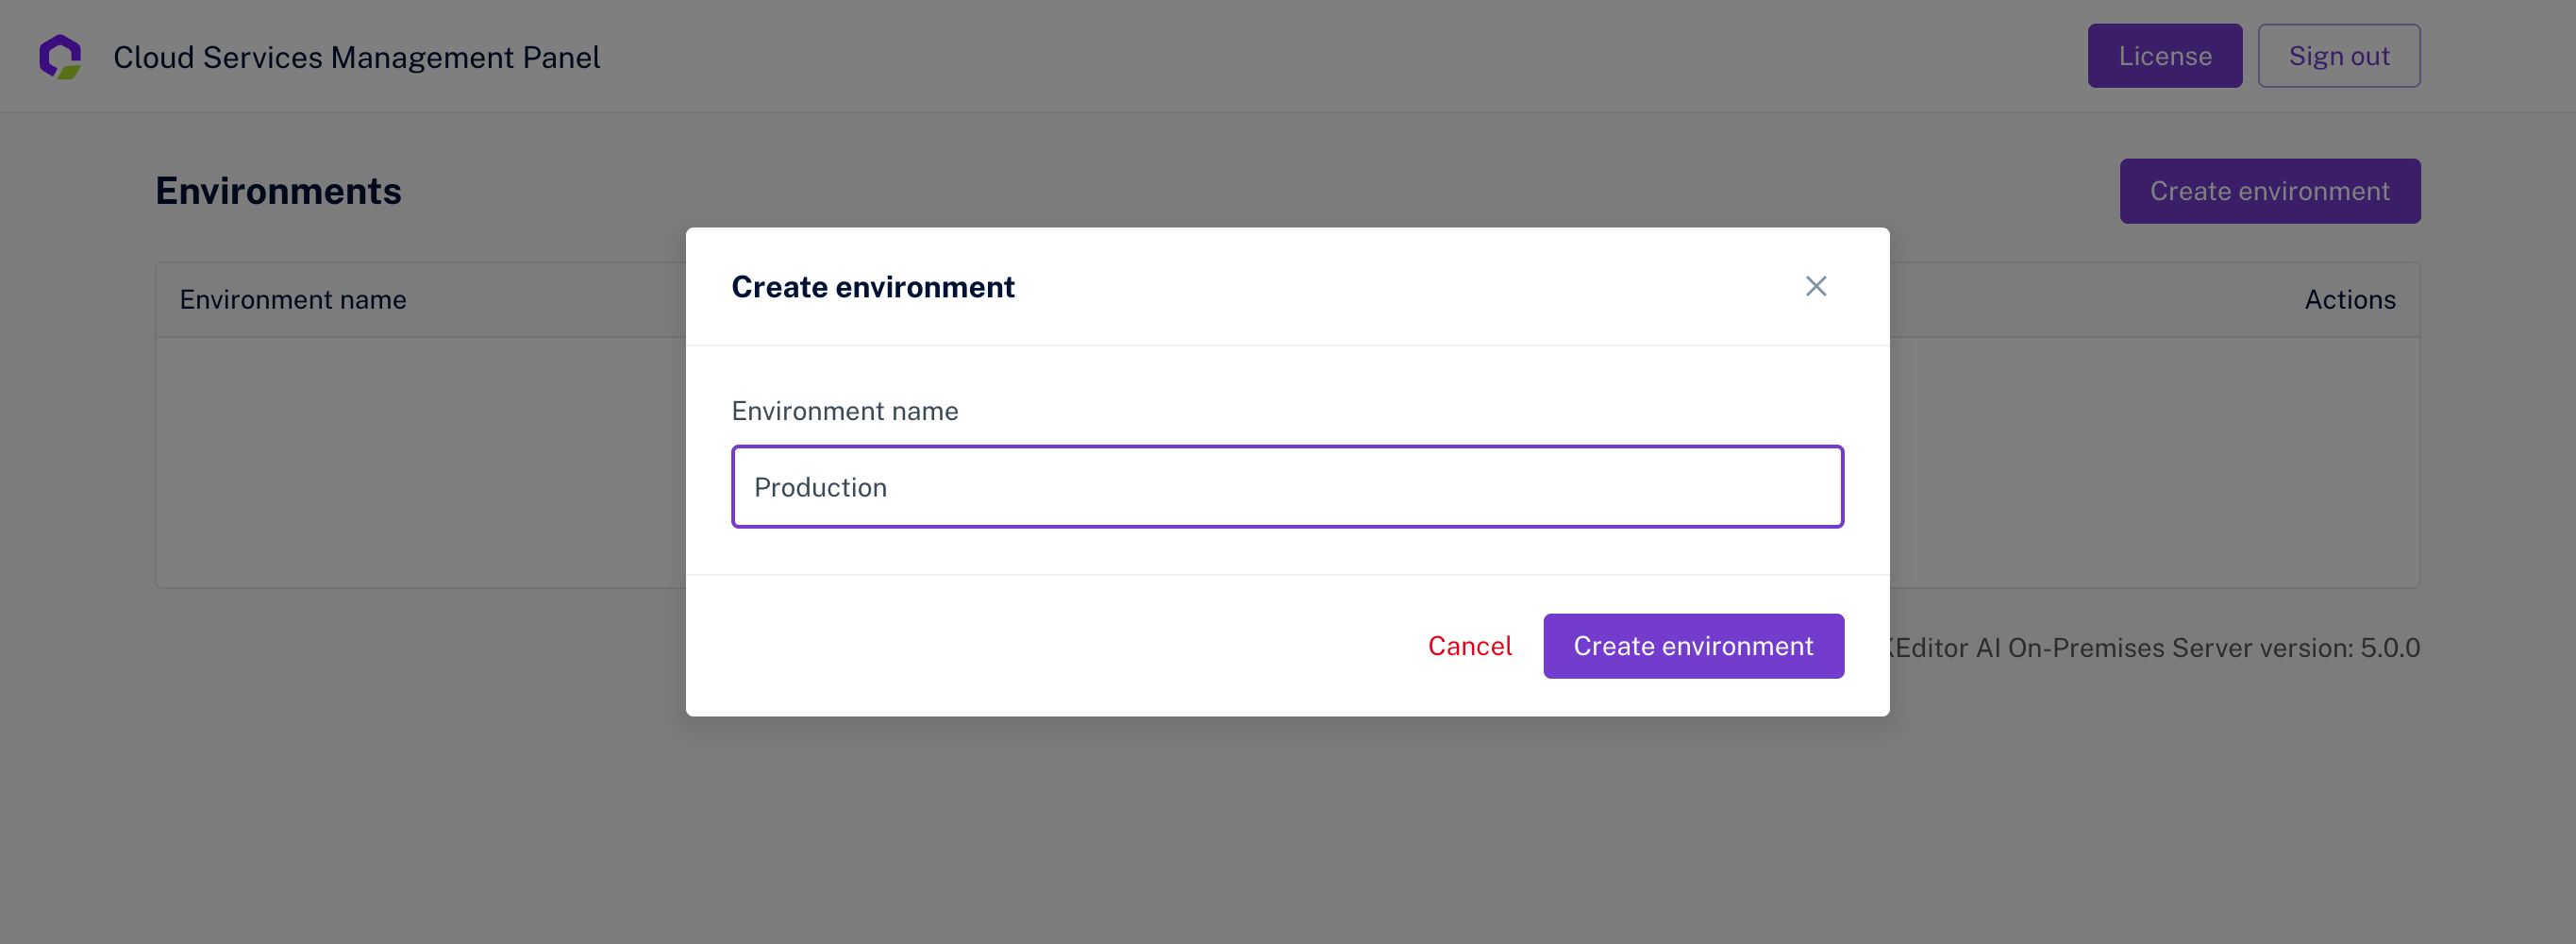
Create a new Environment.
-
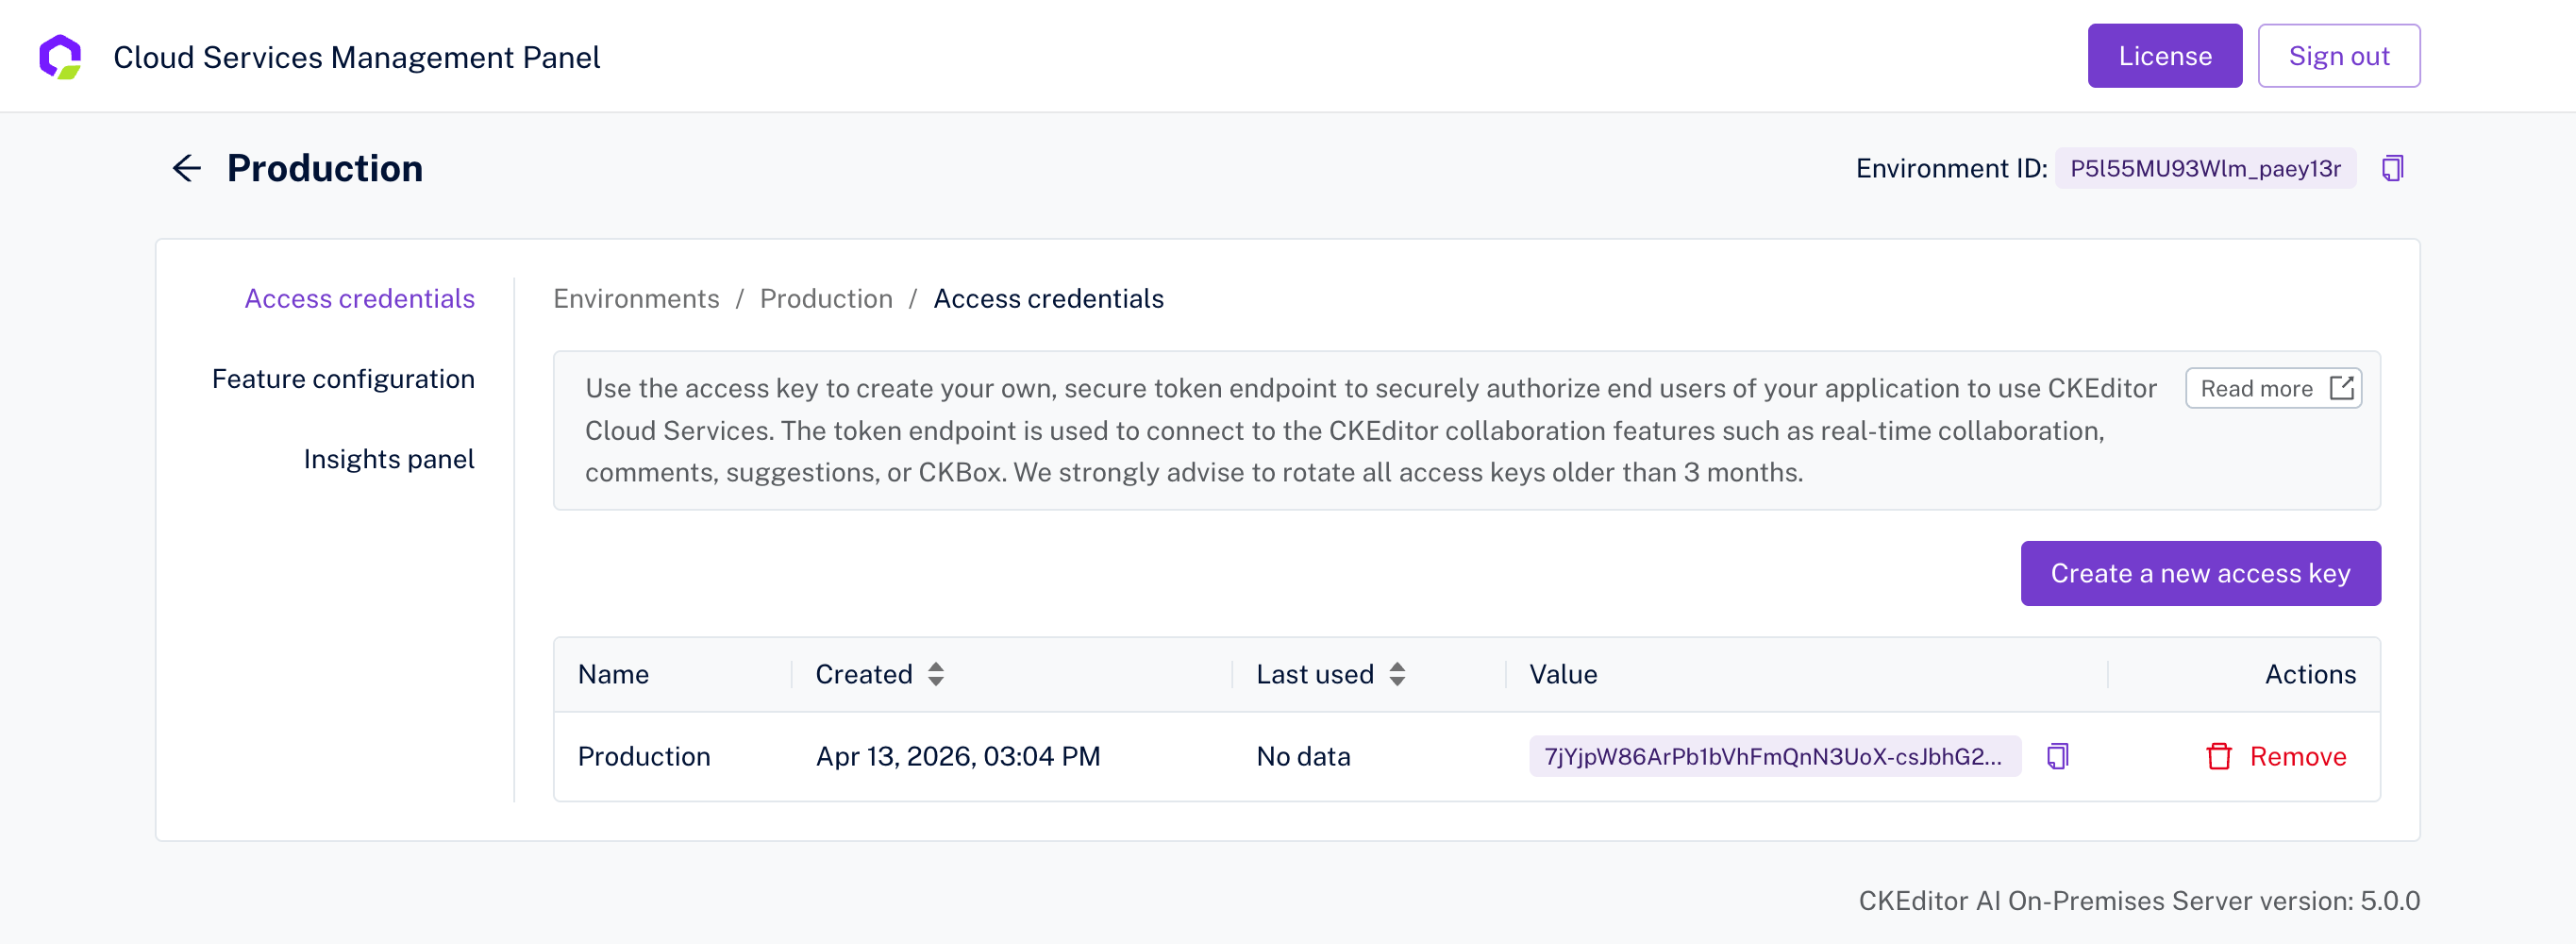
Inside the environment, create a new Access Key.
-
Save both the
Environment IDand theAccess Key— you will need them for the token endpoint.
For more details on managing environments and access keys, see the Access Key guide.
Use the Environment ID and Access Key from the previous step to create a token endpoint in your application. The token endpoint generates JWT tokens that authorize your users to use CKEditor AI features.
Make sure the token includes auth.ai.permissions to grant access to AI features. See the Node.js token endpoint example (including the CKEditor AI section) for a ready-to-use implementation, or check examples in PHP, Python, Java, and ASP.NET.
For details on AI-specific permissions, see the CKEditor AI Permissions guide.