Quick start installation guide
The Collaboration Server On-Premises Quick-Start guide lets you quickly set up the infrastructure needed to use CKEditor 5 with Real-Time Collaboration and Collaboration Server On-Premises. With a single setup command you can run a working CKEditor 5 instance and start testing our solution, with the Collaboration Server running locally on your machine. This setup process should take less than 10 minutes (it may be slightly longer in case of a slow network connection).
The infrastructure created with the Collaboration Server On-Premises Quick-Start can be only used for testing purposes during local development and it cannot be used in production. For details about production-grade architecture please refer to the Collaboration Server On-Premises Architecture.
A valid license key is needed in order to install Collaboration Server On-Premises.
Contact us for a trial license key.
To successfully run Collaboration Server On-Premises Quick-Start you need the following tools:
- Docker Desktop for Windows or Mac (or Docker tools for Linux)
- node version 10 and above
- npm version 6 and above
- git
If you do not have these tools installed on your machine, refer to the following installation guides:
- The Docker Desktop on Win10 installation guide
- The Docker Desktop on Mac installation guide
- The Node.js download page
- The Git installation guide
The On-Premises Quick-Start installation will download several docker images about 2GB in size. Appropriate free space on your disk is hence required.
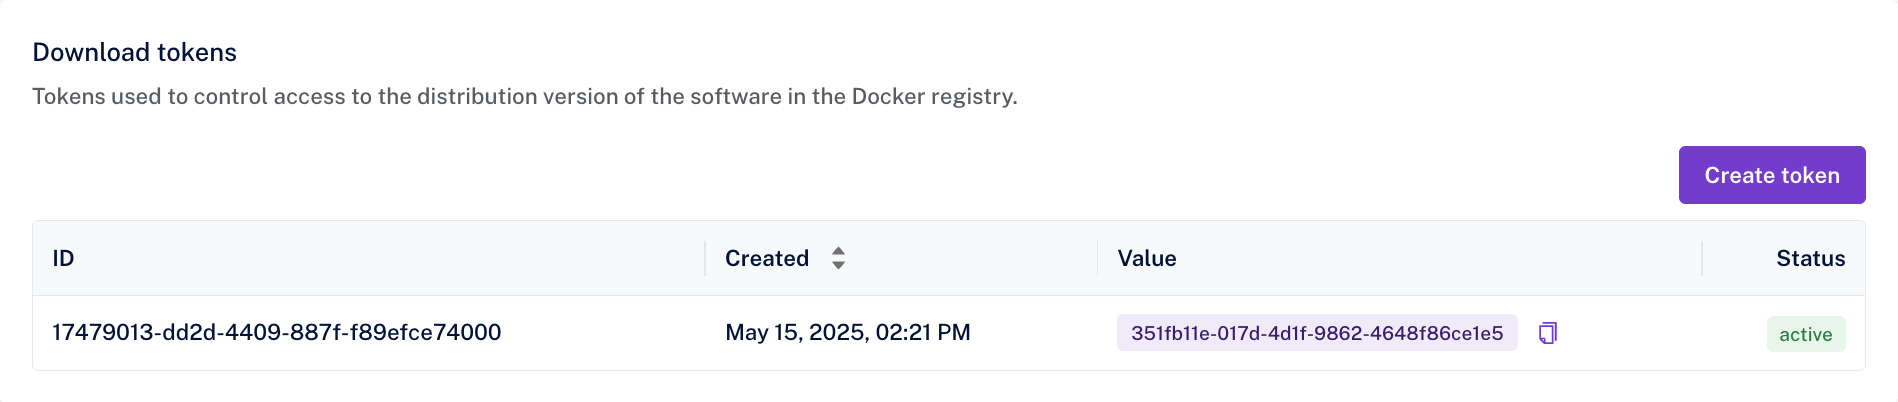
Two essential credentials are needed to run the Collaboration Server On-Premises Quick-Start: a License key and a Download token, both available through the Customer Portal.
- Log in to the Customer Portal
- Navigate to Subscription → License keys → Collaboration
- Scroll to the Download token section
- If no tokens exist, click Create token
- Copy and save the token
Your next steps depend on your license type:
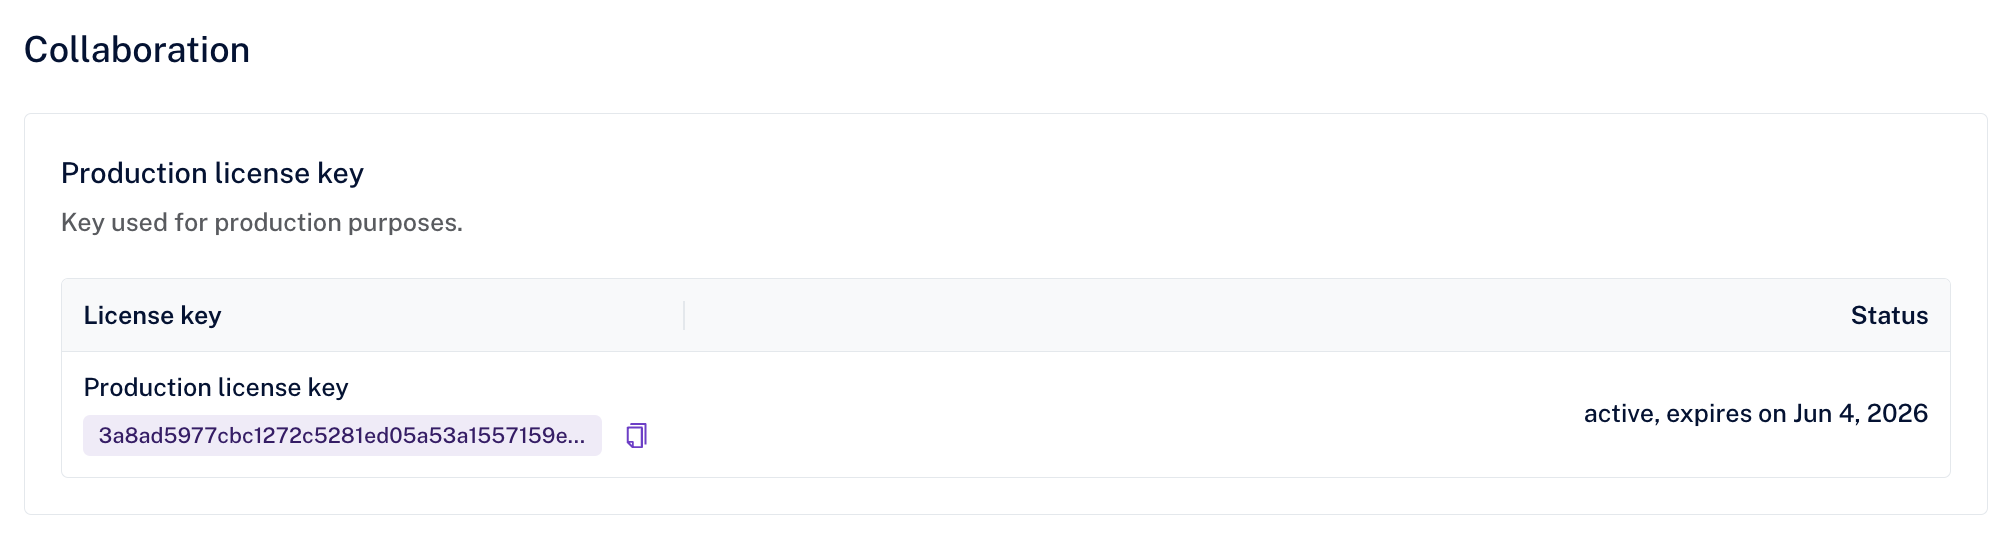
For the Online license version, you should see the License key value right away as shown below.
Benefits of Online License: The online license offers automatic scaling with no hard user limits, allowing your collaboration needs to grow naturally. You benefit from simplified management as there’s no need to pre-allocate users or manage complex allocation pools. This flexible usage model grows with your team without hitting hard stops that could interrupt your workflow. Most importantly, there’s no risk of blocking users - when you exceed limits, you’re billed accordingly rather than users being prevented from collaborating.
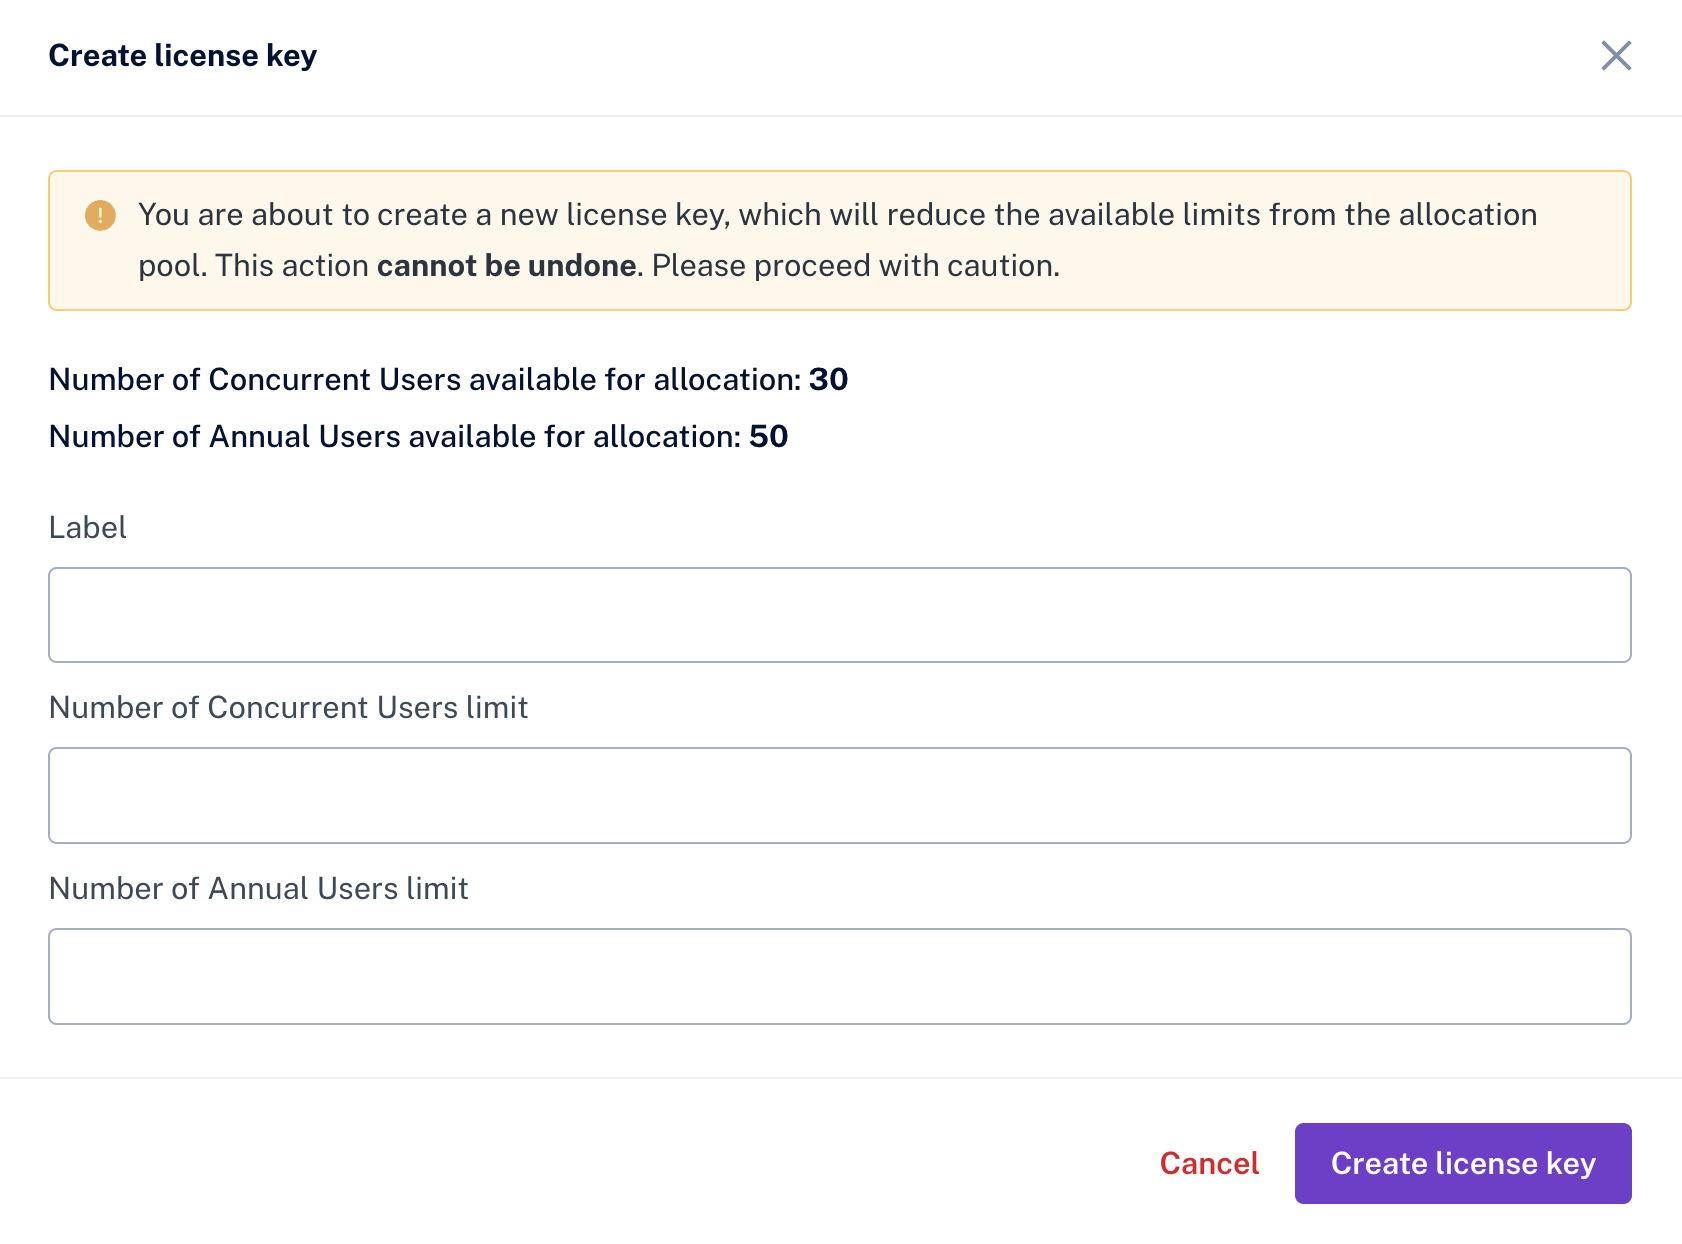
With the Offline license version, you receive an allocation pool representing your total Annual and Concurrent users. This allows you to create multiple individual license keys from this pool.

Your allocation pool contains the total Annual and Concurrent users you purchased. You create individual license keys by allocating users from this pool. Understanding the two user types is essential for proper allocation:
- Annual users represent the maximum number of unique users who can use the collaboration features within a 12-month period with your specific key
- Concurrent users define the maximum number of users who can actively collaborate simultaneously at any given moment
For example, if you create a key with 50 Annual users and 10 Concurrent users, only 50 unique people can use collaboration features per year, with a maximum of 10 people collaborating at the same time.
The offline license system enforces strict boundaries on usage. When the annual limit is exceeded, new users beyond the allocated annual limit will be blocked from accessing collaboration features, though existing users within the limit can continue to collaborate normally. For concurrent limits, when more users try to collaborate simultaneously than the limit allows, additional users will receive an error message and won’t be able to join the collaboration session until someone else leaves. The system enforces these limits as hard stops (in contrast to the Online license).
Once a license key is created, it cannot be deleted or modified, and the allocated users from that key cannot be returned to the pool. This permanence means you should plan your key allocation carefully before creation. If you need a different allocation, you must create a new key from your remaining pool rather than modifying existing ones.
When your entire allocation pool is used up across all created keys, you cannot create additional license keys. To increase your pool or get additional licenses, you need to submit a support request, either through the Customer Portal or through the contact us form. Your existing keys will continue to work normally within their allocated limits.
To manage your allocation effectively, plan your key allocation strategy before creating keys, considering separate allocations for development, staging, and production environments. Consider future growth when allocating users to each key to avoid running out of capacity. Monitor your usage regularly to avoid hitting limits unexpectedly, and contact support well in advance if you anticipate needing additional capacity.
To create a license key:
- Click Create license key
- Allocate Annual and Concurrent users from your pool
- Add a descriptive label for identification
- Confirm by clicking Create license key
-
Make sure that Docker Desktop is running. You can check the Docker tray icon to see the current status.
-
Verify that you have all the necessary tools installed by running this command in your terminal:
docker -v && docker-compose -v && node -v && npm -v && git --version
You should see version numbers of all of these tools. If you see a command not found message, please install the missing tool before proceeding with the next step.
- Clone repository containing script files and install the packages with the following commands:
git clone https://github.com/cksource/ckeditor-cs-on-premises-infrastructure.git

cd ckeditor-cs-on-premises-infrastructure/quick-start && npm install
- Run the On-Premises Quick-Start, replacing the arguments with the credentials placeholders with your credentials:
node setup.js --license_key="YOUR_LICENSE_KEY" --docker_token="YOUR_DOCKER_DOWNLOAD_TOKEN" --env_secret="YOUR_ENVIRONMENT_SECRET"
Use the values obtained from the Customer Portal. The env_secret value is your own password, that will be used to access the Collaboration Server On-Premises management panel
Running this setup process for the first time may take several minutes. The script needs to pull several docker images from the web, install the packages and build the editor bundle. The following command runs will be much shorter. After the successful installation, you should see a message stating Visit http://localhost:3000 to start collaborating. Open this page in your browser.
When your testing session is over, you can simply stop running the process in the terminal with the Ctrl+C keystroke and the created containers will be removed from your machine.
Only the 3 arguments mentioned above are required to successfully run the Collaboration Server On-Premises Quick-Start script. There are, however, other optional arguments to customize the setup process. Here is a list of all possible arguments:
--license_key=""      - required,
--docker_token=""     - required,
--env_secret=""       - required,
--docker_endpoint=""  - optional, the default is "docker.cke-cs.com", use it to change the docker registry url
--version=""          - optional, the default is "latest", use it to specify a different version of the docker image
--cs_port=""          - optional, the default is "8000", a port for Collaboration Server On-Premises
--node_port=""        - optional, the default is "3000", a port for the frontend part of Quick-Start
--keep_containers     - optional, use it to preserve the created containers on exit
Note: If you use different ports than the default ones, please remember to update the URL endpoints after opening a sample page.