Collaboration import and export
The process of saving the data of the document in an active collaboration session with multiple users can be challenging. A simple implementation using the autosave plugin comes with some drawbacks. Another approach to initializing and saving collaboration data can solve most of them.
The import and export feature, based on the REST API, improves the process of synchronizing the data of the document which is saved in your database. When using this feature, the responsibility for saving the current document data will be transferred from the users to your server.
This feature utilizes two methods available from the REST API:
- Import a document – Use this endpoint to set the initial content and create a new collaboration session. This endpoint will not work if a collaboration session with a given
documentIdalready exists. - Export a document – Use this endpoint to fetch the content from an active collaboration session. In the response, you will get plain HTML or Markdown output from the editor (depending on the editor configuration), just like you would call
editor.getData()on the client side. Exported document data may contain comments and/or suggestions markers if you are using corresponding plugins in your editor. To export a document without these markers use the document import and export feature.
Follow this guide to learn how to properly set up and use this feature.
To use the import and export feature, an editor with its configuration needs to be uploaded to the CKEditor Cloud Services server. Cloud Services uses your editor to generate the correct output during the export and to validate the input during the import. Thanks to this approach, your custom plugins that could generate some custom data will also work correctly.
Two steps need to be taken before you can start using the feature:
- Upload your editor bundle with the editor configuration to the CKEditor Cloud Services server. Refer to the Editor bundle guide for more information.
- Set the required
bundleVersionproperty in the editor configuration. Refer to the Editor configuration section of the editor bundle documentation for more details.
It is also possible to initialize a new collaboration session with your data without uploading the editor bundle using the use_initial_data parameter. Please remember that this will only work when importing a document. The Export feature always requires an uploaded editor bundle. Refer to the REST API documentation for more details.
Here is a recommended flow to successfully initialize an editing session using content stored in your database:
- A user in your application that wants to open a document sends
channelId(a new one or an already existing one) to your server. - Your server communicates with CKEditor Collaboration Server and uses the
GET /collaborations/{document_id}/existsREST API endpoint to verify whether the session already exists. - Your server gets the document data from the database. This step should be skipped if the collaboration session already exists.
- Your server initializes the collaboration session through the
POST /collaborationsREST API endpoint. This step should be skipped if the collaboration session already exists. - Your server signals to the user that the session is ready to connect.
- The editor initializes and connects the user to the collaboration session.
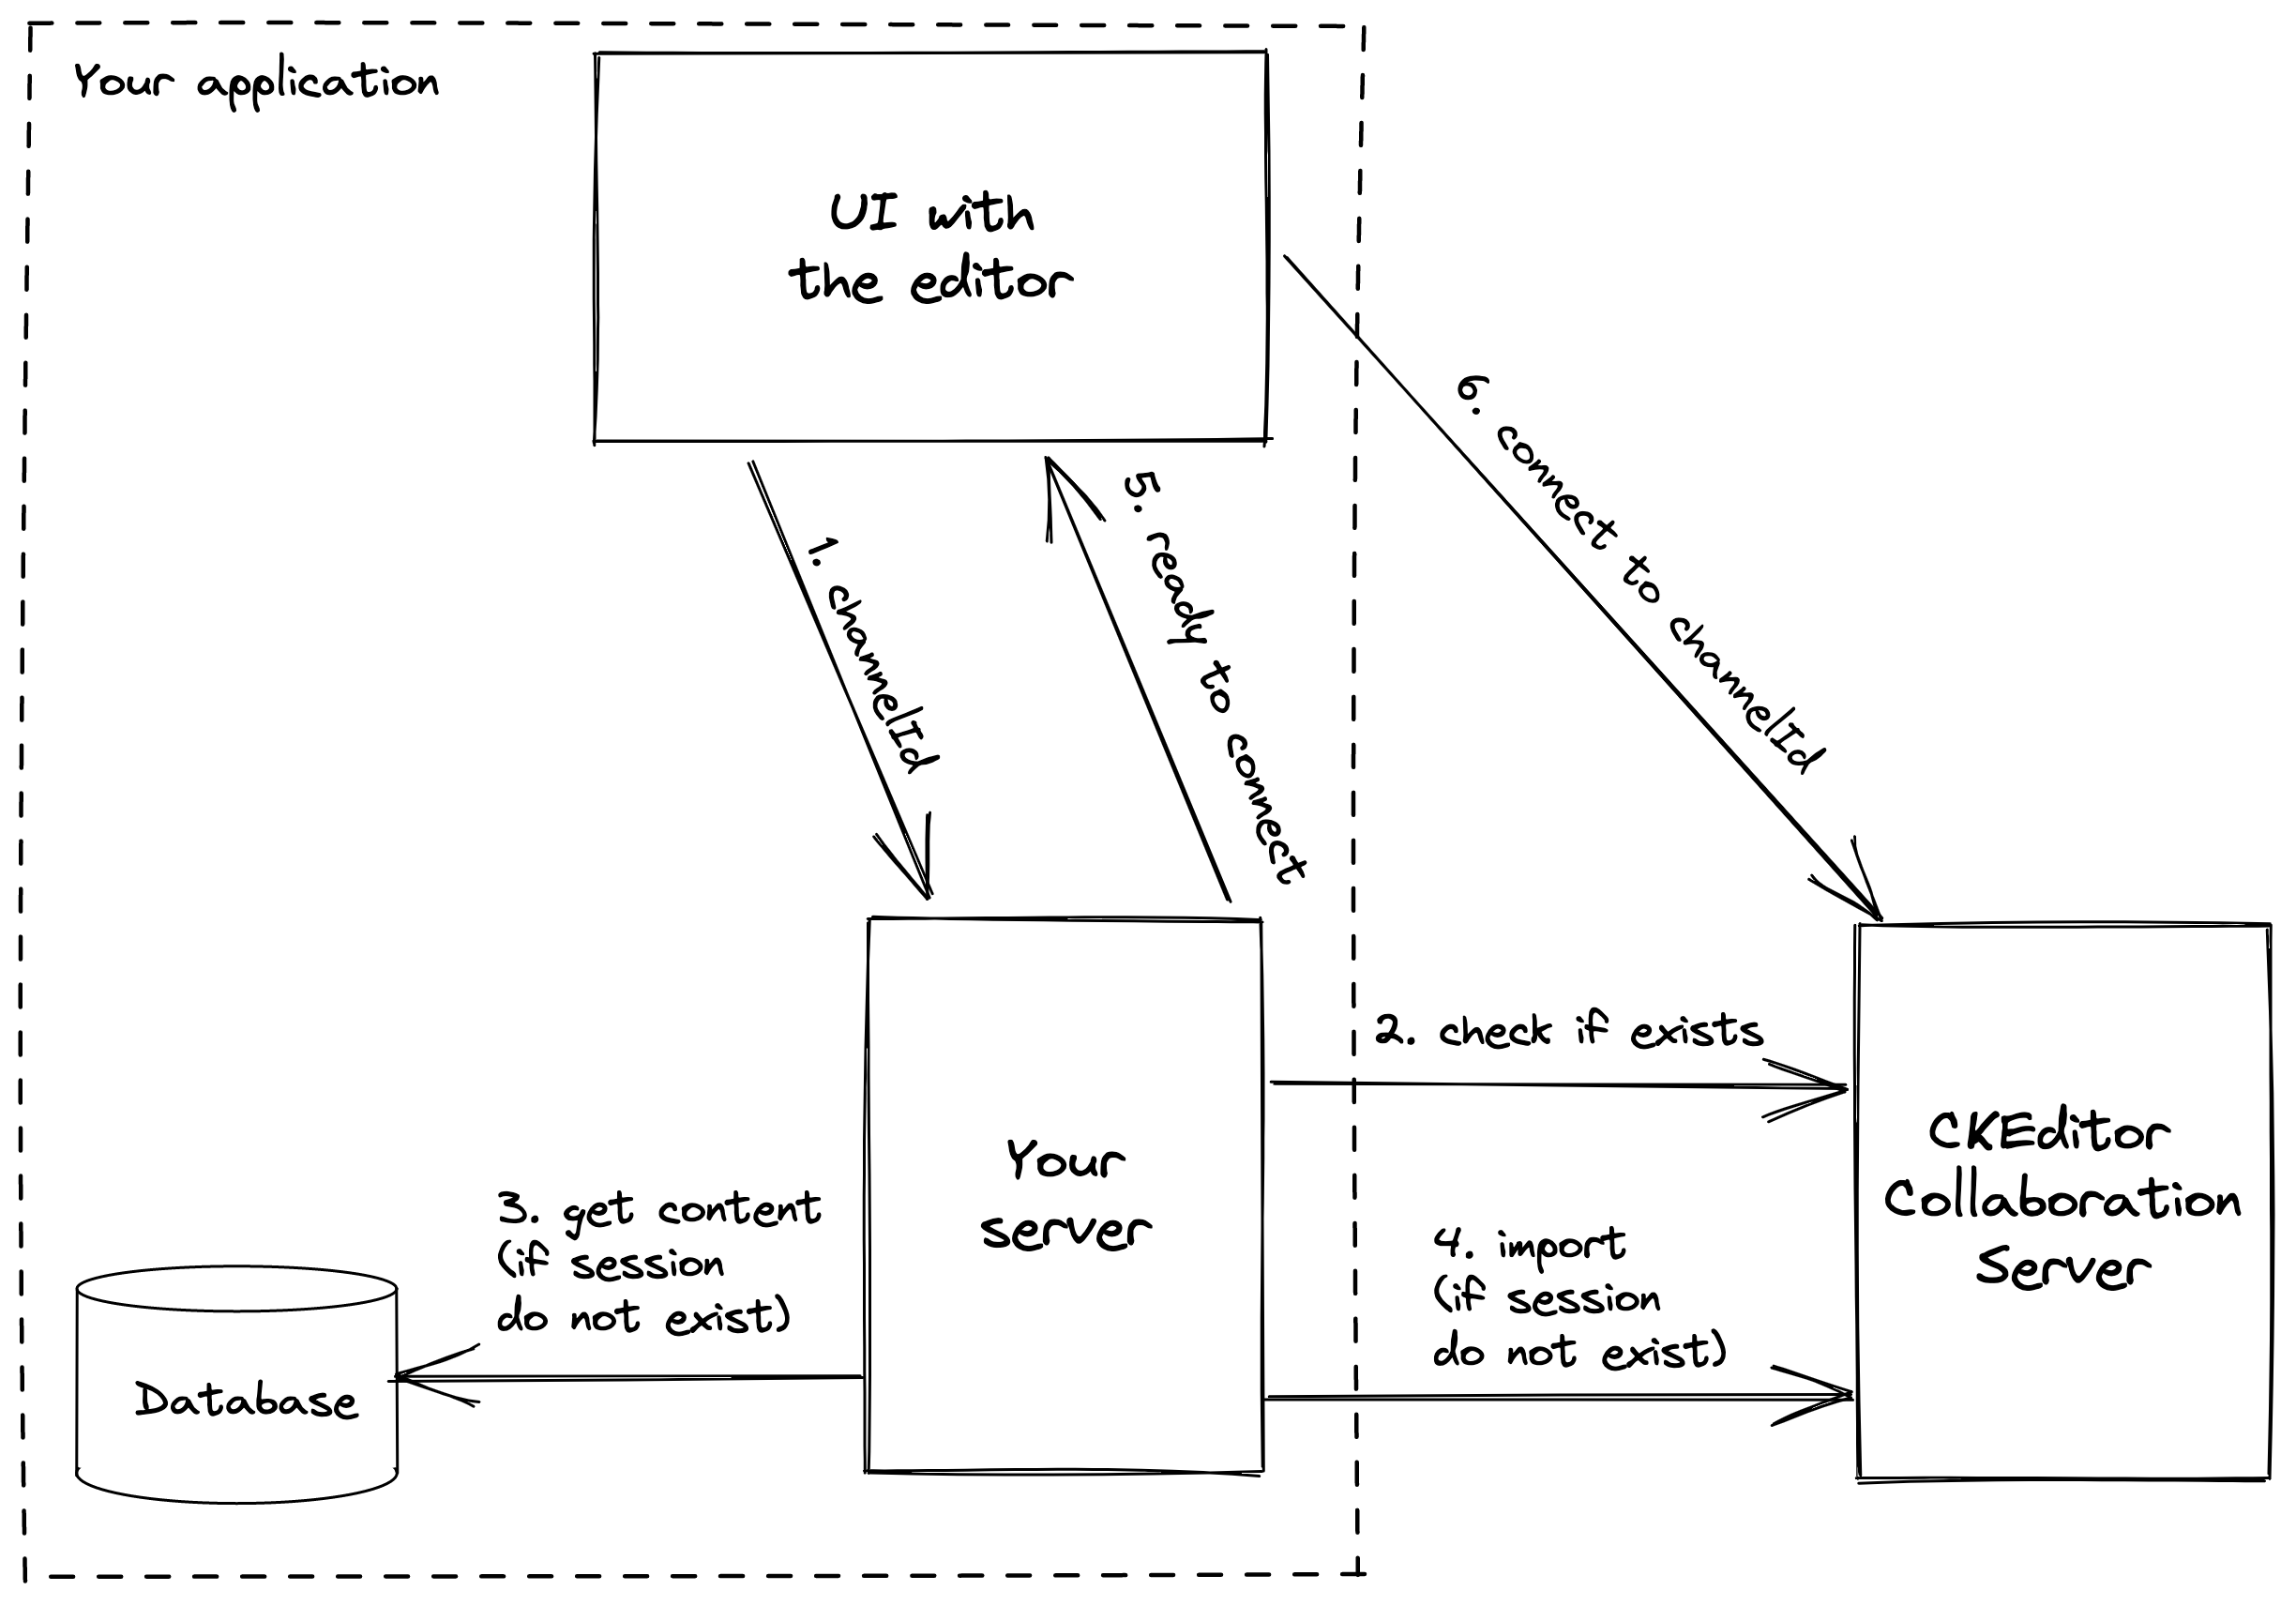
If the collaboration session does not yet exists, and you let the user connect to CKEditor Collaboration Server, the collaboration session will be initialized using initialData from the editor configuration. This can be used to initialize a new empty document or to start a new document with some predefined template.
Depending on your use case, you may choose one or more of the following solutions to save the content from a collaboration session in your own database.
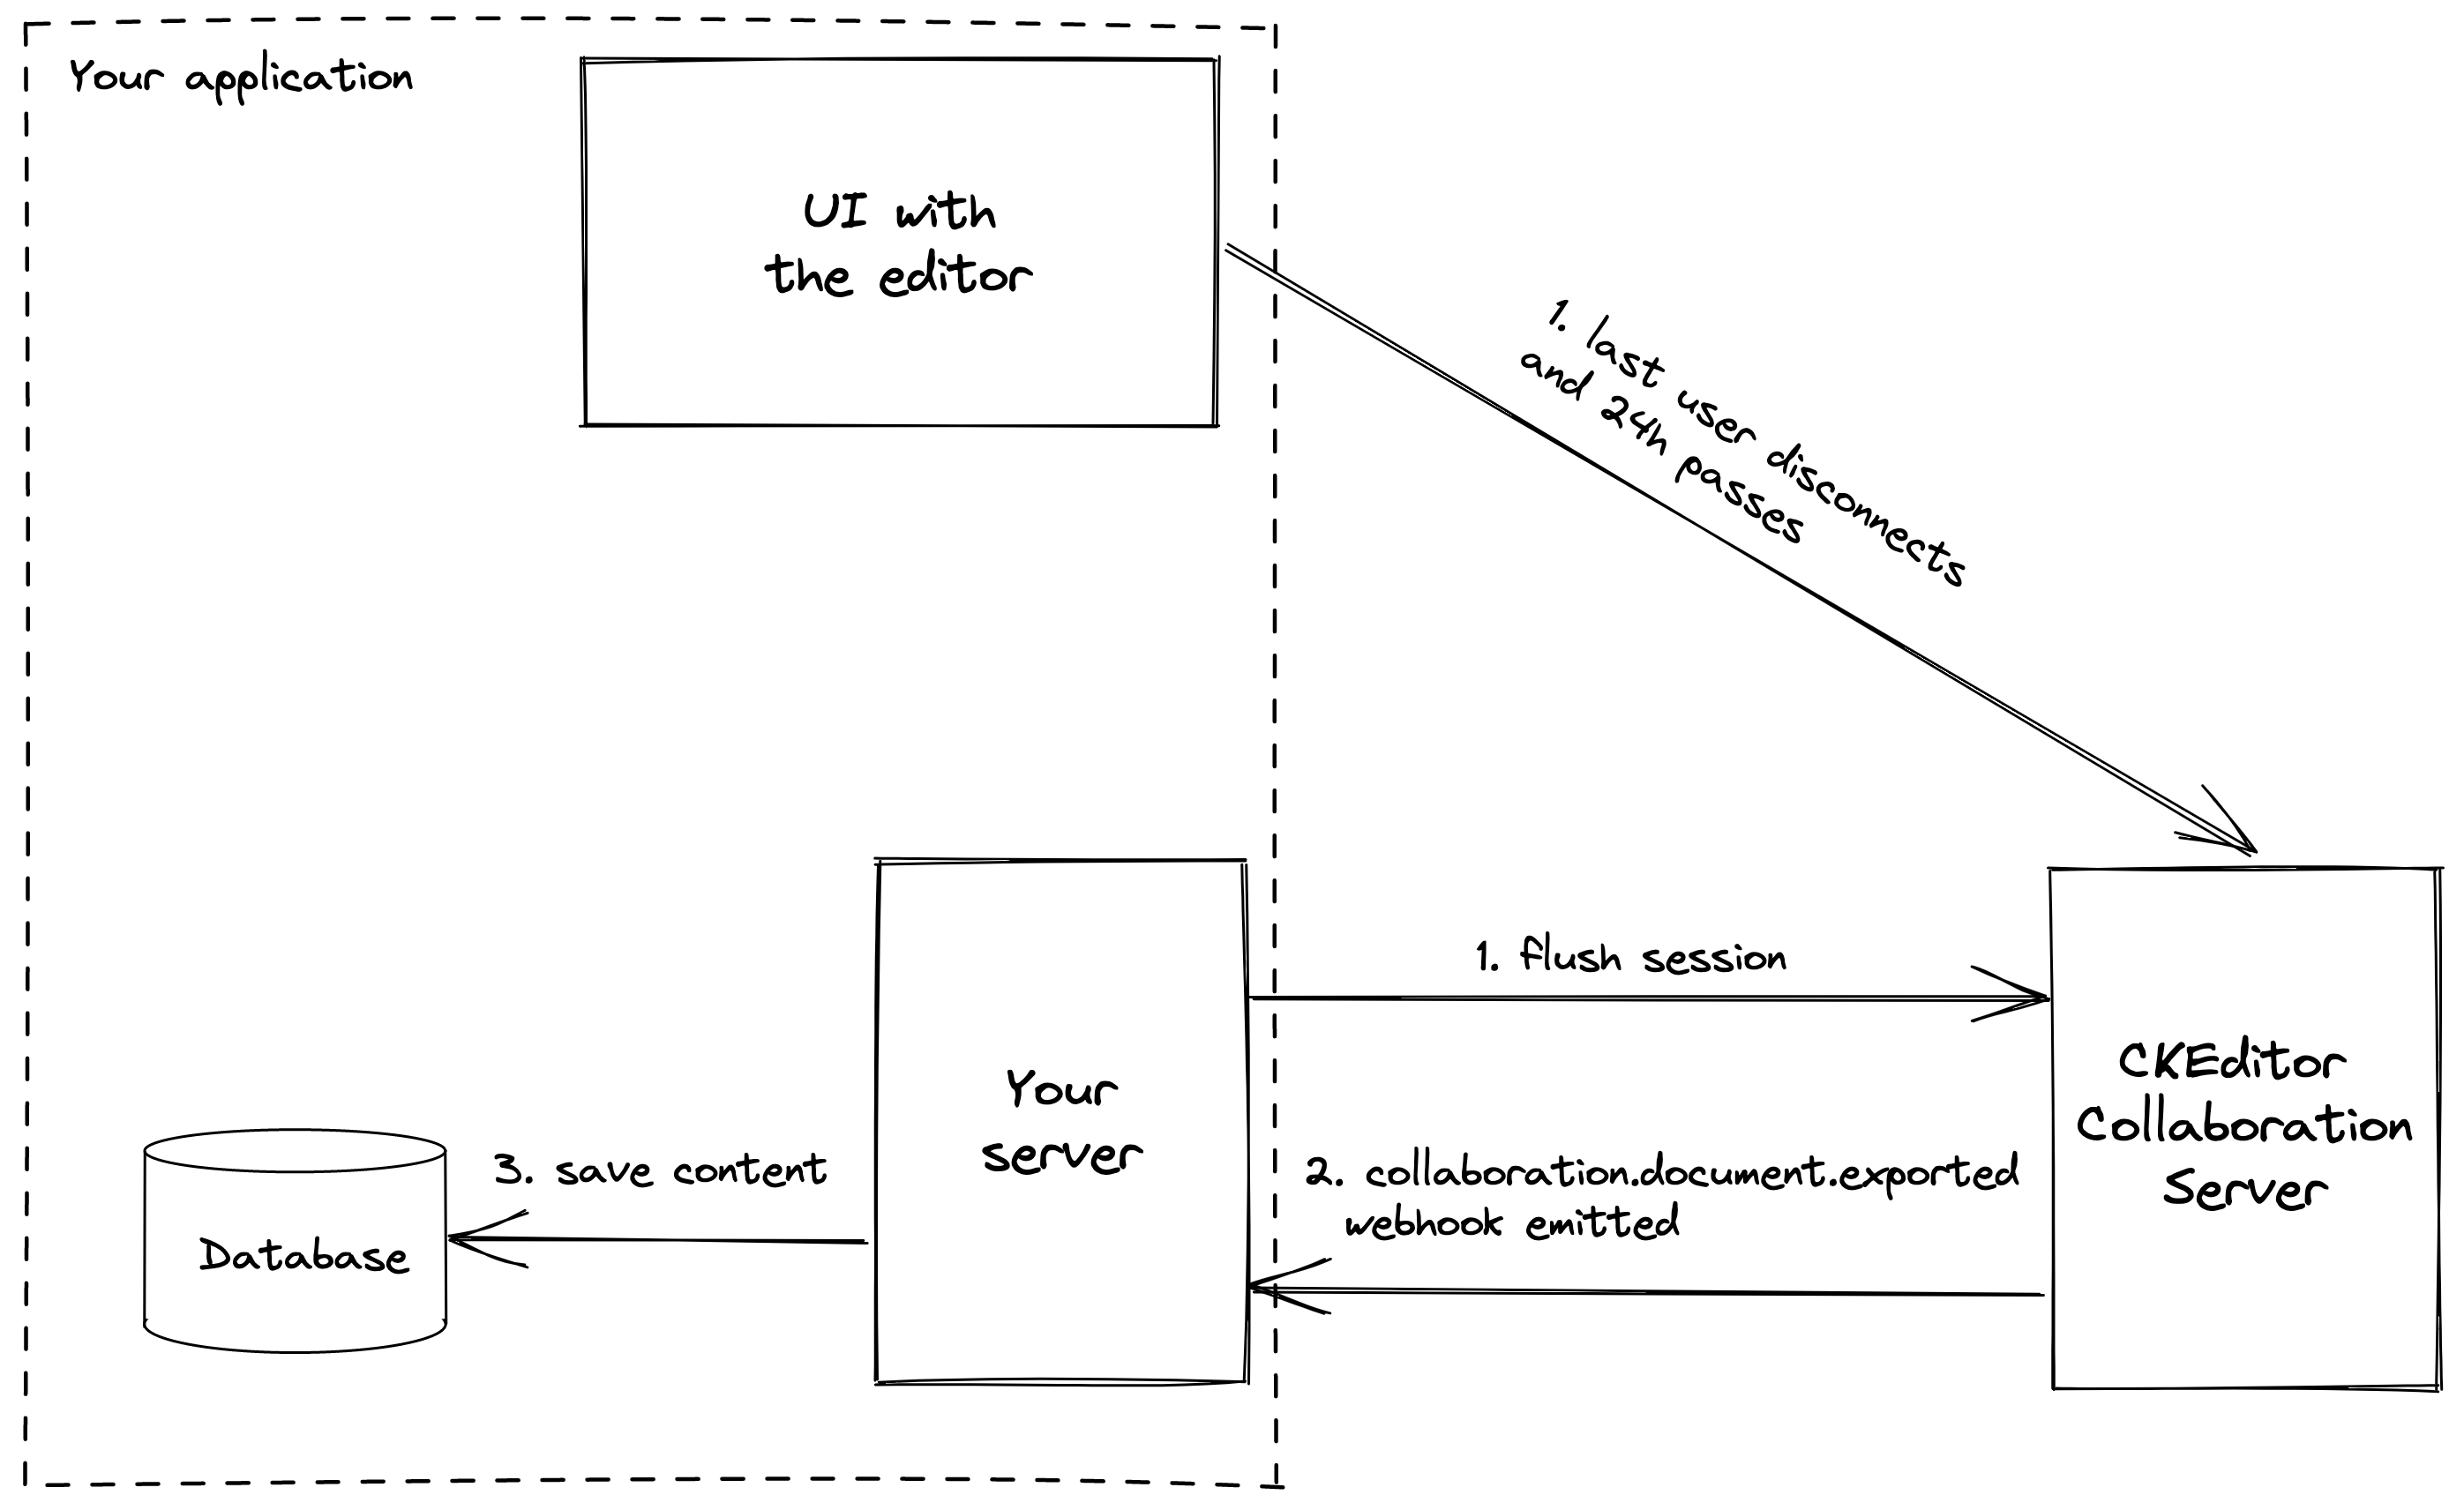
We recommend using the collaboration.document.exported webhook for saving document data. This webhook is emitted when a collaboration session is removed and already contains the content of the session. This ensures that the saved content includes all changes made by users during document editing and that you receive the latest version of the document.
The recommended flow for using this webhook is as follows:
- The collaboration session ends. You can either wait for it to end automatically 24 hours after the last user disconnects, or you can trigger it using the
DELETE /collaborations/{document_id}REST API endpoint. - CKEditor Collaboration Server emits the
collaboration.document.exportedwebhook, which contains the content of the document and thechannelIdproperty. - Once you receive the data, store it in your database.
We highly recommend using this method of saving the collaboration session content, even if you implement other solutions, to ensure consistency between edited collaboration sessions and the data stored in your database.
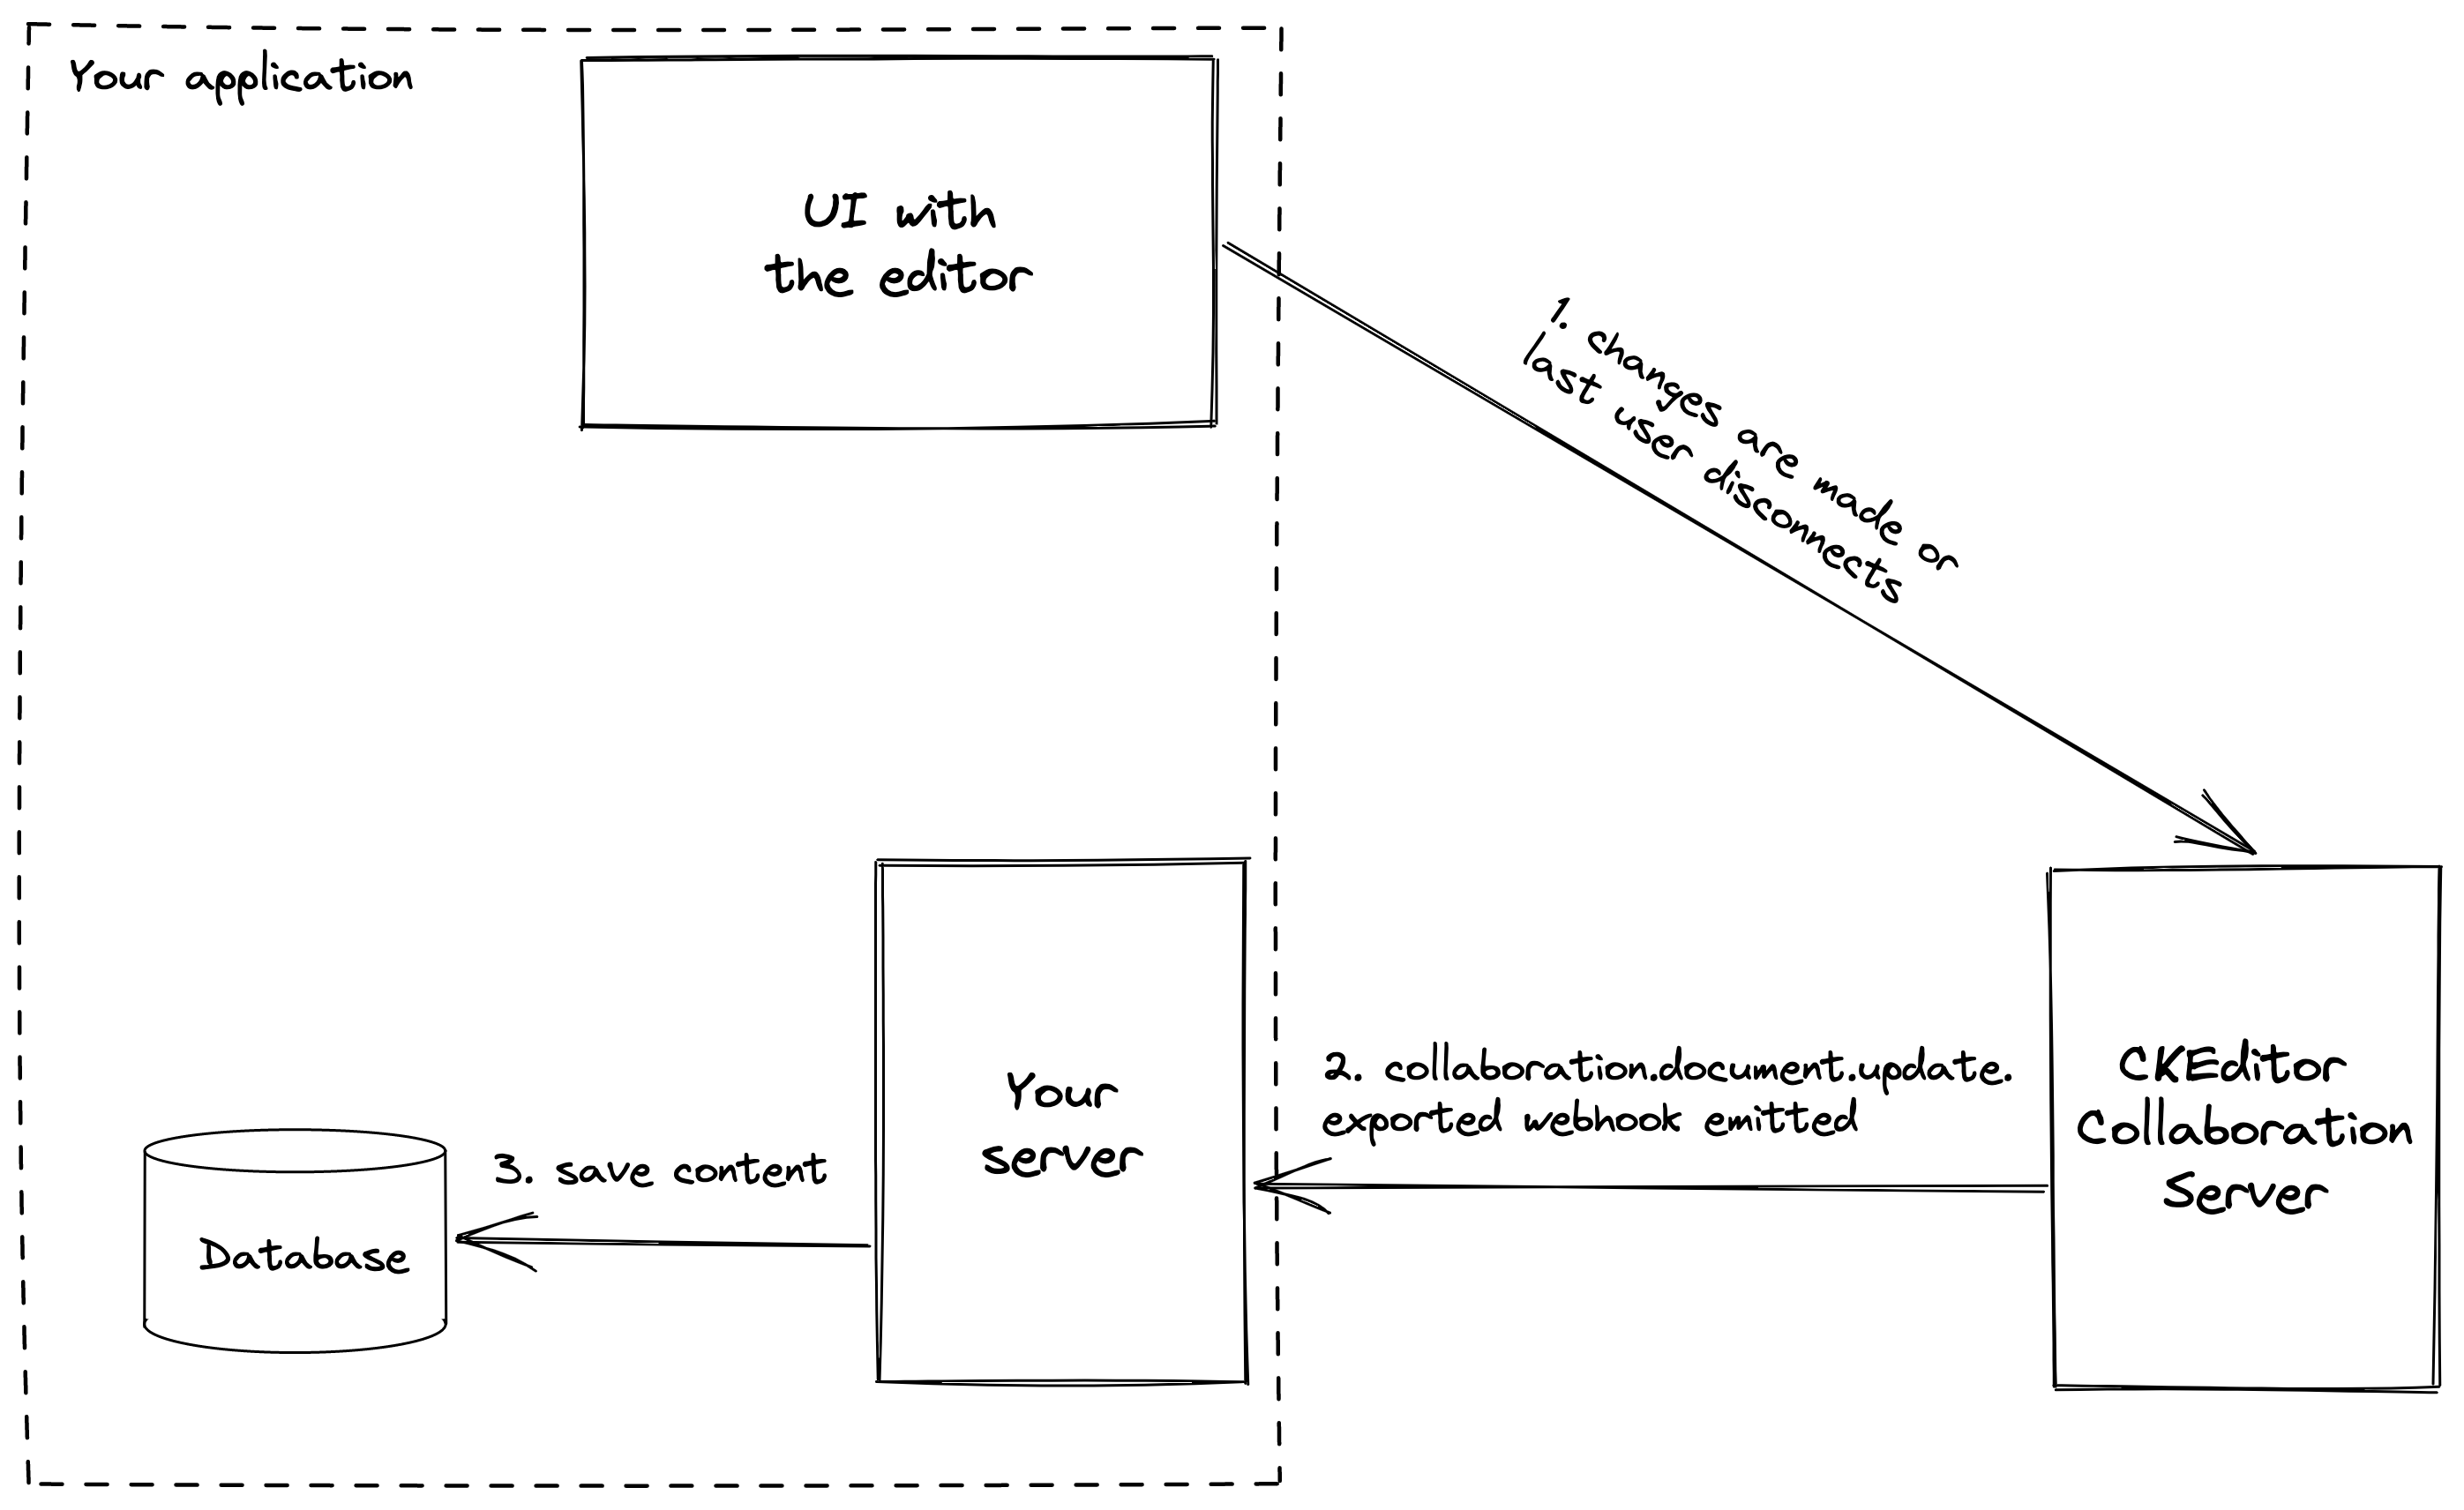
The above solution, which uses the collaboration.document.exported webhook, ensures that the latest possible version of the content is saved when the collaboration session ends. If you need frequent access to the current version of the content being edited in an active collaboration session, you can also use the collaboration.document.update.exported webhook. This webhook is periodically emitted during active editing sessions and after the last user disconnects from the collaboration session.
Here is the recommended flow for using this webhook:
- The webhook is triggered by:
- adding an operation (once every 10 minutes) by the users,
- adding 5000 operations by the users, or
- the last user disconnecting from the collaboration session.
- The
collaboration.document.update.exportedwebhook, which contains the content of the document and thechannelIdproperty, is emitted from the CKEditor Collaboration Server. - After receiving the data, your server stores it in your database.
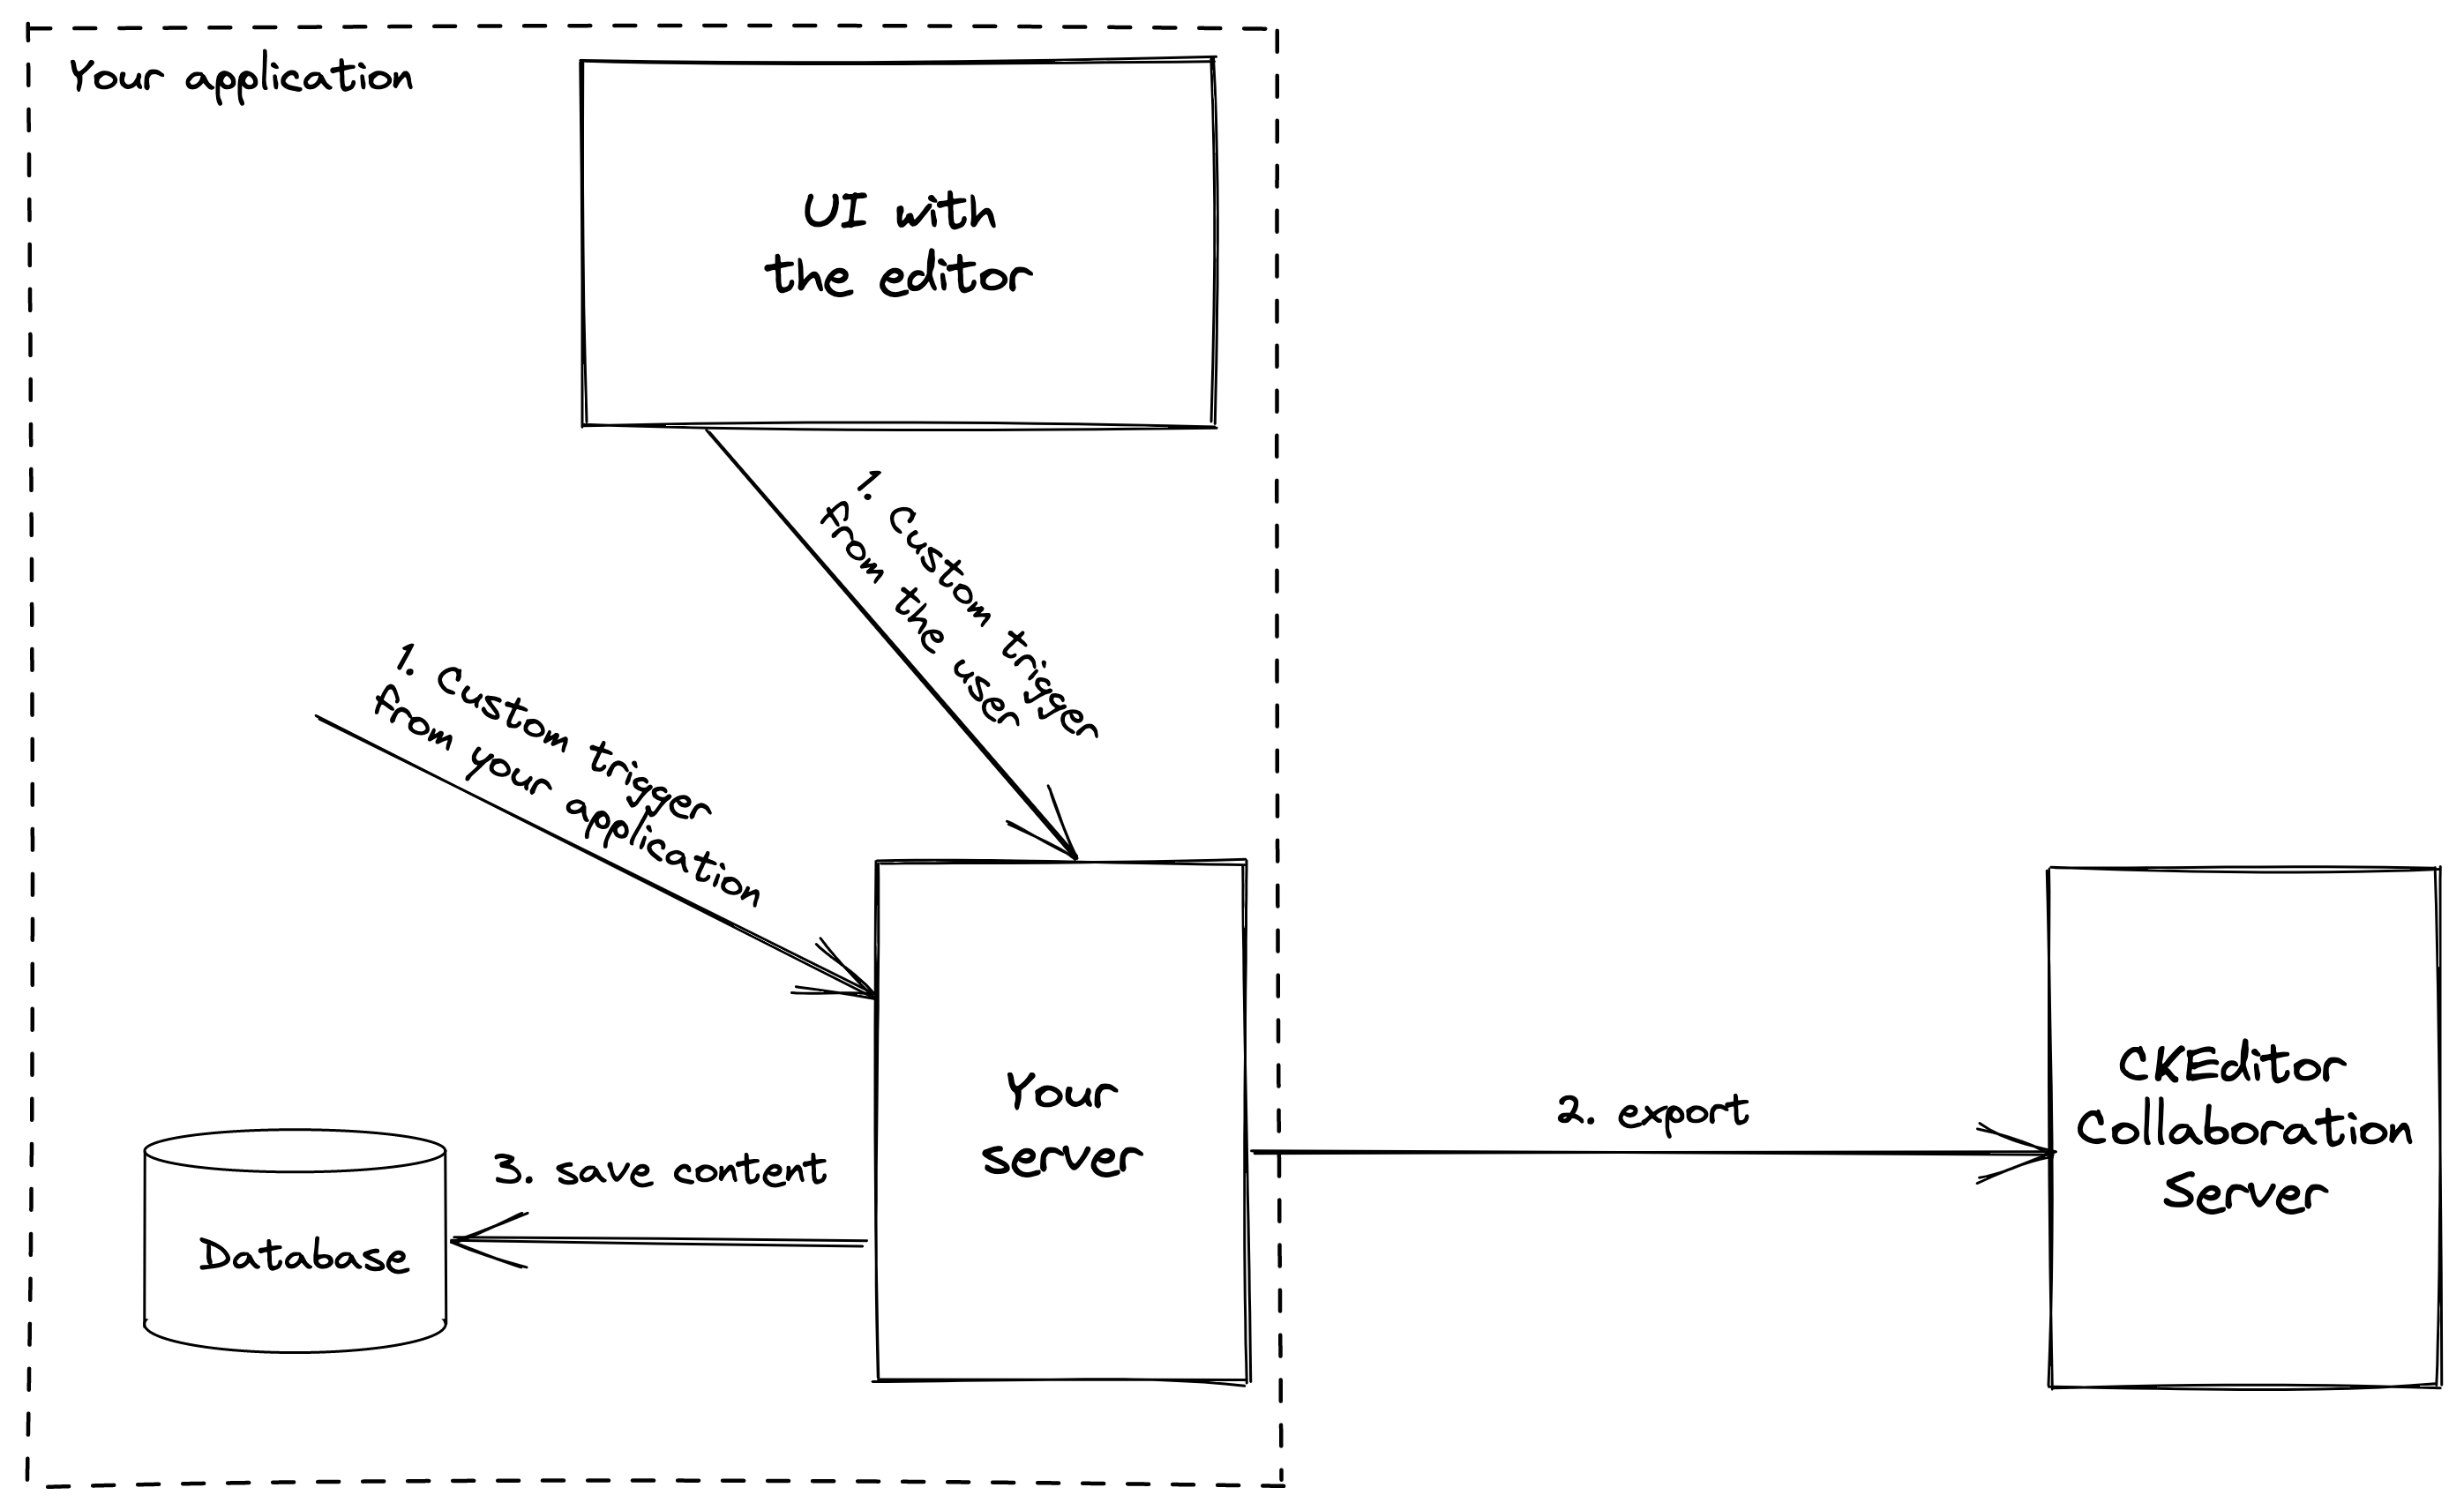
If the triggers defined for the collaboration.document.exported and collaboration.document.update.exported webhooks do not match your use case, and you want to create custom triggers to obtain collaboration data, you could send a GET /collaborations/{document_id} request to CKEditor Collaboration Server to receive the content of the active collaboration session.
The recommended flow for using export on demand looks as follows:
- Some part of your application or a user action sends a request to your server with the
channelIdproperty. - Your server sends a
GET /collaborations/{document_id}request to CKEditor Collaboration Server to get the content of the collaboration session. - After receiving the data, your server stores it in your database.
After successfully uploading your editor bundle to CKEditor Cloud Services you can start using the import and export feature. Every request made to Cloud Services REST API needs to have the following headers:
X-CS-Timestamp– the value of this header will be used for the signature generation and validation and it is very important to use a unique value for every request to make sure that the generated signatures will be unique as well. This value needs to be a number. Good example of a timestamp is the current Unix time.X-CS-Signature– the value of this header is generated using a SHA-256 algorithm and is signed with the API Secret. CKEditor Cloud Services are also generating signatures for every request and only accept the ones with a correct signature. Refer to the Request signature guide for more information.
Check an example of an application that uses this mechanism in Node.js and Express.js or follow this guide for more details on the feature’s usage.
Also, you can check the CKEditor Cloud Services samples repository, where you can find more examples.
Importing a document means creating a new collaboration session using the previously saved document data. It is based on sending a request from your server to CKEditor Cloud Services using the POST /collaborations REST API method with the required data in the body:
{
  "document_id": "your_document_id",
  "bundle_version": "your_editor_id",
  "data": "<p>document_content</p>"
}
At this point, CKEditor Cloud Services converts the document data sent in the request using the previously uploaded editor bundle with a set bundle_version and creates an active collaborative session for the document_id.
After this operation, users can connect to the newly created collaboration session and continue working on the loaded document.
There are more Cloud Services REST API methods that you will find useful when working with collaboration data:
- The document exists – use this API endpoint to check if an active collaboration session with a given
documentIdalready exists. Remember that import will only succeed, when there is no active collaboration session, and you can use this method to check it before importing the data. - Flush a document – use this API endpoint to remove an active collaboration session. Collaboration sessions without connected users will be removed after 24 hours, but in case when the removal should be immediate, this API method can be used to remove it manually.
When importing a document with a multi-root editor build, the data field should contain a stringified JSON structure where the keys are the root names and the values are the HTML content for a particular root.
This example is using node.js and npm. Make sure that you have these tools installed before you follow the next steps. This snippet assumes that you have already followed the steps from Prerequisites section.
- Run the following commands:
mkdir cs-import-example && cd cs-import-example
npm init -y && npm i axios
- Create a new file named
import.jsin thecs-import-examplefolder with the following content:
const crypto = require( 'crypto' );
const axios = require( 'axios' );

// Update with your credentials and application endpoint
const environmentId = 'txQ9sTfqmXUyWU5LmDbr';
const apiSecret = '4zZBCQoPfRZ7Rr7TEnGAuRsGgbfF58Eg0PA8xcLD2kvPhjGjy4VGgB8k0hXn';
const applicationEndpoint = 'https://33333.cke-cs.com';
const apiEndpoint = `${ applicationEndpoint }/api/v5/${ environmentId }/collaborations/`;

const body = {
    document_id: "document-1", // Set document_id of created collaboration session
    bundle_version: "bundleversion-1", // Use bundle_version from uploaded editor bundle
    data: "<p>Lorem Ipsum is <b>simply dummy</b> text of the printing and typesetting industry.</p>"
};

const CSTimestamp = Date.now();
const config = {
    headers: {
        'X-CS-Timestamp': CSTimestamp,
        'X-CS-Signature': generateSignature( apiSecret, 'POST', apiEndpoint, CSTimestamp, body )
    },
};

axios.post( apiEndpoint, body, config )
    .then( response => {
        console.log ( response.status );
    } ).catch( error => {
        console.log( error.message );
        console.log( error.response.data );
    } );

function generateSignature( apiSecret, method, uri, timestamp, body ) {
    const url = new URL( uri );
    const path = url.pathname + url.search;
    const hmac = crypto.createHmac( 'SHA256', apiSecret );

    hmac.update( `${ method.toUpperCase() }${ path }${ timestamp }` );

    if ( body ) {
        hmac.update( Buffer.from( JSON.stringify( body ) ) );
    };

    return hmac.digest( 'hex' );
}
-
Update your credentials, the
document_idandbundle_versionvalues in the code snippet. -
Run the import with the
node import.jscommand.
After a successful response with a status code 204 you can open the editor with the same document_id as set in the snippet to see your imported content. You can also check the content using the export method.
Exporting a document means getting the current data of the document from an active collaboration session. It is based on sending a request from your server to CKEditor Cloud Services using the GET /collaborations/{document_id} REST API method.
At this point, using the previously loaded editor bundle, CKEditor Cloud Services converts an active collaboration session to the configured output form (HTML, Markdown, text etc.) which your server will receive in response to the request. Your server should save the received document data in the database.
It is recommended to perform this operation at least once after all users disconnect from the document.
You can achieve this with the GET /collaborations/{document_id}/users REST API method to fetch information about users connected to the collaboration session. Alternatively, you can use the User disconnected webhook event.
For multi-root editor builds, an exported document’s data is a stringified JSON structure where the keys are the root names and the values are the HTML content for a particular root.
This example is using node.js and npm. Make sure that you have these tools installed before you follow the next steps. This snippet assumes that you have already followed the steps from the Prerequisites section.
- Run the following commands:
mkdir cs-export-example && cd cs-export-example
npm init -y && npm i axios
- Create a new file named
export.jsin thecs-export-examplefolder with the following content:
const crypto = require( 'crypto' );
const axios = require( 'axios' );

// Update with your credentials and application endpoint
const environmentId = 'txQ9sTfqmXUyWU5LmDbr';
const apiSecret = '4zZBCQoPfRZ7Rr7TEnGAuRsGgbfF58Eg0PA8xcLD2kvPhjGjy4VGgB8k0hXn';
const applicationEndpoint = 'https://33333.cke-cs.com';

const documentId = 'document-1'; // Set document_id of an active collaboration session
const apiEndpoint = `${ applicationEndpoint }/api/v5/${ environmentId }/collaborations/${ documentId }`;

const CSTimestamp = Date.now();
const config = {
    headers: {
        'X-CS-Timestamp': CSTimestamp,
        'X-CS-Signature': generateSignature( apiSecret, 'GET', apiEndpoint, CSTimestamp )
    },
};

axios.get( apiEndpoint, config )
    .then( response => {
        console.log ( response.data );
    } ).catch( error => {
        console.log( error.message );
        console.log( error.response.data );
    } );

function generateSignature( apiSecret, method, uri, timestamp, body ) {
    const url = new URL( uri );
    const path = url.pathname + url.search;
    const hmac = crypto.createHmac( 'SHA256', apiSecret );

    hmac.update( `${ method.toUpperCase() }${ path }${ timestamp }` );

    if ( body ) {
        hmac.update( Buffer.from( JSON.stringify( body ) ) );
    };

    return hmac.digest( 'hex' );
}
-
Update your credentials and the
documentIdvalue in the code snippet. -
Run the export with the
node export.jscommand.
You should see the content of an active collaboration session in your console.