


Creating a Simple CKEditor 4 Plugin (Part 2)
The aim of this tutorial is to demonstrate how to extend an existing CKEditor 4 plugin with context menu support as well as the possibility to edit a previously inserted element.
Instead of creating a new plugin, this time we are going to expand on the functionality of the Abbreviation plugin created in the previous installment of the tutorial series.
We need to start where we previously left off. You can download the entire plugin folder including the icon and the fully commented source code.
If you have any doubts about the content of the plugin and its configuration, refer to the Creating a Simple CKEditor 4 Plugin (Part 1) tutorial.
Please note that since CKEditor 4.1 all editor plugins that create content should be integrated with Advanced Content Filter (ACF).
To follow this guide and at the same time comply with the new CKEditor 4.1 requirements you need to either set config.allowedContent = true; in order to disable content filtering or integrate your plugin with ACF. For more information, please refer to the official Advanced Content Filter integration guide.
#Context Menu Support
Context menu support in CKEditor 4 is implemented by the Context Menu plugin.
The context menu implementation should be placed inside the init function in the plugin file, following the command and button definitions:
if ( editor.contextMenu ) {
    editor.addMenuGroup( 'abbrGroup' );
    editor.addMenuItem( 'abbrItem', {
        label: 'Edit Abbreviation',
        icon: this.path + 'icons/abbr.png',
        command: 'abbr',
        group: 'abbrGroup'
    });
}
The if check here is a “best practice”. If for some reason the Context Menu plugin will be removed or not available, the menu registration should not take place (otherwise an exception is thrown).
Then, considering that we want the context menu option for the Abbreviation plugin to be separated from standard context menu items, we used the editor.addMenuGroup function to register a new menu group called abbrGroup.
Using the editor.addMenuItem function we can now register a new menu item that will belong to the newly created group. The label and icon properties let us set the context menu item name and its icon, respectively. To make the context menu item open the Abbreviation Properties dialog window, we need to set the command property to use the abbr command.
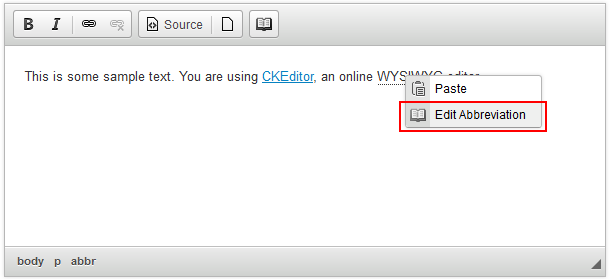
#Showing the Menu Option “In Context”
However, when we reload the CKEditor 4 instance and add an abbreviation, the context menu does not contain the newly created Edit Abbreviation item. We now need to enable the Abbreviation context menu for each selected <abbr> element:
if ( editor.contextMenu ) {
    ... the previous context menu creation code ...

    editor.contextMenu.addListener( function( element ) {
        if ( element.getAscendant( 'abbr', true ) ) {
             return { abbrItem: CKEDITOR.TRISTATE_OFF };
         }
    });
}
By using the addListener method we will add an event listener function that will be called whenever the context menu is fired.
At this point we just check if the current element, or any of its parents, is an <abbr>. If this is true, we simply return the menu item to activate (abbrItem) saying that it is enabled but not in the “selected state” (CKEDITOR.TRISTATE_OFF).
The Edit Abbreviation item is now visible in the context menu of an <abbr> element. Once selected, it opens the Abbreviation Properties dialog window due to the use of the abbr command.
The context menu works — but only partially. It opens the Abbreviation Properties dialog window for the abbreviation, but the editing feature does not really work. The Abbreviation and Explanation fields are empty:
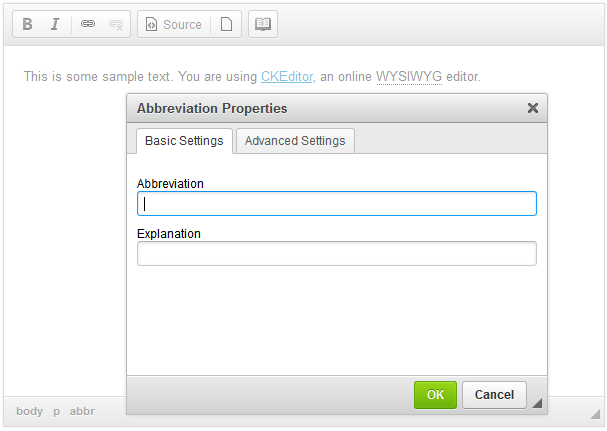
If you try to enter some values into these fields and accept the changes, a new <abbr> element will be added at the position of the cursor in the document.
It is time to work on the selection logic so that editing an inserted element would not create a new one, but use the previously entered values.
#Dialog Window Logic
The editing behavior for a previously inserted element will use the onShow function that is defined for the plugin dialog window and is executed when the dialog window is opened. This function will be defined above the onOk function that we will also need to refactor later.
onShow: function() {
    // The code that will be executed when a dialog window is loaded.
},
#Getting the Selected Element
We will need to start with the selection logic.
To get to the element that is selected by the user (either highlighted or just having the caret inside), we need to use the editor.getSelection method:
var selection = editor.getSelection();
We will also use the selection.getStartElement method to get the element in which the selection starts, and assign it to the element variable:
var element = selection.getStartElement();
#Insert and Edit Modes
Still our dialog window must work both to add and to edit <abbr> elements. Because of this, we introduce some startup logic that identifies the proper case:
if ( element )
    element = element.getAscendant( 'abbr', true );

if ( !element || element.getName() != 'abbr' ) {
    element = editor.document.createElement( 'abbr' );
    this.insertMode = true;
}
else
    this.insertMode = false;
We just used similar if code that we used in the context menu checks to figure out whether the selected element, or any of its ancestors, is an <abbr>.
To differentiate between adding a new element and editing an existing one, we will create a new insertMode flag. It will be set to true in the “add new element” scenario. If an <abbr> element already exists, the insertMode flag will be set to false.
We will now store a reference to the <abbr> element in the element variable since we will need to access it in the new version of the onOK function later.
this.element = element;
#Setup Functions
The onShow function will finish with a call to the setupContent method that will invoke the setup functions for the element. Each parameter that will be passed on to the setupContent function will also be passed on to the setup functions.
if ( !this.insertMode )
    this.setupContent( element );
For the above code to work we will however first need to define the setup functions themselves. In order to do that, we will revisit the code of the dialog window UI elements.
The setup function for the Abbreviation text field needs to get the content of the <abbr> element by using the getText method in order to populate the field with its value by using the setValue method.
A similar approach can be used for the Explanation field, although in this case we will need to get the content of the title attribute of the <abbr> element by using the getAttribute method in order to populate the field with its value by using the setValue method again.
elements: [
    {
        type: 'text',
        id: 'abbr',
        label: 'Abbreviation',
        validate: CKEDITOR.dialog.validate.notEmpty( "Abbreviation cannot be empty." ),
        setup: function( element ) {
            this.setValue( element.getText() );
        }
    },
    {
        type: 'text',
        id: 'title',
        label: 'Explanation',
        validate: CKEDITOR.dialog.validate.notEmpty( "Title cannot be empty." ),
        setup: function( element ) {
            this.setValue( element.getAttribute( "title" ) );
        }
    }
]
Since the Advanced Settings tab contains a single Id text field that reflects the content of the id attribute, we will use the same combination of the getAttribute and setValue methods as in case of the Explanation text field.
elements: [
    {
        type: 'text',
        id: 'id',
        label: 'Id',
        setup: function( element ) {
            this.setValue( element.getAttribute( "id" ) );
        }
    }
]
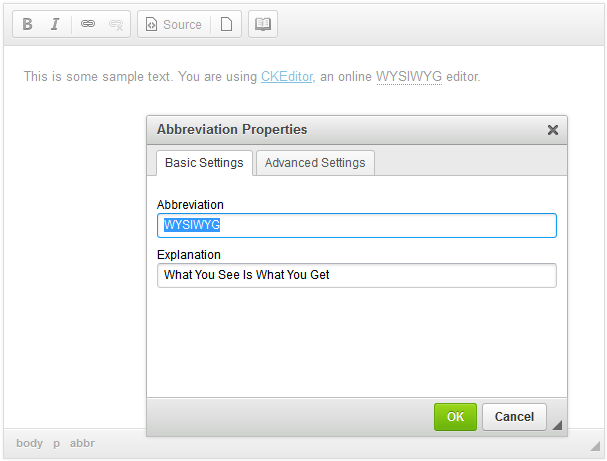
When you reload the page, add an abbreviation, and then attempt to modify it by opening the context menu and selecting Edit Abbreviation, the Abbreviation Properties dialog window will now re-open with the Abbreviation and Explanation fields already filled in with the content of the edited element.
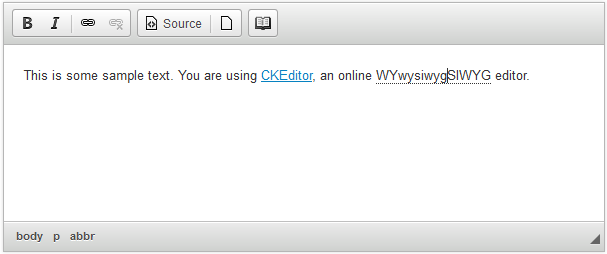
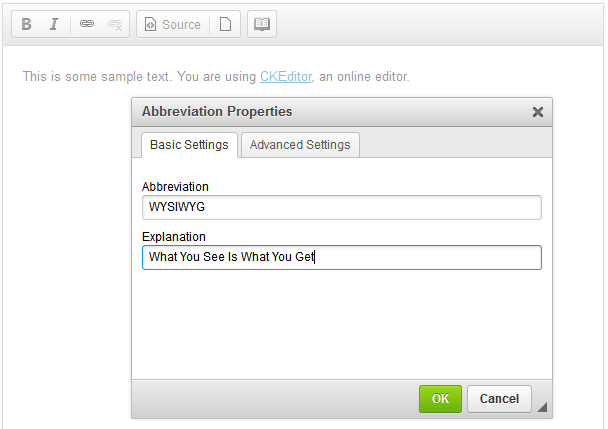
Suppose you were to change the abbreviation spelling into lower case. Replace the content of the text fields as follows and click the OK button.
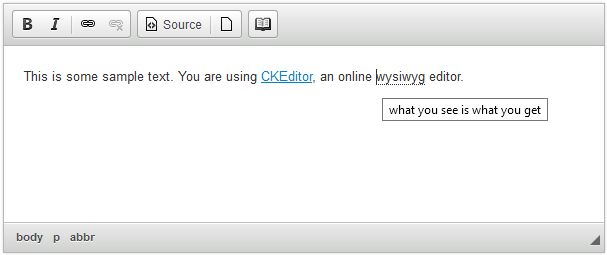
However, this operation fails. The modified values do not replace the content of the first abbreviation, but are used to create a new abbreviation element inserted inside the first one, at the position of the cursor.
Why is that so? It is because the current edition of the onOk function does not differentiate between adding an element and modifying it, so it simply inserts the values supplied in the dialog window fields into the <abbr> that it creates and adds this element to the document.
#Commit Functions
To correct this error, we will need to re-write the code of the onOk function to account for both scenarios. The function can now, in fact, be stripped to the minimum.
Firstly, we will define the variables for the dialog window (dialog) and the <abbr> element (abbr).
The insertMode flag created in the onShow function can then be used to switch between the creation of a new element and modification of the existing one. If we are in the insert mode, we add a new <abbr> element to the document. We then use the commitContent method to populate the element with values entered by the user. Every parameter that is passed to the commitContent method will also be passed on to the commit functions.
onOk: function() {
    var dialog = this,
        abbr = dialog.element;

    dialog.commitContent( abbr );

    if ( dialog.insertMode )
        editor.insertElement( abbr );
}
To make the commitContent method work we will however first need to define the commit functions themselves. In order to do that, we will have to revise the code of the dialog window UI elements again.
The commit function for the Abbreviation text field needs to get the value entered by the user by using the getValue method to set the content of the <abbr> element by using the setText method.
A similar approach can be used for the retrieval of the Explanation field content, although in this case we will need to set the content of the title attribute of the <abbr> element by using the setAttribute method.
elements: [
    {
        type: 'text',
        id: 'abbr',
        label: 'Abbreviation',
        validate: CKEDITOR.dialog.validate.notEmpty( "Abbreviation cannot be empty." ),
        setup: function( element ) {
            this.setValue( element.getText() );
        },
        commit: function( element ) {
            element.setText( this.getValue() );
        }
    },
    {
        type: 'text',
        id: 'title',
        label: 'Explanation',
        validate: CKEDITOR.dialog.validate.notEmpty( "Title cannot be empty." ),
        setup: function( element ) {
            this.setValue( element.getAttribute( "title" ) );
        },
        commit: function( element ) {
            element.setAttribute( "title", this.getValue() );
        }
    }
]
Similarly, since the Advanced Settings tab contains an Id text field that reflects the content of the id attribute, we will use the same combination of the getValue and setAttribute methods as in case of the Explanation text field. This time, however, we will also need to account for the possibility of removing the attribute value by the user during the modification of the element. If we are not in the insert mode (which means we are editing an existing element) and the Id field is empty, we will use the removeAttribute method to delete the id element of an existing abbreviation.
elements: [
    {
        type: 'text',
        id: 'id',
        label: 'Id',
        setup: function( element ) {
            this.setValue( element.getAttribute( "id" ) );
        },
        commit: function ( element ) {
            var id = this.getValue();
            if ( id )
                element.setAttribute( 'id', id );
            else if ( !this.insertMode )
                element.removeAttribute( 'id' );
        }
    }
]
#Full Source Code
The complete content of the plugin.js file is as follows:
CKEDITOR.plugins.add( 'abbr', {
    icons: 'abbr',
    init: function( editor ) {

        editor.addCommand( 'abbr', new CKEDITOR.dialogCommand( 'abbrDialog' ) );

        editor.ui.addButton( 'Abbr', {
            label: 'Insert Abbreviation',
            command: 'abbr',
            toolbar: 'insert'
        });

        if ( editor.contextMenu ) {
            editor.addMenuGroup( 'abbrGroup' );
            editor.addMenuItem( 'abbrItem', {
                label: 'Edit Abbreviation',
                icon: this.path + 'icons/abbr.png',
                command: 'abbr',
                group: 'abbrGroup'
            });

            editor.contextMenu.addListener( function( element ) {
                if ( element.getAscendant( 'abbr', true ) ) {
                    return { abbrItem: CKEDITOR.TRISTATE_OFF };
                }
            });
        }

        CKEDITOR.dialog.add( 'abbrDialog', this.path + 'dialogs/abbr.js' );
    }
});
This is what we have in the dialogs/abbr.js file:
CKEDITOR.dialog.add( 'abbrDialog', function( editor ) {
    return {
        title: 'Abbreviation Properties',
        minWidth: 400,
        minHeight: 200,

        contents: [
            {
                id: 'tab-basic',
                label: 'Basic Settings',
                elements: [
                    {
                        type: 'text',
                        id: 'abbr',
                        label: 'Abbreviation',
                        validate: CKEDITOR.dialog.validate.notEmpty( "Abbreviation field cannot be empty." ),

                        setup: function( element ) {
                            this.setValue( element.getText() );
                        },

                        commit: function( element ) {
                            element.setText( this.getValue() );
                        }
                    },
                    {
                        type: 'text',
                        id: 'title',
                        label: 'Explanation',
                        validate: CKEDITOR.dialog.validate.notEmpty( "Explanation field cannot be empty." ),

                        setup: function( element ) {
                            this.setValue( element.getAttribute( "title" ) );
                        },

                        commit: function( element ) {
                            element.setAttribute( "title", this.getValue() );
                        }
                    }
                ]
            },

            {
                id: 'tab-adv',
                label: 'Advanced Settings',
                elements: [
                    {
                        type: 'text',
                        id: 'id',
                        label: 'Id',

                        setup: function( element ) {
                            this.setValue( element.getAttribute( "id" ) );
                        },

                        commit: function ( element ) {
                            var id = this.getValue();
                            if ( id )
                                element.setAttribute( 'id', id );
                            else if ( !this.insertMode )
                                element.removeAttribute( 'id' );
                        }
                    }
                ]
            }
        ],

        onShow: function() {
            var selection = editor.getSelection();
            var element = selection.getStartElement();

            if ( element )
                element = element.getAscendant( 'abbr', true );

            if ( !element || element.getName() != 'abbr' ) {
                element = editor.document.createElement( 'abbr' );
                this.insertMode = true;
            }
            else
                this.insertMode = false;

            this.element = element;
            if ( !this.insertMode )
                this.setupContent( this.element );
        },

        onOk: function() {
            var dialog = this;
            var abbr = this.element;
            this.commitContent( abbr );

            if ( this.insertMode )
                editor.insertElement( abbr );
        }
    };
});
You can also download the entire plugin folder inluding the icon and the fully commented source code.
#Working Example
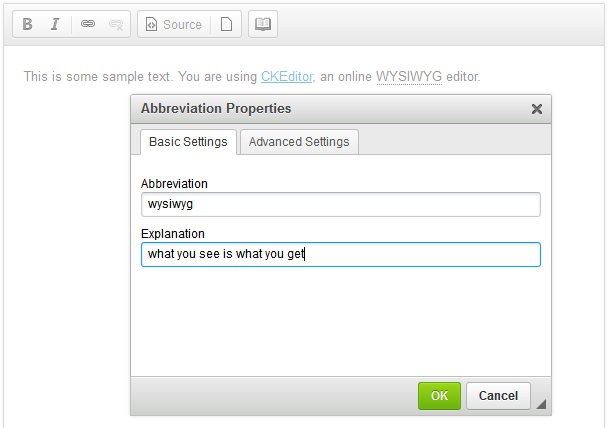
The code of the extended Abbreviation plugin is now ready. When you click the Insert Abbreviation toolbar button, the Abbreviation Properties dialog window will open. Fill in the obligatory Abbreviation and Explanation fields and click the OK button.
The newly added abbreviation will be inserted into the document and will be displayed using the default styling of your browser. In Firefox, for example, the abbreviation will be underlined using a dotted line and the explanation will be displayed in a tooltip.
If you want to edit the abbreviation, select it and open its context menu. Choose the Edit Abbreviation option to open the dialog window again, filled in with the content of the element. Modify the abbreviation and click OK.
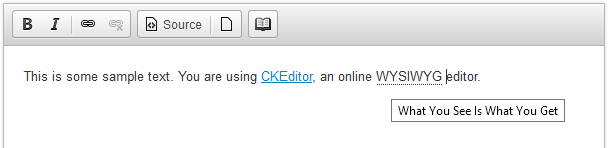
Voilà! The abbreviation was updated and its content was replaced with texts entered in the dialog window.
#Further Reading
Refer to the following resources for more information about creating CKEditor 4 plugins:
- Creating a CKEditor 4 Plugin in 20 Lines of Code – Create your first CKEditor 4 plugin that inserts a piece of HTML code into the document.
- Simple Plugin, Part 1 – Develop a basic Abbreviation plugin with a dialog window that lets the user insert a an abbreviation element into the document.
- Integrating Plugins with Advanced Content Filter – Learn how to implement Advanced Content Filter support in your plugins.
- Plugin Stylesheets – Tips on how to integrate custom plugin stylesheets with CKEditor 4.
- Plugin Definition API – Detailed description of the plugin definition.