How to Migrate from Tiptap to CKEditor: A Complete Guide

So, you’ve been using Tiptap for a while, but for one reason or another, you’re looking for an alternative. Maybe it wasn’t flexible enough for your case, you faced technical limitations, or perhaps the decision came from the top: “we’re switching editors.” Whatever the reason, you’re in the right place. I’ve walked this path for you to ease the process of migrating to CKEditor.
This article outlines key considerations for migrating. If you’re thinking about switching, follow along to see how to ensure a smooth transition from Tiptap to CKEditor.
How to migrate from Tiptap to CKEditor: first steps
To kick off the migration, begin by setting up the basics with these initial steps.
Step1: Install the CKEditor packages.
npm install ckeditor5
npm install ckeditor5-premium-features
Step 2: Place the container for CKEditor next to the original editor.
<div id="ckeditor"></div>Step 3: Initialize the CKEditor.
import { ClassicEditor, Essentials, Paragraph, Bold, Italic, } from "ckeditor5";
import { /* PREMIUM, PLUGINS... */ } from "ckeditor5-premium-features";

const initialHtml = tiptapEditor.getHTML();

const ckeditor = await ClassicEditor.create(document.querySelector("#editor"), {
  licenseKey: "<YOUR_LICENSE_KEY>", // Or 'GPL'.
  initialData: initialHtml,
  plugins: [Essentials, Paragraph, Bold, Italic,  /*, PREMIUM, PLUGINS, ... */],
  toolbar: [
    "undo", "redo", "|", "bold", "italic"
  ],
});
Step 4: Get the CKEditor HTML and compare it to the initialHtml.
const html = ckeditor.getData();Step 5: Follow this article and resolve the differences.
Migration proof of concept
To make this guide practical, I combined my own migration experience with insights from previous CKEditor engineering research, mapping the key aspects you’re likely to face and grouping them into clear stages.
My process consisted of the following steps:
Prepare a sample app using Tiptap.
Install CKEditor packages.
Map Tiptap extensions to CKEditor plugins.
Implement the migration process to CKEditor.
Test content compatibility.
Prepare the minimal CKEditor configuration: Content Migration Starter Pack.
Implement custom plugins for any missing functionality.
Unify styles.
The case of an interactive migration
Before you even start experimenting and comparing the feature set and possible mapping, you need to focus on one key concern: the downtime. A full-scale migration often implies a maintenance window. It is not necessarily a bad thing: sometimes a big bang change is necessary if you want to save some resources, mainly cost, time, or scope. On the other hand this can be really disruptive for your users.
A by-the-book transition requires a three step iterative approach (with slight modification):
Dual editor support: Initially, allow both Tiptap and CKEditor to coexist. You can implement a toggle or a feature flag that allows switching between the two editors. This is crucial for testing and ensuring that the new editor works as expected without fully committing. This phase can be done internally with developers.
New content in CKEditor: In the second stage, all new content is created and edited using CKEditor, while existing content created with Tiptap remains editable. This minimizes risk and allows you to focus on the stability of the new editor for future content.
Iterative transition to CKEditor: Once you are confident in CKEditor's performance and have a solid plan for migrating older content, you can deprecate Tiptap entirely. All content will then be managed through CKEditor.
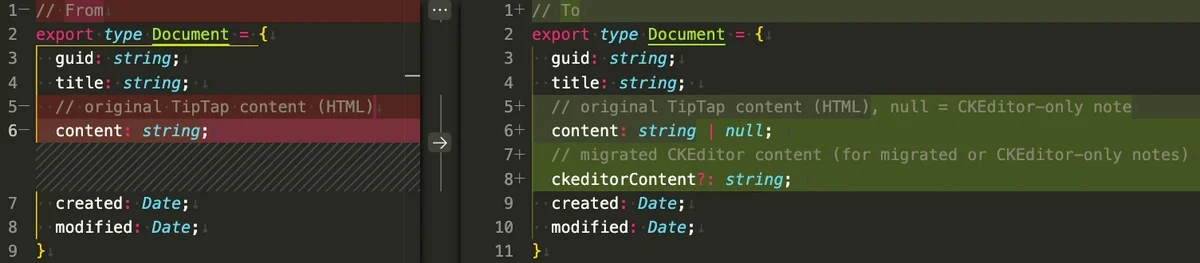
Migration from Tiptap to CKEditor can be achieved in various ways. Let’s assume you have a table with documents storing the content. My tested path was:
Create a new field or column in your database and leave it empty.
Implement the “Migrate to new editor” button, which will perform the actual migration described below and store it in the new column.
Allow editing on the migrated version within CKEditor.
Make the original version read-only (
editable = falsein the editor configuration).
Handling your data: JSON vs. HTML
Tiptap often stores content as JSON, which is great for structured data, but can be less portable than HTML. Fortunately Tiptap editor is capable of also returning the HTML editor.getHTML (once you have the content loaded to the editor).
The following concept is straightforward, but there is an important detail. You have to use the “appropriate” configuration for this migration. Its form heavily depends on your current Tiptap configuration so I dedicated the next section to it.
const ckeditor = await ClassicEditor.create(
  document.getElementById("ckeditor-editor"),
  {
    /* "appropriate" configuration  */
  }
);

const tiptap = new Editor({
  /* current configuration */
  content: initialContent, // from db.loadTiptapContent(documentId)
});

document.getElementById("migrate-button").addEventListener("click", () => {
  const html = tiptap.getHTML();
  ckeditor.setData(html);
  // db.storeCKEditorContent(html, documentId);
});
Installing CKEditor is easy: you can go through the CKEditor Builder, configure the features you want to have in your new editor, and you get the base configurations. If you prefer a different, precise route, you can load CKEditor from CDN or from npm (ckeditor5, ckeditor5-premium-features) and pick the plugins you want to import and configure them according to the docs (or leave the default config for the first run).
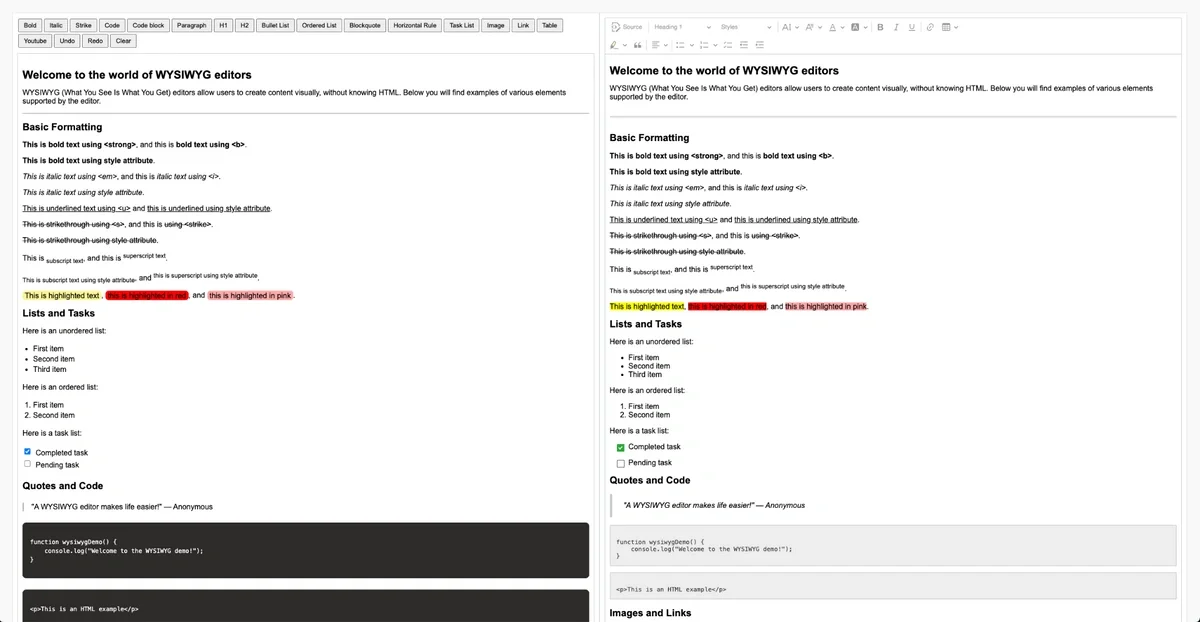
This way you can have CKEditor installed, and start testing out the migration. I started by having the editor side by side and list how they differ:
Server-side migration
Alternatively, you can choose server-side migration and transfer your content under the hood (or perform the migration on the server for the leftover documents that haven’t been migrated via UI). To do that, you can use the HTML utility to retrieve HTML from stored JSON and then use CKEditor’s Server-side Editor API to import to the database.
The following script expects you to have an editor bundle uploaded on the CKEditor server environment and a source document created for the migration purposes:
import { generateHTML } from '@tiptap/html';
import Document from '@tiptap/extension-document';
import Paragraph from '@tiptap/extension-paragraph';

// Transform from HTML
const inputHtml = generateHTML(
    {
        type: "doc",
        content: db.loadTiptapContent(),
    },
    [
        Document,
        Paragraph,
        // other extensions ...
    ]
);

// Prepare server-side script for migration
const body = {
    "script": `editor.data.set(\`${inputHtml}\`, { suppressErrorInCollaboration: true }); return editor.getData();`,
    "config": {
        "cloudServices": {
            "bundleVersion": '1.0.0' // bundle with matching configuration
        }
    }
};

// Execute the script on the server
const timestamp = Date.now();
await axios.post(
    API_BASE_URL + EVALUATE_SCRIPT_URL_PATH,
    {
        headers: {
            'Content-Type': 'application/json',
            'X-CS-Timestamp': timestamp,
            'X-CS-Signature': generateSignature(
                API_SECRET,
                'POST',
                EVALUATE_SCRIPT_URL_PATH,
                timestamp,
                body
            ),
        },
    },
    body
);
The content migration process: match your config
At this point, you likely know how the features stack up between Tiptap and CKEditor. You also know which features map directly and which features CKEditor offers out-of-the-box once you migrate.
For the base features and functionality, mapping the configuration is fairly easy. The difference is that in Tiptap, the extensions are configured right in the sections where they are loaded using the configure method. In CKEditor, the plugins are loaded separately from their configuration:
// Tiptap setup
new Editor({
  element: document.querySelector('#editor'),
  extensions: [
    Document,
    Paragraph,
    Text,
    Heading.configure({ // Loading heading and confoguring it at the same tome
      levels: [1, 2, 3],
    }),
    // ... Other configuration options ...

  ],
})
// CKEditor setup
ClassicEditor.create(
        document.querySelector('#editor'),
        {
            plugins: [ /* other plugins */, Headings ], // Loading Heading
            // ... Other configuration options ...
            heading: { // Heading plugin confoguration
                options: [
                    { model: 'paragraph', title: 'Paragraph', class: 'ck-heading_paragraph' },
                    { model: 'heading1', view: 'h1', title: 'Heading 1', class: 'ck-heading_heading1' },
                    { model: 'heading2', view: 'h2', title: 'Heading 2', class: 'ck-heading_heading2' },
                    { model: 'heading3', view: 'h3', title: 'Heading 3', class: 'ck-heading_heading23' }
                ]
        }
} )Configuration match
You start with matching Tiptap extensions to the CKEditor plugins. I recommend starting in the Features section of the CKEditor documentation or hit “Ask AI” in the docs UI and to get a quick answer! There isn’t 100% compatibility between Tiptap editor configuration and CKEditor, however, the following options might be the ones you might need a bit of time to assess:
Tiptap | CKEditor config option | CKEditor plugin | CKEditor API | Note |
- | - |
| CKEditor takes the source element as the first argument of the | |
extensions | ||||
- | - | The same functionality can be achieved by using the plugin. | ||
- | - | It’s possible to process the clipboard content using Clipboard API. | ||
- | - | - | Integrator can remove content styles and load only necessary editor styles. |
Content migration starter pack
In most cases, the base HTML markup generated by Tiptap will be understood by CKEditor. With CKEditor plugins mirroring the Tiptap extensions for specific HTML elements or attributes, you should be good to go in most cases. For the base functionality provided by Tiptap, there are some focus areas you can cover in just a couple of plugin configurations.
Step 1: However, some markup generated by Tiptap won’t be handled out of the box. The easiest way to start would be using the General HTML Support plugin with a specific configuration that enables support for missing elements and attributes. The following configuration is a must-have for you to cover YouTube videos, highlight, and text style migrations at the beginning:
{
  // ...
  htmlSupport: {
    allow: [
      // Handle Tiptap YouTube videos. You can add additional attributes if you use non-default extension configuration.
      { name: "div", attributes: "data-youtube-video" },
      {
        name: "iframe",
        attributes: {
          src: true,
          width: true,
          height: true,
          allowfullscreen: true,
          frameborder: true,
        },
      },
      // Handle Tiptap highlight
      { name: "mark", styles: "background-color", attributes: "data-color" },
      // Handle Tiptap text style
      { name: "span", styles: true },
      // Handle classes on elements
      { name: /.*/, classes: true },
      // Handle Tiptap details extension
      { name: "details", classes: true },
      { name: "summary", classes: true },
    ];
  }
}
Step 2: Then you definitely want to start with supporting various font families:
{
    // ...
    fontFamily: {
    options: [
        // reconfigure available font family options
    ],
    supportAllValues: true
    }
}
Step 3: Wrapping up with the support for Mentions plugin, we need to map attributes from Tiptap to CKEditor, so the native feature could recognize it as a valid mention.
Tiptap uses the following markup for mentions:
<span data-type="mention" data-id="Jennifer Grey"></span>
CKEditor produces:
<span class="mention" data-mention="@Ted">@Ted</span>
This can be achieved by following custom conversion code:
class SupportTiptapMention extends Plugin {
	init() {
		const editor = this.editor;

		editor.conversion.for('upcast').elementToAttribute({
			view: {
				name: 'span',
				key: 'data-type',
				value: 'mention',
				attributes: {
					'data-id': true
				}
			},
			model: {
				key: 'mention',
				value: viewItem => {
					// The mention feature expects that the mention attribute value
					// in the model is a plain object with a set of additional attributes.
					// In order to create a proper object use the toMentionAttribute() helper method:
					const mentionAttribute = editor.plugins.get('Mention').toMentionAttribute(viewItem, {
						// Add any other properties that you need.
						id: viewItem.getAttribute('data-id')
					});

					return mentionAttribute;
				}
			},
			converterPriority: 'high'
		});
	}
}
And then providing the feed to the Mention plugin.
Tiptap extensions to CKEditor plugins wrap up
As you probably found out, Tiptap extensions are a way to work with resulting content and its metadata or the editor functionalities. The same goes for plugins in CKEditor. For each extension, you should ask whether it falls into any of the three main “buckets”:
-
Does it introduce support for specific HTML elements or attributes?
-
Does it introduce any custom styling to your content?
-
Does it extend editing functionalities?
And if you answered yes to any of these, was the migration covered by the starter pack? If it wasn’t covered, you need to plan for the custom migration step or implement a custom CKEditor plugin. There are various resources you can look at, but the base is to get a grasp of the CKEditor framework and then move to the Conversion and Schema guide. This would give you the answer to which parts of the framework you can use to migrate your extensions to CKEditor plugins. And just to have a practice run, I would recommend the basic and the advanced plugin guide.
Also if you end up with the limited CKEditor configuration, you can write your own plugin and use the lower-level API to achieve the desired behavior. In this stage, just keep the list of the plugins and do not implement the mapping plugins yet.
Styling your editor and its content in CKEditor
CKEditor is distributed with two types of styles:
Editor styles migration can be solved fairly easily. Since Tiptap is primarily headless, you can migrate to CKEditor with two main approaches:
Accommodate CKEditor’s out-of-the-box UI and customize it later based on your users feedback.
Approach the migration as headless to headless and use your already-created UI components and the whole UI component sets (toolbars, modals, or confirmation, etc.)
Both approaches are fair and have their benefits. I would recommend the first approach since you might see a big benefit in offloading a lot of UI markup and the user interaction code to the external system. That means less maintenance for you and a unified overall approach. Then, you can customize when you get feedback during the transition period.
Content styles refer to the way your content itself gets rendered. This is the second part of the styling. By default, Tiptap doesn’t introduce any styling, so you probably apply your own stylesheet. CKEditor introduces its own content styles, so it is not required to provide any additional styles. The options are the same:
Use CKEditor’s provided styles and customize if necessary.
Do not import the provided styles and use yours.
In this case, I would probably go with the second approach since this is what matters to the content manager and content creators. If your styles are simple or you don’t use any, option one is certainly easible.
Migration from Tiptap to CKEditor checklist
| ☑︎ | Choose your migration approach. |
| ☑︎ | Install CKEditor packages. |
| ☑︎ | Prepare migration starterpack. |
| ☑︎ | Map Tiptap extensions to CKEditor plugins. |
| ☑︎ | Test content compatibility. |
| ☑︎ | Implement custom plugins for any missing functionality. |
| ☑︎ | Unify styles. |
Want to see how easy it is to migrate? You can test drive CKEditor easily with a 14-day free trial.
If you want to explore the actual source code I have been using as a base for this article, I dedicated a stale branch for exploration. The main areas of interest are: