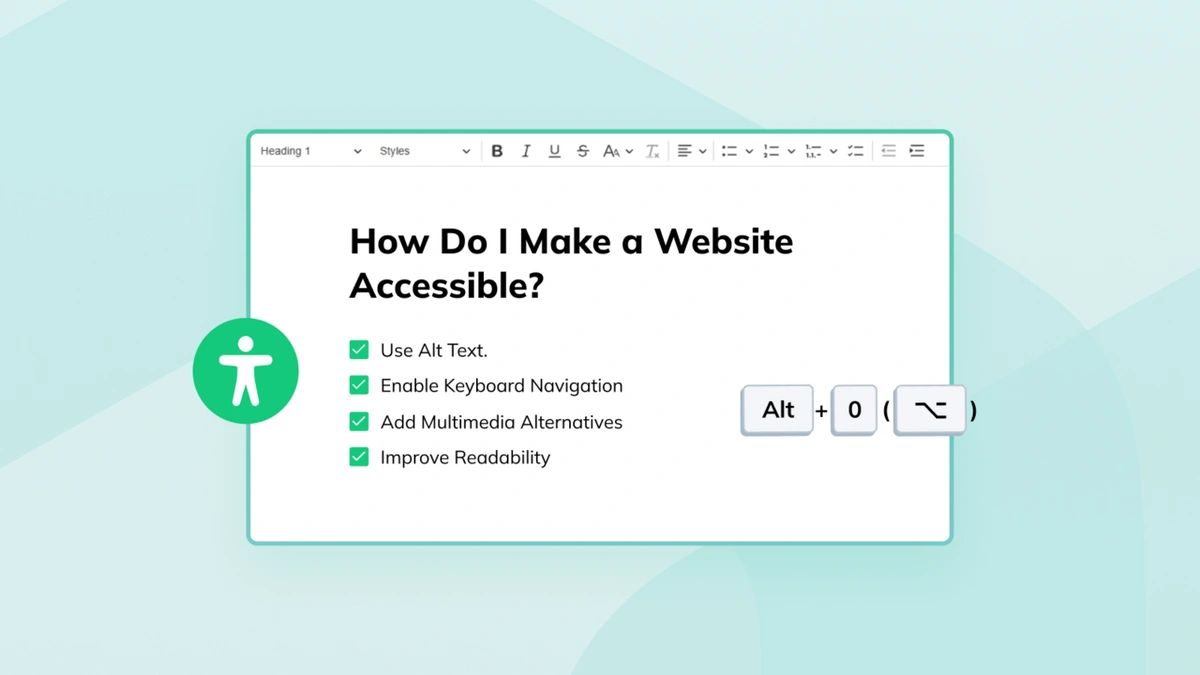
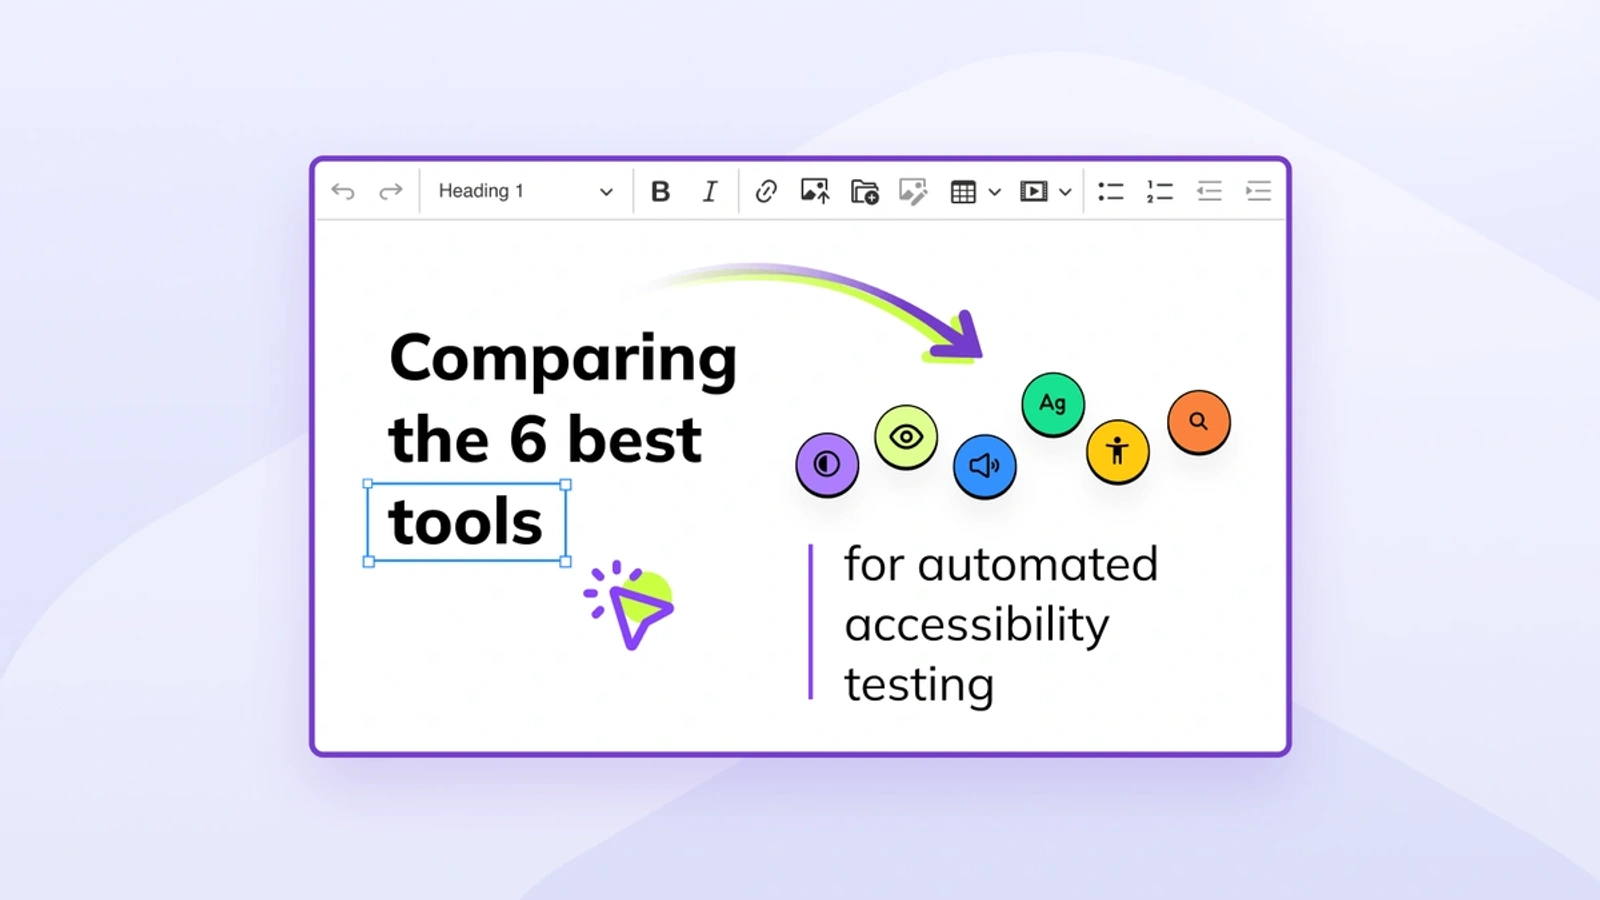
Comparing the 6 best tools for automated accessibility testing
23min read
|There is a known mantra in the programmer’s world: “Automate it.” As programmers, we have a tendency to automate tasks, and testing is often our least favorite part of this process. In the ideal world, all tests are fully automated and we have time to do the real stuff – coding. So it should come as no surprise that we also want to automate accessibility testing, for example, in CKEditor 5.
In this article, we’ll take an in-depth look at some popular accessibility automation tools, putting them head-to-head against each other to see which has the best range of features – and which is the most accurate at detecting accessibility issues. After that, we’ll build a simple prototype to handle accessibility testing in CKEditor 5.
Quick links
- Why automation is crucial for efficient accessibility testing
- Is it possible to automate accessibility testing?
- Manual vs automated accessibility testing
- Overview of 6 top accessibility automation tools
- 6 best accessibility automation tools in detail
- Accessibility automation testing tools compared side-by-side
- Automated accessibility testing tool comparison results
- Which automated accessibility testing tool is the winner?
- How to automate accessibility testing in CKEditor 5
- Learn more about CKEditor
Why automation is crucial for efficient accessibility testing
There’s much low-hanging fruit in the realm of accessibility, like images without the alt attribute or a too-low contrast ratio between the text and its background. Such things can be (and should be) detected automatically to allow content authors and developers to quickly find and fix the most common accessibility errors. Additionally, automated testing can prevent any accessibility regressions. If an automated tool is integrated within the CI environment, every accessibility issue will be found and reported before the defect hits production.
Automated accessibility testing saves time by offloading repetitive manual testing of every paragraph in the webpage content in a tedious quest for potential accessibility issues.
Repetitive tasks tend to be error-prone. Doing the same thing over and over dulls mental attentiveness. After clicking that button one hundred times, you might omit clicking it once more. Thus, a new bug slips into the codebase. So every button that doesn’t need to be manually clicked by a developer is one less avenue to introduce a bug. The same goes for accessibility testing.
Is it possible to automate accessibility testing?
Yes, at least to some extent. To be able to automate something, we need to be able to create objective ways of measuring it. Thanks to the work of the World Wide Web Consortium, there is an objective way to measure the accessibility of a webpage. It’s called the Web Content Accessibility Guidelines (WCAG) standard. The latest version is WCAG version 2.2.
The standard is divided into four principles (Perceivable, Operable, Understandable, and Robust) with each element further divided into guidelines. Guidelines are further divided into success criteria (SC).
Each SC describes one particular accessibility feature, e.g. alternative text for non-text content, and contains additional information on how to understand the criterion and how to conform to it. Additionally, each criterion is a part of one of three levels: A, AA, or AAA. Most webpages aim to conform to the AA level, meaning they need to conform to all AA success criteria.
Many of the existing SCs contain detailed algorithms on how to check if the webpage is conforming. Thanks to these algorithms, at least some accessibility testing can be automated.
Manual vs automated accessibility testing
Manual and automated accessibility testing are both needed as they allow us to find different types of issues.
- Manual testing is much better at finding errors connected with semantics. Despite the whole revolution around AI, computers are still quite error-prone when it comes to understanding the meaning of webpage content. It’s up to us humans to show them “Hey, it’s supposed to be a list” or to point out when an image is described in a peculiar way.
- On the other hand, automated accessibility testing excels in measuring all of the things that can be measured using algorithms from the WCAG standard, like the algorithm for calculating the contrast ratio between text and its background.
This type of stuff is far easier to be correctly assessed by a machine than by a human (I don’t want to have to calculate this whole thing). But at the same time, such automatable rules account only for a part of all possible issues.
That’s why automated testing should be followed up by manual testing. There’s no need to choose between the two – real power comes from combining automated testing with manual testing.
Overview of 6 top accessibility automation tools
There are so many automated accessibility testing tools out there, it’s hard to know which one is right for your use case. We’ve picked six of the most popular tools for this comparison, to give you a better idea of what each one can do.
First, a quick look at the general features of the six accessibility tools we’re testing out:
These are the key criteria for each tool:
- Form: How is the solution provided? Some are published as browser extensions, while others are npm packages. The choice of an accessibility checker is heavily dependent on the forms of its distribution, – a browser-only tool cannot be easily used in CI environments.
- Free to use: Is the tool available free of charge? We all love free stuff!
- WCAG version: The version of the WCAG standard that the webpage will be tested against. It should be the most recent one, which is 2.2 at the time of writing).
- Additional help in manual tests: Not all accessibility issues can be detected automatically, so it’s a bonus if the automated checker can help with manual testing, too.
- Suitable for CI: Can the tool be easily run in the CI environment?
- Suitable for browser: Can the tool be easily run in a web browser environment?
- Customizability: Whether the checker can be extended with additional tests and features.
- Last release: When the newest version of the product was released. The longer a tool goes without updates, the greater the chance that it’s no longer being maintained.
Accessibility automation tools feature comparison
| Feature | axe | Lighthouse | Pa11y | HTML_CodeSniffer | WAVE | Accessibility Insights |
| Form |
|
| npm package (pa11y) |
| Browser extension | |
| Free to use | ✅ (Paid version has additional features) | ✅ | ✅ | ✅ | ✅ (Paid version has additional features) | ✅ |
| WCAG version | WCAG 2.12 | WCAG 2.13 | WCAG 2.14 | WCAG 2.1 | WCAG 2.2 | WCAG 2.13 |
| Additional help in manual tests | ✅ | ✅ | ❌ | ❌ | ✅ | ✅ |
| Suitable for CI | ✅ 5 | ✅ 6 | ✅ | ✅ 6 | ✅ 7 | ❌ |
| Suitable for browser | ✅ | ✅ | ❌ | ✅ | ✅ | ✅ |
| Customizability | ✅ (Via plugins) | ✅ (Via plugins) | ❌ | ❌ | ❌ | ❌ |
| Last release (as of publication date) | 8 May 2024 (axe-core npm package) 29 April 2024 (axe DevTools browser extension) | 13 May 2024 (lighthouse npm package) | 27 March 2024 | 13 April 2020 (html_codesniffer npm package) | 9 February 2024 (browser extension) | 9 November 2023 (browser extension) |
1 Requires paid subscription.
2 It requires the paid Pro version to allow changing the default WCAG version to 2.2.
3 It uses the axe-core package underneath therefore it defaults to the axe’s default.
4 It depends on the selected library; it defaults to the axe-core npm package.
5 In the form of the axe-core package or via a dedicated paid product, axe DevTools Linter.
6 In the form of the npm package.
7 In the form of the API or standalone engine; paid only.
6 best accessibility automation tools in detail
Now let’s take a closer look at each accessibility testing tool. We’ll cover strengths and weaknesses, installation methods, and more.
Accessibility automation tool 1: axe
The axe DevTools toolkit is created by Deque – a renowned company in the field of accessibility. The toolkit consists of several separate products, including:
- A browser extension for running accessibility tests on a visited page – there are free and paid versions
- The axe-core npm package that runs accessibility checks on provided page content
- The axe DevTools Linter for easy integration with CI environments
The axe brand is so widely known that it became a de facto standard. The open source axe-core package is used in many other automated tools for checking accessibility – including some from this list.
Features
The main feature of axe DevTools is automated accessibility testing via the browser extension and the axe-core JS library. The extension allows you to run accessibility tests on a page you’ve visited, while the library lets you run tests programmatically.
However, Deque also offers a whole ecosystem built around axe – including axe DevTools Linter, which allows integrating the axe toolkit with your CI environment. Other axe solutions offer additional guidance for manual accessibility testing or checking the accessibility of mobile applications.
The axe toolkit is versatile, covering the most common use cases encountered in web application accessibility work. You can use axe for in-browser ad-hoc testing, as an additional check in the CI environment, or as part of another accessibility testing tool, thanks to the axe-core npm package.
Both the browser extension and the axe-core library provide detailed testing result reports. They show WCAG guideline violations and propose fixes for most of the reported issues.
The paid version of the browser extension offers additional manual tests to find even more accessibility issues on the page.
Advantages of axe
The biggest pro is the fact that you’ve probably used axe (in the form of the axe-core npm package) at least once if you’ve used any other popular accessibility automation tools. Another advantage is the continuous maintenance of the solution. Deque ensures that axe is up to date with the latest changes to accessibility standards.
The docs are also really good, describing in detail the whole API of the npm library and providing additional guidance and hints in the form of blog posts. Then there’s axe-con – an inclusive conference dedicated to accessibility topics. Overall, the whole axe ecosystem is thriving.
Disadvantages of axe
There aren’t many cons to the axe toolkit. Some could point to pricing as a weakness, but it’s worth mentioning that the core of the solution (the axe-core library) is free to use and open source. One notable downside is that axe-core has a “zero false positives” philosophy, which means omitting any potential accessibility issues (like a table without any headers). Including such issues in the final report could further enhance the produced content.
Installation
The easiest way to start using axe DevTools is to install the free browser extension. Just click the browser extension link on the axe website, and you’ll be redirected to your browser’s extensions store. Please follow the instructions in the store to install the extension.

After installing the extension, it will appear in your browser’s developer tools as an additional tab.
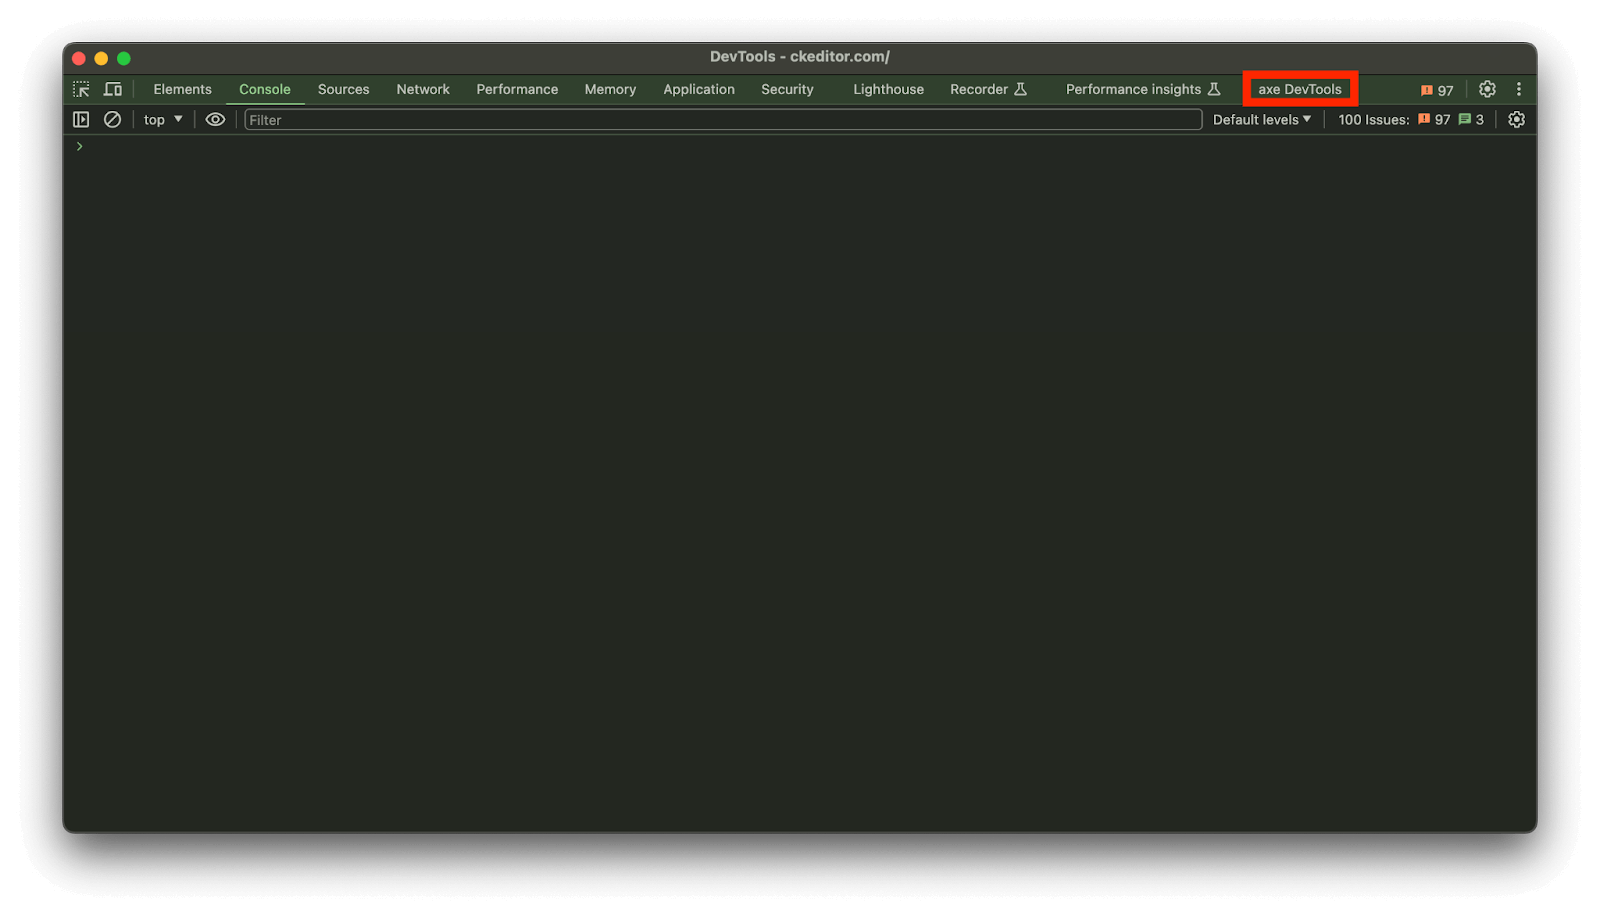
- To open the developer tools, press F12 or Cmd+Option+J on macOS and Ctrl+Shfit+J on Windows/Linux
- Then select the “axe DevTools” tab on the developer toolbar
The extension also offers an extensive walkthrough. The free version of the extension can also be easily updated to the premium version.
To use the axe-core npm package in your project, you need to install it using a package manager, e.g. npm. The axe-core GitHub repository contains documentation on how to start with the library.
Accessibility automation tool 2: Lighthouse
Lighthouse is a unique solution as it’s the only tool on this entire list that’s built into a browser. As a Google product, it found a place in Google Chrome DevTools.
However, Lighthouse isn’t just an accessibility testing tool, it’s more of a quality assurance tool. It checks accessibility, performance, the usage of best practices, SEO, and other important topics. It’s a Swiss army knife for automated checking of all things related to web development. And it’s right there in the browser.
Features
Having said all that, Lighthouse isn’t much different from axe in terms of accessibility testing, because it uses the axe-core library under the hood.
So both report very similar issues. But there is one bonus: a summary of the current state of the page’s accessibility in the form of a score from 0 to 100. Reports also contain screenshots of noncompliant elements for some of the found issues. And that’s basically it.
![Results of the accessibility checking: the score of 74 in orange color at the beginning, following by the list of issues divided into several groups (like "Names and labels"); there is the "Image elements do not have [alt] atttribute" issue with a detailed description and the screenshot of the violating img element.](https://cdn.buttercms.com/1juX8PQfqPkiSZ9VtAGz)
It’s also worth mentioning that there is the lighthouse npm package that could be used in Node.js to run tests programmatically, for example in a CI environment. There is also a browser extension, but it’s probably better to just use the built-in version instead.
Lighthouse plugins are node modules that perform specific checks for Lighthouse and add them as a new category to the report. These checks could include accessibility testing or other unrelated tasks.
Advantages of Lighthouse
The biggest pro is the fact Lighthouse is inside every Google Chrome browser. You don’t need to install anything, just open up the browser’s devtools. Another pro is the fact that it uses the axe-core library underneath, so it’s probably the most popular tool for automated accessibility testing at the moment.
Disadvantages of Lighthouse
On the other hand, the biggest con is it’s quite a Chrome-centric solution. Its accessibility testing feature isn’t even its main purpose – it’s just one of many features.
Installation
The easiest way to use Lighthouse is to use Google Chrome web browser as Lighthouse is built into it.
- After launching Chrome, open the browser’s developer tools by pressing F12 or Cmd+Option+J on macOS and Ctrl+Shift+J on Windows/Linux
- Then navigate to the Lighthouse tab
To use the lighthouse npm package, you will need to install it using a package manager. The following code will install the lighthouse package using the npm package manager:
npm install -g lighthouseThe -g flag installs the package globally, meaning that it can be now used in the terminal like any other application. To run Lighthouse from the terminal, type its name followed by the URL of the page you like to check, for example:
lighthouse https://ckeditor.com --viewThanks to the --view flag, the generated report will be automatically opened in the default browser.
Accessibility automation tool 3: Pa11y
Pa11y is a small CLI pal that runs a set of tests on a provided URL or file. It can use two different engines to run its test: axe-core (the default) or HTML_CodeSniffer. Similar to axe, a whole ecosystem has arisen around Pa11y, including the dashboard for continuous accessibility testing or a dedicated solution for CI integration.
Features
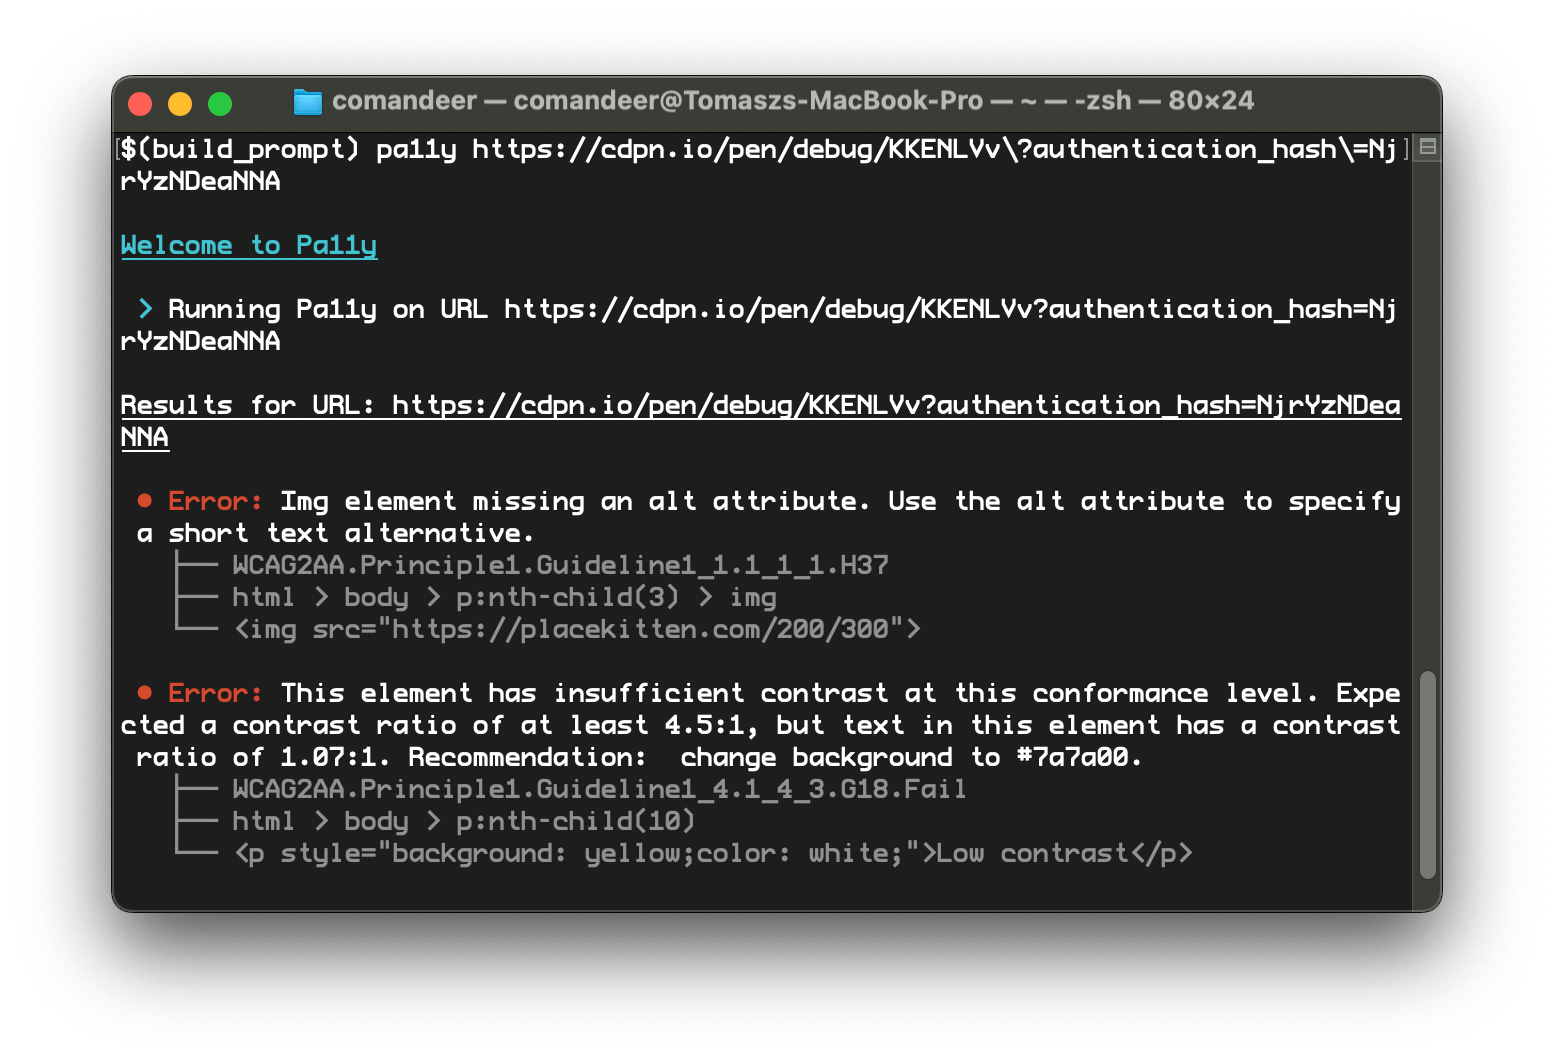
Pa11y is a super simple CLI application distributed as the pa11y npm package. Its main feature is running a set of tests on a provided URL or file:
pa11y https://cksource.com
pa11y ./some/path/to/a/file
It has several configuration options, including one that allows switching between axe-core and HTML_CodeSniffer as test runners used under the hood.
After a successful run, Pa11y displays the results right inside the terminal. Each result contains a detailed CSS selector helping you to easily find the noncompliant element.
Advantages of Pa11y
The main advantage of Pa11y is that it’s extremely simple and easy to use. Pa11y can give you a quick overview of accessibility issues straight from the command line.
Disadvantages of Pa11y
Pa11y’s greatest strength – its simplicity – is also its greatest weakness. Pa11y may be the perfect tool for fast assessment of webpage accessibility, but it lacks bells and whistles in comparison to other tools on the list.
Installation
To use the pa11y npm package, you will need to install it using a package manager. The following code will install the pa11y package using the npm package manager:
npm install -g pa11yThe -g flag installs the package globally, meaning that it can be now used in the terminal like any other application. To run Pa11y from the terminal, type its name followed by the URL of the page you like to check, for example:
pa11y https://ckeditor.comAccessibility automation tool 4: HTML_CodeSniffer
HTML_CodeSniffer is a solution developed by Squiz. It’s a JS library that offers a set of automated tests to check the accessibility of a provided webpage or piece of content. It’s also offered in the form of a bookmarklet.
Features
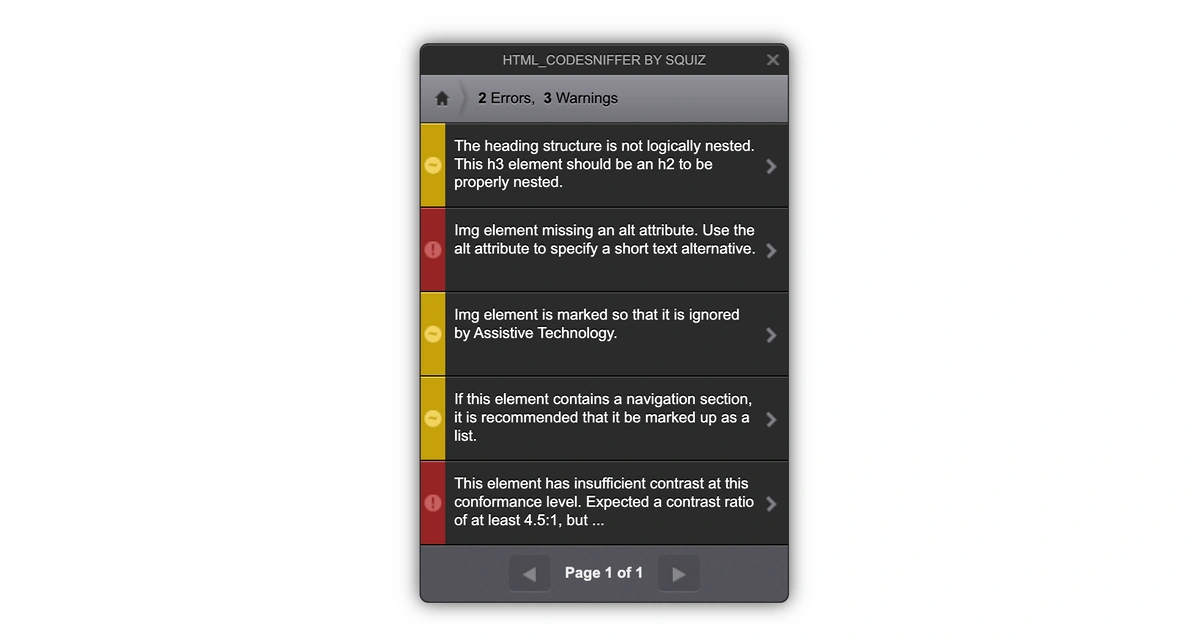
HTML_CodeSniffer runs the set of tests on any page provided. If used as a bookmarklet, it shows the results of the tests in a floating modal dialog added to the page. If used as a library, it can run both on a provided DOM element and HTML content. Results contain references to any noncompliant elements alongside a detailed description of the issue.
Advantages of HTML_CodeSniffer
The biggest pro of HTML_CodeSniffer is ease of use, especially for the bookmarklet – all you need to do is drag it to your browser’s bookmark toolbar, then click to run.
Disadvantages of HTML_CodeSniffer
The biggest downside is that HTML_CodeSniffer has gone a long time without any updates. At the time of writing, HTML_CodeSniffer only supports WCAG 2.1, while the latest standard is WCAG 2.2.
The other big issue is the lack of documentation of the library – using the API programmatically requires you to do some sniffing of your own around the code. Additionally, the bookmarklet does not work on pages secured by a Content Security Policy, making the tool much less usable.
Installation
The easiest way to use HTML_CodeSniffer is to drag the bookmarklet from the official library page and drop it to the browser’s bookmark bar. Then go to the page you want to test and click on the bookmark.
To use the html_codesniffer npm package, you will need to install it using a package manager. The following code will install the html_codesniffer package using the npm package manager:
npm install html_codesnifferAfter installing the package, you can then use it inside a Node.js application. The official documentation contains more details about operation and use.
Accessibility automation tool 5: WAVE
WAVE is an accessibility evaluation tool developed by WebAIM. It’s provided as a web app, browser extension, and a pay-per-use API. It’s another big name on the list and probably one of the longest-lived automated accessibility testing tools.
Features
The browser extension and web app work in a very similar manner: they display a toolbar on the left, containing the list of all detected issues, and the tested webpage on the right, with icons next to elements that failed accessibility tests.
The main difference between the two is that the web app operates on a provided URL, while the extension works on the currently visited page. Additionally, the extension can bypass issues with a Content Security Policy that can make the web app function incorrectly. All detected issues have detailed descriptions with proposed fixes and references to the WCAG standard.
Using the API returns all detected issues in a JSON or XML format, optionally with CSS selectors for each noncompliant element.
Advantages of WAVE
The biggest pro is the detailed description of each issue. The WAVE web app and extension arguably have the best documentation out of all of the tools on this list – and they’re also easy to use.
Disadvantages of WAVE
The biggest downside is the very cryptic WAVE API documentation. Additionally, the form of the API makes it usable mainly for server-side integrations, and less usable in browser environments.
Installation
The easiest way to start using WAVE is to install the free browser extension.
- Just click the extension install link for your browser on the WAVE site to go to your browser’s extension store
- Follow the instructions in the store to install the extension
After installing, open your extensions menu and click the WAVE icon to run an accessibility check on the current page.
Accessibility automation tool 6: Accessibility Insights
Accessibility Insights is a browser extension developed by Microsoft. It’s designed to test the accessibility of webpages, and uses the axe-core library under the hood.
Features
The extension enables webpage accessibility testing with three modes based on testing time. The quickest mode focuses on automated tests, while the other two involve more manual testing. This comprehensive approach covers most of the WCAG standard through user-friendly checklists, providing thorough webpage testing.
Advantages of Accessibility Insights
The biggest pro of Accessibility Insights is its ease of use and the depth of automated accessibility testing it provides.
Disadvantages of Accessibility Insights
The biggest weakness is the fact that it’s offered only as a browser extension, which excludes this tool from usage in CI environments. Additionally, the extension is available only for Google Chrome and Microsoft Edge, with no support for Firefox or Safari web browsers.
Installation
Go to the Downloads page.
- Click the extension install link to go to your browser’s extension store.
- Follow the instructions in the store to install the extension.
After installing, open your extensions menu and click the Accessibility Insights icon to run an accessibility check on the current page.
Accessibility automation testing tools compared side-by-side
Now it’s time to see how all these tools measure up in a simple comparison test. Of the many possible accessibility errors, we’ve chosen eight different issues for this test:
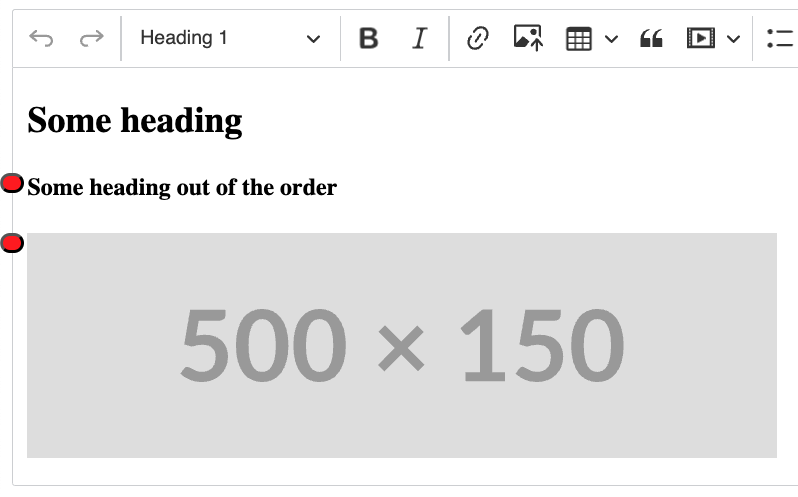
1. Headings out of order
All headings in HTML have corresponding levels, indicated by the number in their name. The lower the number, the more important heading is – h1 is the most important and h6 is the least important.
Properly using heading levels helps create a page’s structure, similar to a book’s table of contents. So, it’s best practice not to skip any heading levels and maintain their order. For example, h1 should be followed only by h2 and h2 only by another h2 or a h3, etc.
This issue is connected to the SC 1.3.1 Info and Relationships in the WCAG standard.
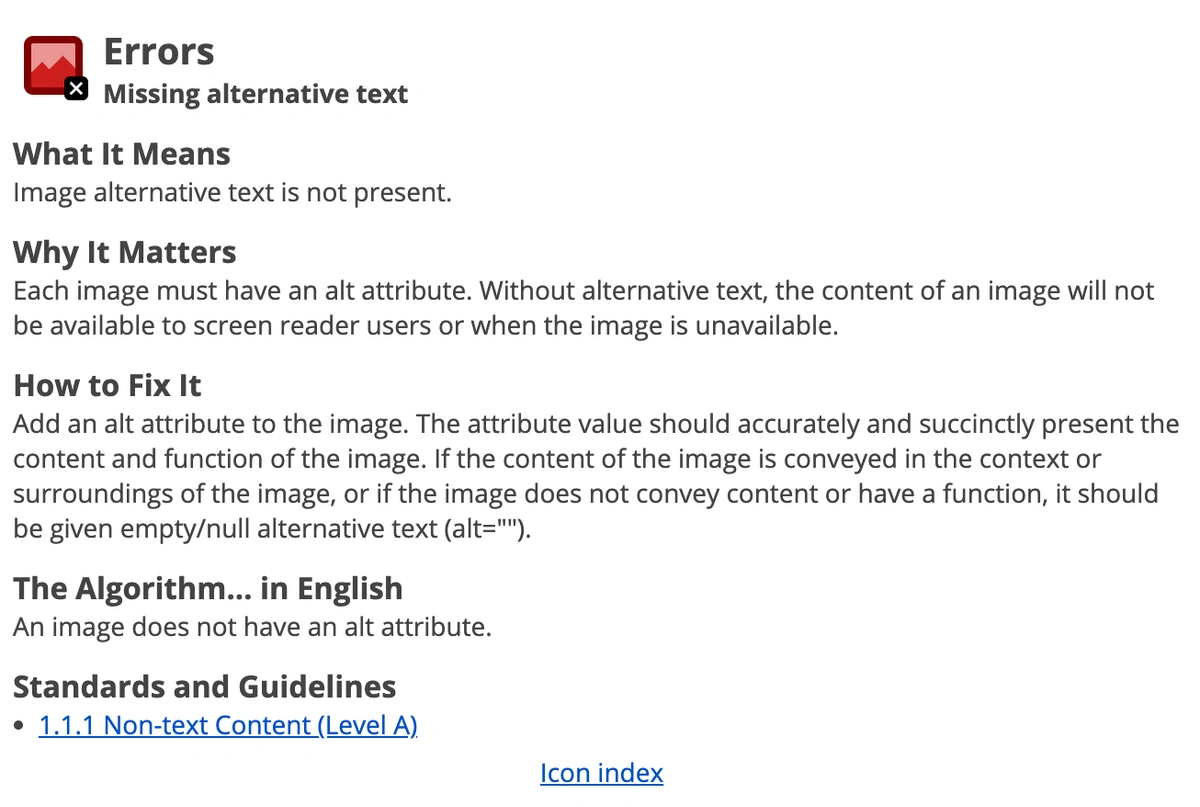
2. Image without alternative text
Each image needs alternative text describing its content or function. Images lacking alternative text are difficult for people using assistive technology, like screen readers, to comprehend while browsing the web.
If you don’t use the alt attribute on the img element to provide alternative text, a screen reader may simply read aloud the image URL. This wouldn’t be very helpful to most users.
This issue is connected to the SC 1.1.1 Non-text Content.
3. Image with empty alternative text
Decorative images, which don’t add much to the content, can have empty alternative text. All other images should always be described.
While not necessarily an accessibility problem, it could become one in certain situations. Therefore, an automated accessibility checker should flag it as a potential issue.
This topic is also connected to SC 1.1.1 Non-text Content.
4. Adjacent links directing to the same page
This situation often indicates a bug. Why would we want two links to the same page next to each other? To sighted users, this is confusing, but much more so for users with assistive technology.
Why? Adjacent links can be cumbersome for people navigating the webpage with a keyboard; they would need to press the Tab key twice to get past two links that look like one link.
This issue is not directly related to any Success Criterion from the WCAG standard but it’s connected to SC 2.4.4 Link Purpose (In Context) – the content structure is confusing.
5. Table without any headers
Every table should have some form of headers to indicate what data it contains. If the table contains the number of books sold in each month, the table should have a header row clearly labeling the data in that column. The lack of table headers may indicate the purpose of the table is purely layout. As an industry, we agreed to move on from table based layouts some time ago.
This issue is connected to the SC 1.3.1 Info and Relationships.
6. Fake list
A common error often made while writing content is creating elements that look like other elements, like paragraphs with manual numbering imitating an ordered list. As there is no duck typing in HTML, everything that looks like a list should be constructed with list components.
This issue is connected to the SC 1.3.1 Info and Relationships.
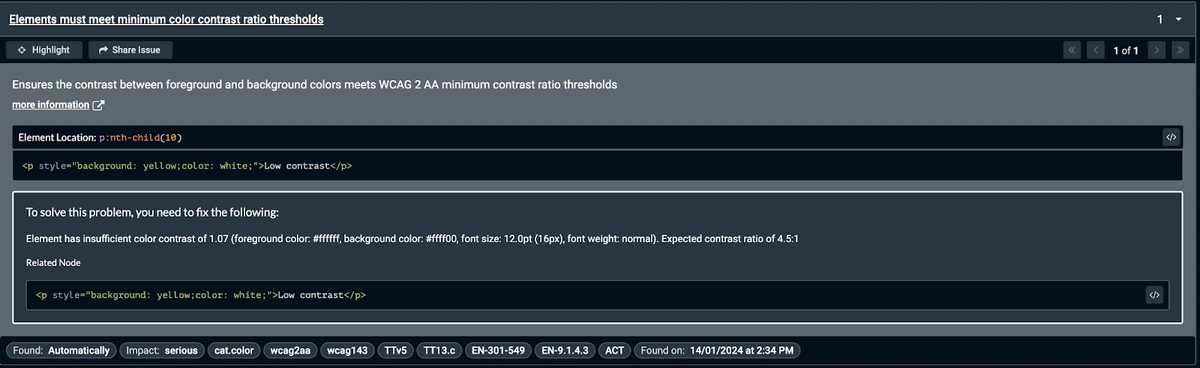
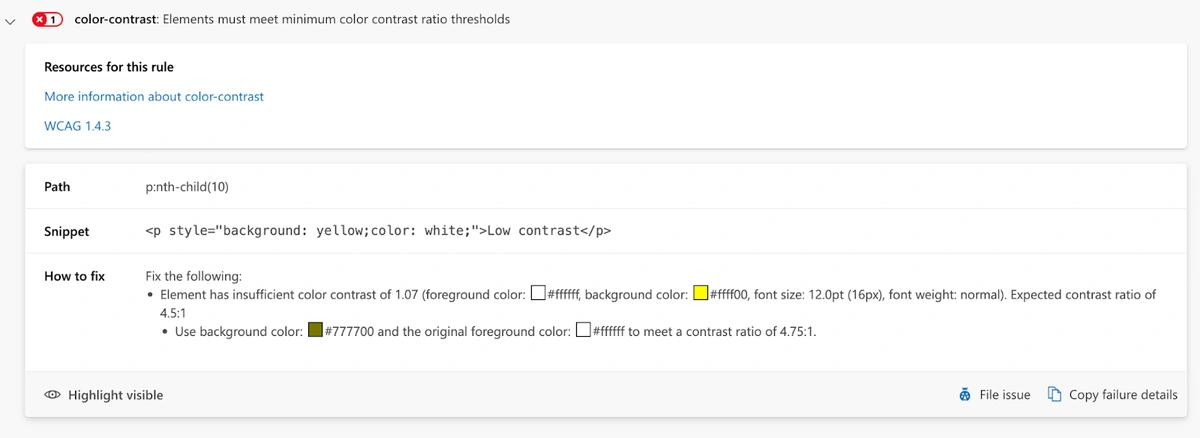
7. Low contrast paragraph
If content is presented with inadequate contrast, it’s unreadable. For example, imagine trying to read white text on a bright yellow background, or dark gray text on a black background. This is a serious issue for anyone with visual impairment.
The WCAG standard contains the SC 1.4.3 Contrast (Minimum) requiring at least a 4.5:1 contrast ratio 5:1 between the text and background.
8. Button that’s too small
The newest WCAG version introduces a new Success Criterion – 2.5.8 Target Size (Minimum). This guideline requires clickable and touchable elements to be at least 24x24 pixels in size. Anything below these values is considered suspicious and should be picked up by an automated accessibility checker.
This is also a good test to see if the tool truly supports WCAG 2.2.
How we tested accessibility automation tools
To test how well each tool can detect those eight issues, we’ve prepared a sample webpage that’s riddled with accessibility errors.
The test uses free versions of all of the solutions in the following forms:
- axe DevTools as a browser extension,
- Lighthouse as a built-in tool in Google Chrome’s developer tools,
- Pa11y as a CLI application downloaded from the npm registry,
- HTML_CodeSniffer as a bookmarklet,
- WAVE via the UI on its website,
- Accessibility Insights as a browser extension.
The sample webpage itself was served to the tools via CodePen’s Debug View to ensure that nothing interfered with the testing. Check out the full results in the table below.
Automated accessibility testing tool comparison results
| Test | axe | Lighthouse | Pa11y | HTML_CodeSniffer | WAVE | Accessibility Insights |
| Headings out of order | Detected with a link to a page with more details1 | Detected with a link to a page with more details | Not detected | Detected with a link to the standard | Detected with a detailed description | Needs manual test |
| Image without alternative text | Detected with a link to a page with more details | Detected with a link to a page with more details | Detected with a hint (“Use the alt attribute to specify a short text alternative.”) | Detected with a link to the standard | Detected with a detailed description | Detected with a link to the standard and proposal of how to fix |
| Image with empty alternative text | Needs manual test2 | Not detected | Not detected | Detected with a link to the standard | Detected with a detailed description | Needs manual test |
| Adjacent links directing to the same page | Not detected | Not detected | Not detected | Incorrectly detected as a navigational element | Detected with a detailed description | Not detected |
| Table without any headers | Needs manual test2 | Not detected | Not detected | Not detected | Detected with a detailed description | Needs manual test |
| Fake list | Needs manual test2 | Not detected | Not detected | Not detected | Detected with a detailed description | Needs manual test |
| Low contrast paragraph | Detected with a link to a page with more details | Detected with a link to a page with more details | Detected with a hint (“Recommendation: change background to #7a7a00.”) | Detected with a link to the standard | Detected with a detailed description | Detected with a link to the standard and proposal of how to fix |
| Button that’s too small | Not detected | Not detected | Not detected | Not detected | Not detected | Needs manual test |
Explanatory footnotes:
- The “Best Practices” option needs to be enabled.
- Manual tests are available only in the paid Pro version of the axe DevTools.
Which automated accessibility testing tool is the winner?
- The WAVE tool is the clear winner. It detected all issues but one – the small button
- HTML_CodeSniffer also worked pretty well, detecting five out of eight existing accessibility issues. However, it identified one of them incorrectly: instead of indicating there are two adjacent links to the same location, HTML_CodeSniffer considered it an incorrectly marked-up navigational region, recommending changing the two links to a list when it should have suggested merging the two links together
- Accessibility Insights and axe also identified most errors, but required manual testing to do so; their automated checks found only two issues
- Lighthouse and Pa11y, on the other hand, detected three and two issues respectively
However, when we factor in ease of use, the results vary.
- WAVE, the most accurate solution, has limited options, providing only an HTTP API and a web app/browser extension
- Accessibility Insights only offers a browser extension, while Pa11y is only available as a CLI application
If we’re aiming to develop an in-browser tool that can integrate with web applications such as CKEditor 5, we’re left with two main options: axe-core, arguably the most versatile tool, and HTML_CodeSniffer.
How to automate accessibility testing in CKEditor 5
Considering the above results, let’s create a prototype of an automated accessibility tester for CKEditor 5. Let’s look at two distinct versions: using html_codesniffer and the axe-core npm packages.
These prototypes function like this:
Click the “Check accessibility” button below the editor to start automated accessibility checking.
The results appear next to the editor’s content, showing red dots near elements that failed checks.
In the case of the axe prototype, everything takes place inside the editor. However, in the case of HTML_CodeSniffer, the content of the editor is copied to a separate element, and the check is performed on the copy. This seems to be because the library gets confused by the editor’s DOM structure, then reports incorrect results.
The main part of the prototype is the logic for displaying the dots in the correct places. The actual logic for accessibility checking is surprisingly short. For axe-core, it’s basically a one function call:
axeCore.run( view, ( error, results ) => {
results.violations.forEach( displayInfo );
} );
The view variable points to the editor’s view DOM element (the element containing the visible content). Thanks to that, all checks are performed directly on the editor’s content.
The axe library returns an array of CSS selectors to easily find elements that failed accessibility tests. Using this information, we can then get the positions of all noncompliant elements and place a dot next to each of them.
The logic for the HTML_CodeSniffer prototype is quite similar:
HTMLCS.process( 'WCAG2AA', tester, () => {
	const errors = HTMLCS.getMessages().filter( ( { type } ) => type !== 3 );
	errors.forEach( displayInfo );
} );
The additional filter() ensures that we display only actual errors, instead of additional hints like “text shouldn’t be fully justified”. The main difference between the HTML_CodeSniffer and axe solutions is the fact that the former uses a separate element to perform checks while the latter does everything inside the editor itself.
Both prototypes are available on CodePen:
Learn more about CKEditor
Feel free to try these accessibility checker prototypes out for yourself, or use our test page to do your own comparison of automated accessibility testing tools. As always, please contact us to let us know what you find. For more information on CKEditor 5, check our documentation.