Implementing single-file Web Components
Implementing single-file Web Components
Probably everyone who knows the Vue.js framework also heard about its single-file components. This super simple idea allows web developers to define the entire code of a component in one file. It is such a useful solution that an initiative to include this mechanism in browsers has already appeared. However, it seems quite dead as, unfortunately, no progress has been made since August 2017. Nevertheless, looking into this topic and trying to make single-file components work in the browsers using the technologies already available was an interesting experiment to undertake.
Single-file components
Web developers who know the Progressive Enhancement term are also aware of the “separation of layers” mantra. In the case of components, nothing changes. In fact, there are even more layers, as now every component has at least 3 layers: content/template, presentation, and behavior. If you use the most conservative approach, every component will be divided into at least 3 files, e.g. a Button component could look like this:
Button/
|
| -- Button.html
|
| -- Button.css
|
| -- Button.js
In such an approach the separation of layers is equal to the separation of technologies (content/template: HTML, presentation: CSS, behavior: JavaScript). If you do not use any build tool this means that the browser will have to fetch all 3 files. Therefore, an idea appeared to preserve the separation of layers but without the separation of technologies. And thus single-file components were born.
Generally, I am quite skeptical about the “separation of technologies”. It comes from the fact that it is often used as an argument for abandoning the separation of layers — and these two things are actually totally separated.
The Button component as a single file would look like this:
<template>
  <!-- Button.html contents go here. -->
</template>

<style>
  /* Button.css contents go here. */
</style>

<script>
  // Button.js contents go here.
</script>
It is clearly visible that a single-file component is just Good Old HTML™ with internal styles and scripts + the <template> tag. Thanks to the approach that uses the simplest methods, you get a web component that has a strong separation of layers (content/template: <template>, presentation: <style>, behavior: <script>) without the need to create a separate file for every layer.
Yet the most important question remains: How do I use it?
Fundamental concepts
Start by creating a loadComponent() global function that will be used to load the component.
window.loadComponent = ( function() {
  function loadComponent( URL ) {}

  return loadComponent;
}() );
I used the module pattern here. It allows you to define all necessary helper functions but exposes only the loadComponent() function to the outer scope. For now, this function does nothing.
And this is a good thing as you do not have anything to be loaded yet. For the purpose of this article you may want to create a <hello-world> component that will display text:
Hello, world! My name is ``.
Additionally, after a click, the component should display an alert:
Don't touch me!
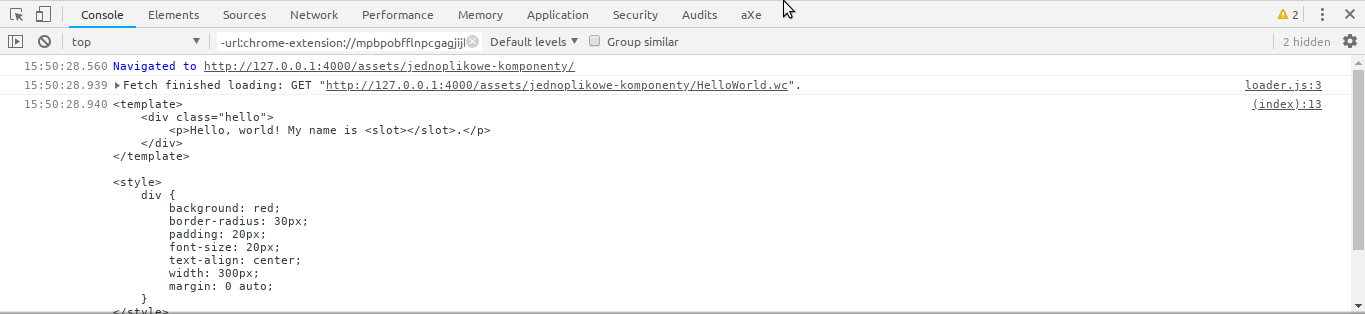
Save the code of the component as the HelloWorld.wc file (.wc stands for Web Component). At the beginning it will look like this:
<template>
  <div class="hello">
    <p>Hello, world! My name is <slot></slot>.</p>
  </div>
</template>

<style>
  div {
    background: red;
    border-radius: 30px;
    padding: 20px;
    font-size: 20px;
    text-align: center;
    width: 300px;
    margin: 0 auto;
  }
</style>

<script></script>
For now, you have not added any behavior for it. You only defined its template and styles. Using the div selector without any restrictions and the appearance of the <slot> element suggest that the component will be using Shadow DOM. And it is true: all styles and the template by default will be hidden in shadows.
The use of the component on the website should be as simple as possible:
<hello-world>Comandeer</hello-world>

<script src="loader.js"></script>
<script>
  loadComponent( 'HelloWorld.wc' );
</script>
You work with the component like with a standard Custom Element. The only difference is the need to load it before using loadComponent() (that is located in the loader.js file). This function does the whole heavy lifting, like fetching the component and registering it via customElements.define().
This sums up all the basic concepts. Time to get dirty!
Basic loader
If you want to load the data from an external file, you need to use immortal Ajax. But since it is already year 2020, you can use Ajax in the form of Fetch API:
function loadComponent( URL ) {
  return fetch( URL );
}
Amazing! However, at the moment you only fetch the file, doing nothing with it. The best option to get its content is to convert the response to text:
function loadComponent( URL ) {
  return fetch( URL ).then( ( response ) => {
    return response.text();
  } );
}
As loadComponent() now returns the result of the fetch() function, it returns Promise. You can use this knowledge to check if the content of the component was really loaded and whether it was converted to text:
loadComponent( 'HelloWorld.wc' ).then( ( component ) => {
  console.log( component );
} );
It works!
Parsing the response
However, the text itself does not fulfill your needs. You were not writing the component in HTML just to do the forbidden. You are in the browser after all — the environment where the DOM was created. Use its power!
There is a nice DOMParser class in browsers that allows you to create a DOM parser. Instantiate it to convert the component into some DOM:
return fetch( URL ).then( ( response ) => {
  return response.text();
} ).then( ( html ) => {
  const parser = new DOMParser(); // 1

  return parser.parseFromString( html, 'text/html' ); // 2
} );
First, you create an instance of the parser (1), then you parse the text content of the component (2). It is worth noting that you use the HTML mode ('text/html'). If you wanted the code to comply better with the JSX standard or original Vue.js components, you would use the XML mode ('text/xml'). However, in such case you would need to change the structure of the component itself (e.g. add the main element which will hold every other one).
If you now check what loadComponent() returns, you will see that it is a complete DOM tree.
And by saying “complete” I mean really complete. You have got a complete HTML document with the <head> and <body> elements.
As you can see, the contents of the component landed inside the <head>. This is caused by the way in which the HTML parser works. The algorithm of building the DOM tree is described in detail in HTML LS specifications. To TL;DR it, you could say that the parser will put everything inside the <head> element until it approaches an element that is allowed only in the <body> context. All elements (<template>, <style>, <script>) used by you, though, are also allowed in <head>. If you added e.g. an empty <p> tag to the beginning of the component, its entire content would be rendered in <body>.
To be honest, the component is treated as an incorrect HTML document, as it does not begin with a DOCTYPE declaration. Because of this, it is rendered using the so-called quirks mode. Fortunately, it does not change anything for you as you use the DOM parser only to slice the component into appropriate parts.
Having the DOM tree, you can get only the parts you need:
return fetch( URL ).then( ( response ) => {
  return response.text();
} ).then( ( html ) => {
  const parser = new DOMParser();
  const document = parser.parseFromString( html, 'text/html' );
  const head = document.head;
  const template = head.querySelector( 'template' );
  const style = head.querySelector( 'style' );
  const script = head.querySelector( 'script' );

  return {
    template,
    style,
    script
  };
} );
Move the whole fetching and parsing code into the first helper function, fetchAndParse():
window.loadComponent = ( function() {
  function fetchAndParse( URL ) {
    return fetch( URL ).then( ( response ) => {
      return response.text();
    } ).then( ( html ) => {
      const parser = new DOMParser();
      const document = parser.parseFromString( html, 'text/html' );
      const head = document.head;
      const template = head.querySelector( 'template' );
      const style = head.querySelector( 'style' );
      const script = head.querySelector( 'script' );

      return {
        template,
        style,
        script
      };
    } );
  }

  function loadComponent( URL ) {
    return fetchAndParse( URL );
  }

  return loadComponent;
}() );
Fetch API is not the only way to get a DOM tree of an external document. XMLHttpRequest has a dedicated document mode that allows you to omit the entire parsing step. However, there is one drawback: XMLHttpRequest does not have a Promise-based API, which you would need to add by yourself.
Registering the component
Since you have all the needed parts available, create the registerComponent() function which will be used to register the new Custom Element:
window.loadComponent = ( function() {
  function fetchAndParse( URL ) {
    […]
  }

  function registerComponent() {

  }

  function loadComponent( URL ) {
    return fetchAndParse( URL ).then( registerComponent );
  }

  return loadComponent;
}() );
Just as a reminder: Custom Element must be a class inheriting from HTMLElement. Additionally, every component will use Shadow DOM that will store styles and template content. This means that every component will use the same class. Create it now:
function registerComponent( { template, style, script } ) {
  class UnityComponent extends HTMLElement {
    connectedCallback() {
      this._upcast();
    }

    _upcast() {
      const shadow = this.attachShadow( { mode: 'open' } );

      shadow.appendChild( style.cloneNode( true ) );
      shadow.appendChild( document.importNode( template.content, true ) );
    }
  }
}
You should create it inside registerComponent() as the class will use the information that will be passed to the mentioned function. The class will use a slightly modified mechanism for attaching Shadow DOM that I described in an article about declarative Shadow DOM (in Polish).
There is only one thing left connected with registering the component: giving it a name and adding to the collection of the current page’s components:
function registerComponent( { template, style, script } ) {
class UnityComponent extends HTMLElement {
[...]
}
return customElements.define( 'hello-world', UnityComponent );
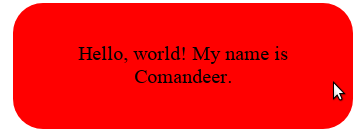
}If you try to use the component now, it should work:
Fetching the script’s content
The simple part is done. Now it is time for something really hard: adding the layer of behavior and… a dynamic name for the component. In the previous step you hardcoded the component’s name, however, it should be delivered from the single-file component. In the same way, you should deliver information about event listeners that you want to bind to the Custom Element. Use the convention based on the one from Vue.js:
<template>
  […]
</template>

<style>
  […]
</style>

<script>
  export default { // 1
    name: 'hello-world', // 2
    onClick() { // 3
      alert( `Don't touch me!` );
    }
  }
</script>
You can assume that the <script> inside the component is a module, so it can export something (1). That export is an object containing the component’s name (2) and event listeners hidden behind methods with a name starting with on... (3).
It looks nice and nothing leaks outside (as modules do not exist in the global scope). Yet there is a problem: there is no standard for handling exports from internal modules (so the ones whose code is directly inside the HTML document). The import statement assumes that it gets a module identifier. Most often it is a URL to the file containing the code. In the case of internal modules, there is no such identifier.
But before you surrender, you can use a super dirty hack. There are at least two ways to force the browser to treat a given text as a file: Data URI and Object URI.
Stack Overflow also suggests the Service Worker. However, in this case, it looks like an overkill.
Data URI and Object URI
Data URI is an older and more primitive approach. It is based on converting the file content into a URL by trimming unnecessary whitespace and then, optionally, encoding everything using Base64. Assuming that you have such a simple JavaScript file:
export default true;It would look like this as Data URI:
data:application/javascript;base64,ZXhwb3J0IGRlZmF1bHQgdHJ1ZTs=You can use this URL just like a reference to a normal file:
import test from 'data:application/javascript;base64,ZXhwb3J0IGRlZmF1bHQgdHJ1ZTs=';

console.log( test );
However, the biggest drawback of Data URI becomes visible quite fast: as the JavaScript file is getting bigger, the URL becomes longer. It is also quite hard to put binary data into Data URI in a sensible way.
This is why Object URI was created. It is a descendant of several standards, including File API and HTML5 with its <video> and <audio> tags. The purpose of Object URI is simple: create a false file from the given binary data, which will get a unique URL working only in the context of the current page. To put it simpler: create a file in memory with a unique name. This way you get all advantages of Data URIs (a simple way to create a new “file”) without its drawbacks (you will not end up with a 100 MB string in your code).
Object URIs are often created from multimedia streams (e.g. in the <video> or <audio> context) or files sent via input[type=file] and the drag&drop mechanism. You can also create such files by hand, using the File and Blob classes. In this case use the Blob class, where you will put the contents of the module, and then convert it into Object URI:
const myJSFile = new Blob( [ 'export default true;' ], { type: 'application/javascript' } );
const myJSURL = URL.createObjectURL( myJSFile );

console.log( myJSURL ); // blob:https://blog.comandeer.pl/8e8fbd73-5505-470d-a797-dfb06ca71333Dynamic import
There is one more issue, though: the import statement does not accept a variable as a module identifier. This means that apart from using the method to convert the module into a “file”, you will not be able to import it. So defeat after all?
Not exactly. This issue was noticed long ago and the dynamic import proposal was created. It is a part of the ES2020 standard and it is already implemented in Chrome, Firefox, Safari, and Node.js 13.x. Using a variable as a module identifier alongside a dynamic import is no longer an issue:
const myJSFile = new Blob( [ 'export default true;' ], { type: 'application/javascript' } );
const myJSURL = URL.createObjectURL( myJSFile );

import( myJSURL ).then( ( module ) => {
  console.log( module.default ); // true
} );
As you can see, import() is used like a function and it returns Promise, which gets an object representing the module. It contains all declared exports, with the default export under the default key.
Implementation
You already know what you have to do, so you just need to do it. Add the next helper function, getSettings(). You will fire it before registerComponents() and get all necessary information from the script:
function getSettings( { template, style, script } ) {
  return {
    template,
    style,
    script
  };
}

[...]

function loadComponent( URL ) {
  return fetchAndParse( URL ).then( getSettings ).then( registerComponent );
}
For now, this function just returns all passed arguments. Add the entire logic that was described above. First, convert the script into an Object URI:
const jsFile = new Blob( [ script.textContent ], { type: 'application/javascript' } );
const jsURL = URL.createObjectURL( jsFile );
Next, load it via import and return the template, styles and component’s name received from <script>:
return import( jsURL ).then( ( module ) => {
  return {
    name: module.default.name,
    template,
    style
  }
} );
Thanks to this, registerComponent() still gets 3 parameters, but instead of script it now gets name. Correct the code:
function registerComponent( { template, style, name } ) {
  class UnityComponent extends HTMLElement {
    [...]
  }

  return customElements.define( name, UnityComponent );
}
Voilà!
Layer of behavior
There is one part of the component left: behavior, so handling events. At the moment you only get the component’s name in the getSettings() function, but you should also get event listeners. You can use the Object.entries() method for that. Return to getSettings() and add appropriate code:
function getSettings( { template, style, script } ) {
  [...]

  function getListeners( settings ) { // 1
    const listeners = {};

    Object.entries( settings ).forEach( ( [ setting, value ] ) => { // 3
      if ( setting.startsWith( 'on' ) ) { // 4
        listeners[ setting[ 2 ].toLowerCase() + setting.substr( 3 ) ] = value; // 5
      }
    } );

    return listeners;
  }

  return import( jsURL ).then( ( module ) => {
    const listeners = getListeners( module.default ); // 2

    return {
      name: module.default.name,
      listeners, // 6
      template,
      style
    }
  } );
}
The function became complicated. The new helper function, getListeners() (1), appeared inside it. You pass the module’s export to it (2).
Then you iterate through all properties of this export using Object.entries() (3). If the name of the current property begins with on... (4), you add the value of this property to the listeners object, under the key equal to setting[ 2 ].toLowerCase() + setting.substr( 3 ) (5).
The key is computed by trimming the on prefix and switching the first letter after it to a small one (so you will get click from onClick). You pass the listeners object further (6).
Instead of [].forEach() you can use [].reduce(), which will eliminate the listeners variable:
function getListeners( settings ) {
  return Object.entries( settings ).reduce( ( listeners, [ setting, value ] ) => {
    if ( setting.startsWith( 'on' ) ) {
      listeners[ setting[ 2 ].toLowerCase() + setting.substr( 3 ) ] = value;
    }

    return listeners;
  }, {} );
}
Now you can bind the listeners inside the component’s class:
function registerComponent( { template, style, name, listeners } ) { // 1
  class UnityComponent extends HTMLElement {
    connectedCallback() {
      this._upcast();
      this._attachListeners(); // 2
    }

    [...]

    _attachListeners() {
      Object.entries( listeners ).forEach( ( [ event, listener ] ) => { // 3
        this.addEventListener( event, listener, false ); // 4
      } );
    }
  }

  return customElements.define( name, UnityComponent );
}
There is a new parameter in destructuring, listeners (1), and a new method in the class, _attachListeners() (2). You can use Object.entries() once more — this time to iterate through listeners (3) and bind them to the element (4).
After this the component should react to click:
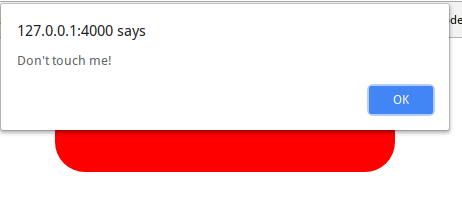
And this is how you can implement single-file Web Components 🎉!
Browser compatibility and the rest of the summary
As you can see, a lot of work went into creating even a basic form of support for single-file web components. Many parts of the described system are created using dirty hacks (Object URIs for loading ES modules — FTW!) and the technique itself seems to have little sense without native support from the browsers. However, the entire magic from the article works correctly in all major browsers: Chrome, Firefox, and Safari!
Still, creating something like this was great fun. It was something different that touched many areas of the browser development and modern web standards.
Of course, the whole thing is available online.
See other How to articles: