Token endpoint
To connect CKEditor 5 or CKEditor 4 with CKEditor Cloud Services, you need to create your own token endpoint. This guide will explain a few principles that you need to know to create it.
To authenticate users, CKEditor Cloud Services uses tokens. The purpose of tokens is to inform the cloud services that the user has access to resources and to which environment the user should connect to. The authenticity of tokens is provided by a digital signature.
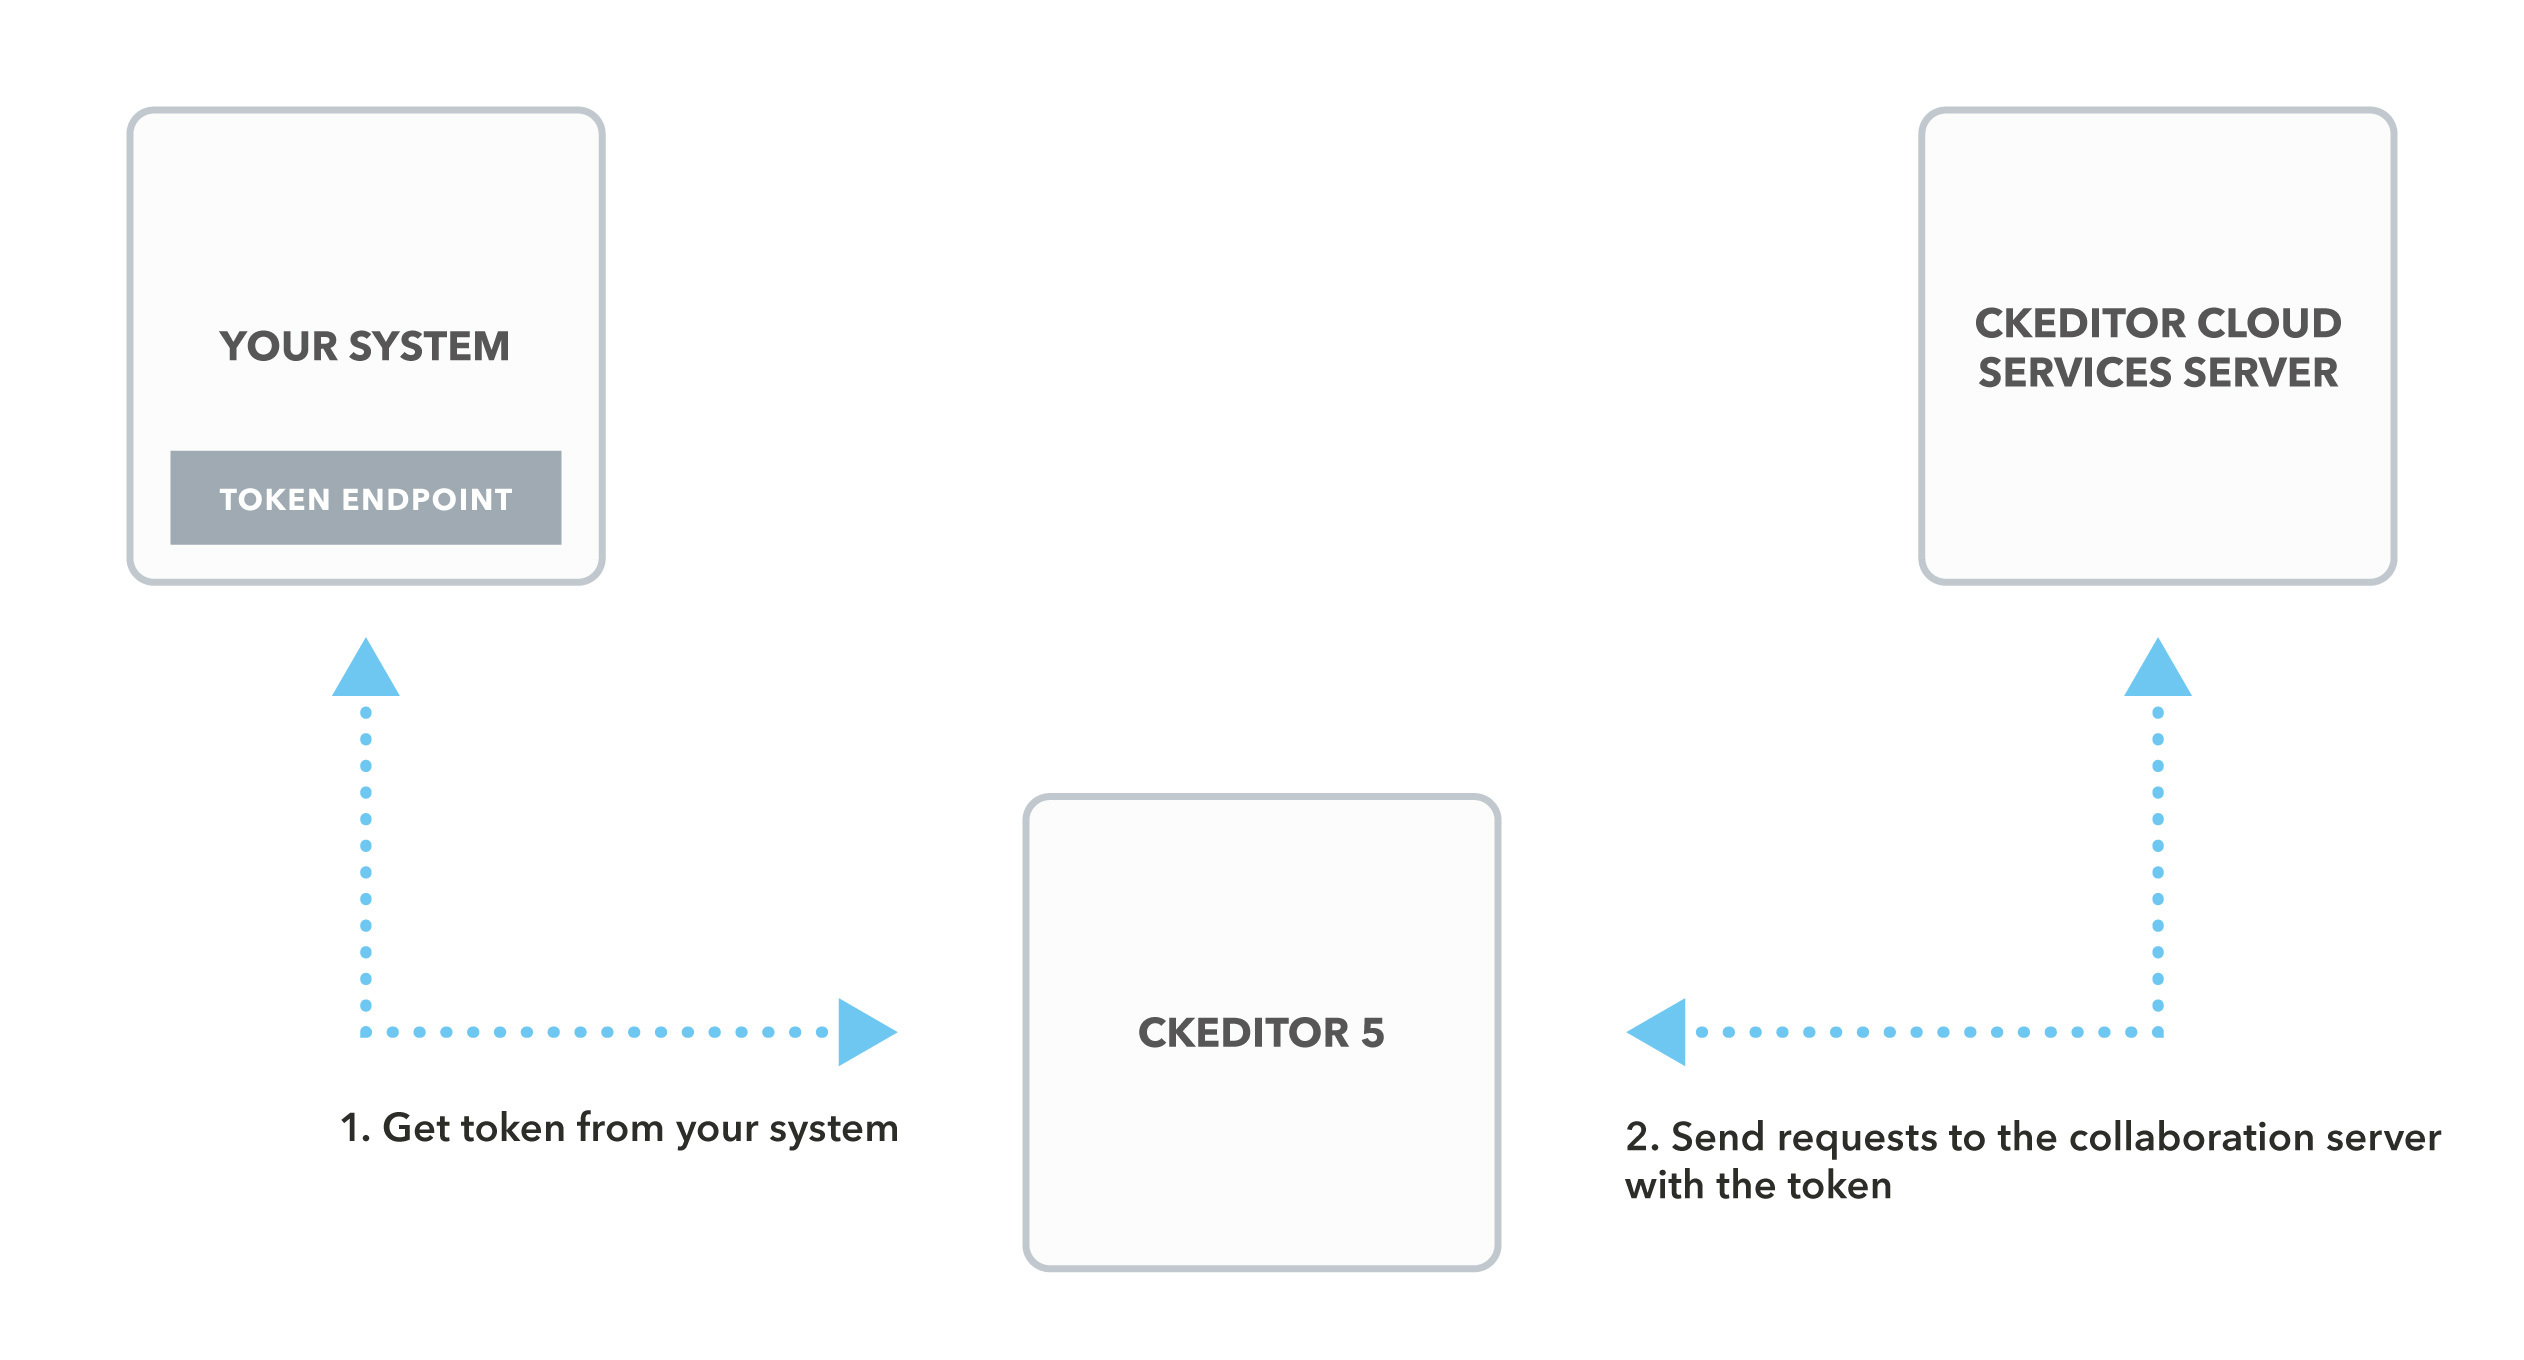
The token endpoint is where the client using CKEditor makes a request to get the token. It should return the token only if the user proves their identity.
The token endpoint should be placed inside of your system.
CKEditor Cloud Services tokens are represented as JSON Web Tokens (JWT). JWT is an open standard for transmitting digitally signed information. Using it ensures that the data comes from a trusted source.
The tokens consist of three parts:
- header
- payload
- signature
Each part is encoded in base64url and separated by periods:
header.payload.signature
An example token can look like this:
eyJhbGciOiJIUzI1NiIsInR5cCI6IkpXVCJ9.eyJ1c2VyIjoiSm9obiJ9.3MOd-0xmppWAX_86vMPjQ0PTKAniCtr762UTM5WuGa8
The header indicates that it is a JWT and defines the hashing algorithm for calculating the signature. It is simply a JSON object with the typ and alg properties, where typ always contains the JWT value and alg contains the name of the algorithm used.
The payload is a JSON object with the claims. In CKEditor Cloud Services it is mostly used for specifying the environment, user data and permissions.
The JWT standard specifies some predefined claims like aud (audience), exp (expiration time), sub (subject) or iat (issued at). In CKEditor Cloud Services we use aud for identifying environments, iat for checking if the token has not expired and sub for identifying users.
Unlike the header and the payload, the signature is not a JSON object but instead raw bytes produced by the cryptographic algorithm.
The signature is calculated for the header merged with the payload. It enables the authentication of data and verification that the token has not been tampered with:
signature = HMACSHA256(
    base64UrlEncode(header) + "." + base64UrlEncode(payload),
    secret
)
CKEditor Cloud Services supports signatures created by the HS256, HS384 and HS512 algorithms.
Never disclose the secret key because it will allow to forge tokens.
The token for the CKEditor Cloud Services should specify the Environment ID as the aud property and it needs to be signed with the Access key. Both can be found in the Customer Portal for SaaS or in the Management Panel for On-Premises - refer to the documentation for environments management. Optionally, the token can contain the user data. Otherwise CKEditor Cloud Services will treat the user as an anonymous user.
If the user is not anonymous, the payload should contain the sub claim, which identifies the user. You can also put a user object to define other properties like name, email or avatar. In the case of an anonymous user, a random user ID will be generated.
The user identifier should be unique within the environment scope, so you should not use the same Environment ID in two applications because it can cause user ID collisions.
While using CKEditor Cloud Services in the SaaS variant, you will be billed for every unique user. Customers who use the On-Premises variant of the CKEditor Collaboration Server are limited by the number of unique connected users.
A unique user is counted based on a unique pair of the aud(environment ID) and sub(user ID) properties from the token. In the case of an anonymous user, every user will be billed separately as a random user ID will be assigned.
To limit the billing, ensure that, for every real user, you always use the same, unique sub(user ID) to generate the token. For testing the token endpoint, we suggest creating a constant, limited list of the example users. It will help you to avoid unnecessary payments. During the development of your application, you can use a free, limited development token endpoint with 10 free users.
The following properties must be included in the payload:
aud– The environment ID.iat– “Issued at”. Make sure thatiatis present and contains a correct time stated in seconds. Some JWT implementations do not include it by default. Sometimes the system time may also be invalid, causing weird issues with tokens (see e.g. Docker for Mac time drift).auth– Permissions for the services being used. If you plan to use collaboration, theauth.collaborationroles are required. If you plan to use CKEditor AI, theauth.ai.permissionsarray is required. If you just use Export to Word/PDF, you may skip it.
The properties that are optional:
sub– The user ID.user– User information. Providingnameandemailis recommended.exp– Token expiration time. Identifies the expiration time after which the JWT will not be accepted. Cloud Services only accept tokens no older than 24 hours. This field can be used to shorten the token validity time.
To define permissions to resources, the token payload should include the auth object with specified user roles and/or permissions.
{
    "auth": {
        "collaboration": {
            "doc-1": {
                "role": "writer"
            },
            "doc-2": {
                "role": "commentator",
                "permissions": [
                    "comment:admin"
                ]
            },
            "doc-3": {
                "permissions": [
                    "document:read",
                    "document:write",
                    "comment:read"
                ]
            }
        }
    }
}
More information about roles can be found in the Roles guide.
To control access to CKEditor AI features, the token payload should include the auth.ai.permissions array. Each permission follows the format ai:<permission-type>:<permission-value>.
{
    "auth": {
        "ai": {
            "permissions": [
                "ai:conversations:*",
                "ai:models:agent",
                "ai:actions:system:*",
                "ai:reviews:system:*"
            ]
        }
    }
}
For a full list of available AI permissions (model access, feature restrictions, context controls, and more), see the CKEditor AI Permissions guide.
The example below presents a complete token payload with access to editing all documents in the environment:
{
    "aud": "NQoFK1NLVelFWOBQtQ8A",
    "iat": 1511963669,
    "sub": "exampleuser",
    "user": {
        "email": "example@cksource.com",
        "name": "A User",
        "avatar": "http://example.com/avatars/john.png"
    },
    "auth": {
        "collaboration": {
            "*": {
                "role": "writer"
            }
        }
    }
}
The example below presents a token payload granting access to AI conversations, actions, and reviews with the recommended agent model:
{
    "aud": "NQoFK1NLVelFWOBQtQ8A",
    "iat": 1511963669,
    "sub": "exampleuser",
    "auth": {
        "ai": {
            "permissions": [
                "ai:conversations:*",
                "ai:models:agent",
                "ai:actions:system:*",
                "ai:reviews:system:*"
            ]
        }
    }
}
When using both collaboration and AI features together, include both auth.collaboration and auth.ai in the same token:
{
    "aud": "NQoFK1NLVelFWOBQtQ8A",
    "iat": 1511963669,
    "sub": "exampleuser",
    "user": {
        "email": "example@cksource.com",
        "name": "A User"
    },
    "auth": {
        "collaboration": {
            "*": {
                "role": "writer"
            }
        },
        "ai": {
            "permissions": [
                "ai:conversations:*",
                "ai:models:agent",
                "ai:actions:system:*",
                "ai:reviews:system:*"
            ]
        }
    }
}
The token for CKEditor Cloud Services is requested by the CKEditor 5 real-time collaborative editing.
The easiest way to request the token endpoint is to set the config.cloudServices.tokenUrl option to the endpoint. It will be requested from the editor by the Cloud Services plugin with a simple HTTP request at the initialization stage and then after every hour.
ClassicEditor.create( {
    // ...
    cloudServices: {
        tokenUrl: 'https://example.com/cs-token-endpoint'
    }
} );
If you need more control over the request, refer to the Customizing the token request method section below.
The easiest way to request the token endpoint is to set the cloudServices_tokenUrl option to the endpoint. It will be requested from the editor with a simple HTTP request at the initialization stage and then again every hour.
CKEDITOR.replace( 'editor', {
    cloudServices_tokenUrl: 'https://example.com/cs-token-endpoint',
} );
You can find more information about the integration with CKEditor 4 in the Easy Image Integration guide.
If you would like to change the default method of requesting the token from the server (described in the previous section), you can set the config.cloudServices.tokenUrl option to a callback. This callback will be used by the Cloud Services plugin to retrieve the token. It allows specifying exact HTTP request parameters for the token endpoint that should return the token value. The callback needs to return a promise that will be resolved with the token value or rejected with an error.
Note that the editor will not be ready to use until the first token is obtained from the token endpoint. If an error occurs during the initial request, the editor will not start correctly.
An example below presents setting a custom callback to the tokenUrl configuration that adds a custom header to the request:
const tokenUrl = 'https://example.com/cs-token-endpoint';

ClassicEditor.create( {
    // ...
    cloudServices: {
        tokenUrl: () => {
            return new Promise( ( resolve, reject ) => {
                const xhr = new XMLHttpRequest();

                xhr.open( 'GET', tokenUrl );

                xhr.addEventListener( 'load', () => {
                    const statusCode = xhr.status;
                    const xhrResponse = xhr.response;

                    if ( statusCode < 200 || statusCode > 299 ) {
                        return reject( new Error( 'Cannot download a new token!' ) );
                    }

                    return resolve( xhrResponse );
                } );

                xhr.addEventListener( 'error', () => reject( new Error( 'Network error' ) ) );
                xhr.addEventListener( 'abort', () => reject( new Error( 'Abort' ) ) );

                xhr.setRequestHeader( customHeader, customValue );

                xhr.send();
            } );
        }
    }
} );
The current token value is accessible via the CloudServices plugin.
const cloudServices = editor.plugins.get( 'CloudServices' );
const tokenValue = cloudServices.token.value;
The endpoint should respond with a generated token in the form of a string.
An example response might look like this:
eyJhbGciOiJIUzI1NiIsInR5cCI6IkpXVCJ9.eyJ1c2VyIjoiSm9obiJ9.3MOd-0xmppWAX_86vMPjQ0PTKAniCtr762UTM5WuGa8
We highly recommend using the libraries listed on jwt.io to create the token. You can also check our token endpoint implementation examples in the following languages:
If you encounter problems creating the token endpoint in another server-side language, or if you have any other suggestions regarding the documentation, please contact us.
CKEditorError: cloud-services-internal-error: Invalid token. Error Trace id: <TRACE ID>. Read more: <https://ckeditor.com/docs/ckeditor5/latest/framework/guides/support/error-codes.html#error-cloud-services-internal-error> {"errors":[]}
Check if the token was created in accordance with our standards. You can also refer to our token endpoint examples.
Please also ensure that you are using a correct and valid access key which is assigned to the right environment.
You can validate the token using the jwt.io debugger.
CKEditorError: cloud-services-internal-error: You don't have enough permissions to access this resource. Error Trace id: <TRACE ID>. Read more: <https://ckeditor.com/docs/ckeditor5/latest/framework/guides/support/error-codes.html#error-cloud-services-internal-error> {"errors":[]}
Please ensure that your token endpoint includes the right roles for the requested resource.
You can read more about the role mechanism in the Roles guide.