
 AI Assistant
AI Assistant provides a way to boost your editing efficiency and creativity through the use of AI powers. Users can generate new content and process the data using custom queries, or choose an action from the predefined list of commands, which you can also configure to your liking.
This is a premium feature, and you need a license for it on top of your CKEditor 5 commercial license. Contact us to receive an offer tailored to your needs.
You can also sign up for the CKEditor Premium Features 30-day free trial to test the feature.
# Demo
-
Select some content and press the “AI Commands” button
 in the toolbar to get access to the most common tasks such as “Improve writing” or “Summarize.”
 -
Press the “AI Assistant” button
 and provide your own query for the AI. Here are a few ideas you might try:
- ”Write a detailed guide for one-day walking tour of Barcelona.”
- ”List the top 5 keywords related to traveling.”
- Select the table in the content below, then ask: “Fill empty cells with correct values.”
The three greatest things you learn from traveling

Like all the great things on earth traveling teaches us by example. Here are some of the most precious lessons I’ve learned over the years of traveling.
The real voyage of discovery consists not in seeking new landscapes, but having new eyes.
Marcel Proust
Appreciation of diversity
Getting used to an entirely different culture can be challenging. While it’s also nice to learn about cultures online or from books, nothing comes close to experiencing cultural diversity in person. You learn to appreciate each and every single one of the differences while you become more culturally fluid.
Top five cities to visit next year
| City | Country | Currency | Top places to visit |
|---|---|---|---|
| New York | United States | ||
| Paris | France | ||
| Tokyo | Japan | ||
| Rome | Italy | ||
| Sydney | Australia |
Improvisation
Here’s how my travel checklist looks now:
- buy a ticket
- pack the backpack
- put on a big smile
- start the adventure
Life doesn't allow us to execute every single plan perfectly. This especially seems to be the case when you travel. You plan it down to every minute with a big checklist. But when it comes to executing it, something always comes up and you’re left with your improvising skills. You learn to adapt as you go.
This demo only presents a limited set of features. Visit the feature-rich editor example to see more in action.
# Installation
This feature relies on an external service to provide AI-generated responses. Set up an account on OpenAI platform to use it. Integration details are described later on in this guide.
This feature is enabled by default in the superbuild only.
To add the AI Assistant feature to your editor, install the @ckeditor/ckeditor5-ai package:
npm install --save @ckeditor/ckeditor5-ai
Then, add the AIAssistant plugin to your plugin list and configure it:
import { AIAssistant } from '@ckeditor/ckeditor5-ai';

ClassicEditor
    .create( document.querySelector( '#editor' ), {
        // Load the plugin.
        plugins: [ AIAssistant, /* ... */ ],

        // Provide activation key (see explanation below)
        licenseKey: 'your-license-key',

        // Display the "AI commands" and "AI Assistant" buttons in the toolbar.
        toolbar: [ 'aiCommands', 'aiAssistant', /* ... */ ],

        // AI Assistant feature configuration.
        aiAssistant: {
            apiUrl: '...',
            // ⚠️⚠️⚠️ Use your API key ONLY in a development environment or for testing purposes! ⚠️⚠️⚠️
            // In the production environment, pass your request through a proxy. Follow the guide to learn more.
            authKey: '...',
            // ...
        }
    } )
    .then( /* ... */ )
    .catch( /* ... */ );
Read more about installing plugins and toolbar configuration.
# Activating the feature
In order to use this premium feature, you need to activate it with proper credentials. Please refer to the License key and activation guide for details.
# UI colors (color coding)
The distinctive violet tint used in the AI Assistant’s user interface was chosen to distinguish it from other (non–AI) features within the CKEditor 5 ecosystem. This use of color coding enhances user experience and provides clear visual cues. Thanks to this, users should be able to tell which actions are AI-powered and what results can be expected.
All future AI–driven functionalities in CKEditor 5 that may be introduced will also use this color coding approach. This includes possible smaller AI-related integrations in existing features.
Please note that the violet tint can be removed or customized to meet the needs of your integration.
# Configuration
For more technical details, check the plugin configuration reference.
# Supported AI services
This feature relies on an external service to provide AI-generated responses.
# OpenAI
AI Assistant supports integration with OpenAI platform. To integrate with the feature, you will need to create an OpenAI account and use your OpenAI API key.
For development purposes, you can pass the OpenAI API key straight in the editor configuration.
For the production environment, you will need to implement a proxy service that will pass requests to the OpenAI API.
# Azure OpenAI Service
The feature also allows to integrate with the Azure OpenAI Service. Here is how to set it up:
- Create and configure an instance of OpenAI Service on the Azure platform, and gather the necessary API credentials.
- Implement a proxy service that will pass the AI requests from the editor to the Azure endpoint.
- The proxy service should add appropriate authorization header to the request (as described in Azure OpenAI Service documentation) before passing the request to Azure service.
- Set
config.aiAssistant.apiUrlto point to your proxy service endpoint.
Note that we only support models based on OpenAI.
Support for other AI services or proprietary AI models is planned to be introduced in the future.
Let us know if you are interested in integrating with a particular AI service or an own AI model.
# Integration with AI services
# Development setup
In following sections, we describe integration with the OpenAI service. Your integration may vary if you use a different AI service.
To quickly test the feature, all you need to do is provide the OpenAI API key in the editor configuration.
Use your OpenAI API key ONLY in a development environment for testing purposes!️
In the production environment, pass your request through a proxy.
ClassicEditor
    .create( document.querySelector( '#editor' ), {
        // Load the plugin.
        plugins: [ AIAssistant, /* ... */ ],

        // Provide activation key (see explanation below)
        licenseKey: 'your-license-key',

        // Display the "AI commands" and "AI Assistant" buttons in the toolbar.
        toolbar: [ 'aiCommands', 'aiAssistant', /* ... */ ],

        // AI Assistant feature configuration.
        aiAssistant: {
            // ⚠️⚠️⚠️ Use your API key ONLY in a development environment or for testing purposes! ⚠️⚠️⚠️
            // In the production environment, pass your request through a proxy. Follow the guide to learn more.
            authKey: 'Paste your personal OpenAI API key here',
        }
    } )
    .then( /* ... */ )
    .catch( /* ... */ );
# Using proxy endpoint
Providing an OpenAI API key directly in the editor configuration is a critical security issue. Thus, in the production environment of your application, it is strongly recommended to use a proxy endpoint.
The role of the proxy endpoint is to accept a request, add the API key to it, and then pass the request to the OpenAI API endpoint. When OpenAI API responds, the proxy should pass the response back. This way the API key remains hidden from the end user. Creating a proxy will also enable you to set up additional policies (e.g. related to usage limits).

When your proxy endpoint is ready, provide its URL in the editor configuration:
ClassicEditor
    .create( document.querySelector( '#editor' ), {
        // Load the plugin.
        plugins: [ AIAssistant, /* ... */ ],

        // Provide activation key (see explanation below)
        licenseKey: 'your-license-key',

        // Display the "AI commands" and "AI Assistant" buttons in the toolbar.
        toolbar: [ 'aiCommands', 'aiAssistant', /* ... */ ],

        // AI Assistant feature configuration.
        aiAssistant: {
            // Provide the URL to the OpenAI proxy endpoint in your application.
            apiUrl: 'http://url-to-your-openai-proxy-endpoint/'
        }
    } )
    .then( /* ... */ )
    .catch( /* ... */ );
# Using JWT authorization
AI Assistant supports authorizing API requests through the use of JSON Web Tokens (JWT).
Set the config.aiAssistant.authKey property to a function that will query the authorization API and return a JWT:
ClassicEditor
    .create( document.querySelector( '#editor' ), {
        // Load the plugin.
        plugins: [ AIAssistant, /* ... */ ],

        // Provide activation key (see explanation below)
        licenseKey: 'your-license-key',

        // Display the "AI commands" and "AI Assistant" buttons in the toolbar.
        toolbar: [ 'aiCommands', 'aiAssistant', /* ... */ ],

        // AI Assistant feature configuration.
        aiAssistant: {
            // Provide the URL to the OpenAI proxy endpoint in your application.
            apiUrl: 'http://url-to-your-openai-proxy-endpoint/',
            authKey: async () => {
                // Perform an authorization request and return a string with a JWT.
                return await fetch( 'http://url-to-your-auth-endpoint/' );
            }
        }
    } )
    .then( /* ... */ )
    .catch( /* ... */ );
# Adding AI commands to the list
The “AI Commands” button ![]() allows quick access to the most common AI Assistant commands. You can extend the default list of commands or define your own list.
allows quick access to the most common AI Assistant commands. You can extend the default list of commands or define your own list.
Use the config.aiAssistant.extraCommandGroups configuration option to extend the default list of commands:
ClassicEditor
    .create( document.querySelector( '#editor' ), {
        // Other editor configurations...

        // AI Assistant feature configuration.
        aiAssistant: {
            // ⚠️⚠️⚠️ Use your API key ONLY in a development environment or for testing purposes! ⚠️⚠️⚠️
            // In the production environment, pass your request through a proxy. Follow the guide to learn more.
            authKey: 'Paste your personal OpenAI API key here',

            // Extend the default commands configuration.
            extraCommandGroups: [
                // Add a command to an existing group:
                {
                    groupId: 'translate',
                    commands: [
                        {
                            id: 'translatePolish',
                            label: 'Translate to Polish',
                            prompt: 'Translate to Polish language.'
                        }
                    ]
                },
                // Create a new AI commands group:
                {
                    groupId: 'transformations',
                    groupLabel: 'Transformations',
                    commands: [
                        {
                            id: 'addEmojis',
                            label: 'Add emojis',
                            prompt: 'Analyze each sentence of this text. After each sentence add emoji that summarizes the sentence.'
                        },
                        // ...
                    ]
                },
            ]
        }
    } )
    .then( /* ... */ )
    .catch( /* ... */ );
Use the config.aiAssistant.commands configuration option to create the list of commands from scratch:
ClassicEditor
    .create( document.querySelector( '#editor' ), {
        // Other editor configurations...

        // AI Assistant feature configuration.
        aiAssistant: {
            // ⚠️⚠️⚠️ Use your API key ONLY in a development environment or for testing purposes! ⚠️⚠️⚠️
            // In the production environment, pass your request through a proxy. Follow the guide to learn more.
            authKey: 'Paste your personal OpenAI API key here',

            // Define the commands list from scratch.
            commands: [
                // Command groups keep them organized on the list.
                {
                    groupId: 'customGroupId',
                    groupLabel: 'My group of commands',
                    commands: [
                        {
                            id: 'translateSpanish',
                            label: 'Translate to Spanish',
                            prompt: 'Translate this text to Spanish.'
                        },
                        {
                            id: 'explainFive',
                            label: 'Explain like I\'m five',
                            prompt: 'Explain this like I\'m five years old.'
                        },
                        // ...
                    ]
                },
                // You can add more command groups here.
            ]
        }
    } )
    .then( /* ... */ )
    .catch( /* ... */ );
# Removing default commands from the list
You can use the config.aiAssistant.removeCommands configuration to remove some of the default commands from the list:
ClassicEditor
    .create( document.querySelector( '#editor' ), {
        // Other editor configurations...

        // AI Assistant feature configuration.
        aiAssistant: {
            // ⚠️⚠️⚠️ Use your API key ONLY in a development environment or for testing purposes! ⚠️⚠️⚠️
            // In the production environment, pass your request through a proxy. Follow the guide to learn more.
            authKey: 'Paste your personal OpenAI API key here',

            // Remove some of the default commands.
            removeCommands: [
                'improveWriting',

                // ...
            ]
        }
    } )
    .then( /* ... */ )
    .catch( /* ... */ );
# Data filtering in responses
The AI response will only incorporate HTML elements and features that are compatible with the editor. For instance, if an AI Assistant response contains <b>Bold text</b>, your editor needs the Bold plugin to be loaded to preserve it.
See the overview of the plugins’ HTML output to learn which features you need. You can also use the General HTML Support feature to insert custom HTML into the content.
# Query history
The AI Assistant’s custom query field has a dedicated history button ![]() that gives you access to your previous queries. It displays the last 20 queries and makes it possible to reuse and improve recent queries. The history is stored in the browser’s session storage. The session storage is separate for each browser tab and is cleared when the tab is closed.
that gives you access to your previous queries. It displays the last 20 queries and makes it possible to reuse and improve recent queries. The history is stored in the browser’s session storage. The session storage is separate for each browser tab and is cleared when the tab is closed.
A user can also manually clear the query history by clicking the “Clear” button in the history dropdown.
# UI customization
# Removing the violet tint from the UI
By default, some parts of the UI come with a violet tint that distinguishes the AI Assistant from the rest of CKEditor 5 features. If you do not want this styling in your integration, you can disable it by setting the config.aiAssistant.useTheme configuration to false:
ClassicEditor
    .create( document.querySelector( '#editor' ), {
        // Other editor configurations...

        // AI Assistant feature configuration.
        aiAssistant: {
            // Disable the default feature's theme.
            useTheme: false
        }
    } )
    .then( /* ... */ )
    .catch( /* ... */ );
The AI Assistant in this editor shares colors with the rest of the UI.
# Using custom colors for the UI
You can customize the looks of the AI Assistant UI by using CSS custom properties. Below is the full list of CSS variables that need to be set.
For instance, you can use the following CSS snippet, to change the tint color to red:
.ck-ai-assistant-ui.ck-ai-assistant-ui_theme {
    --ck-color-button-default-hover-background: hsl(0, 100%, 96%);
    --ck-color-button-default-active-background: hsl(0,100%,96.3%);
    --ck-color-button-on-background: hsl(0,100%,96.3%);
    --ck-color-button-on-hover-background: hsl(0,60%,92.2%);
    --ck-color-button-on-active-background: hsl(0,100%,96.3%);
    --ck-color-button-on-disabled-background: hsl(0,100%,96.3%);
    --ck-color-button-on-color: hsl(0,59.2%,52%);
    --ck-color-button-action-background: hsl(0,59.2%,52%);
    --ck-color-button-action-hover-background: hsl(0,58.9%,49.6%);
    --ck-color-button-action-active-background: hsl(0,58.9%,49.6%);
    --ck-color-button-action-disabled-background: hsl(0,59.3%,75.9%);
    --ck-color-list-button-hover-background: hsl(0,100%,96.3%);
}
The AI Assistant UI in this editor uses a configured red color.
Please keep in mind that if you set config.aiAssistant.useTheme to false and disable the default color theme, the .ck-ai-assistant-ui_theme class will no longer be available. You can still apply custom styles via .ck-ai-assistant-ui CSS class that stays regardless of configuration, though.
# Changing the size of the pop-up
Use the following CSS snippet to widen the AI Assistant pop-up balloon:
.ck.ck-ai-form {
    --ck-ai-form-view-width: 800px;
}
# Styling the AI response content area
By default, the AI Assistant’s response content area comes with the .ck-content CSS class. This makes it possible for the users to see the response styled in the same way as the main editor content (learn more about it in the Content styles guide).
However, if your integration uses custom styles outside the .ck-content class scope, and you want them to be applied in the Assistant’s response content area, you can use config.aiAssistant.contentAreaCssClass and specify additional class name (or names) for the element.
Please keep in mind that styling the AI Assistant’s response content area is also possible via .ck.ck-ai-form .ck.ck-ai-form__content-field selector:
.ck.ck-ai-form .ck.ck-ai-form__content-field h2 {
    /* Custom h2 styles. */
}
# Known issues and caveats
Integration with some features
The AI Assistant feature will be disabled if the current selection contains one of the following elements: media embed, HTML embed, or table of contents.
You can overwrite the list of disabled features by changing config.aiAssistant.disabledElements config property.
Comments and suggestions
Markers are not preserved when the selected content is processed by the AI model. That means that all comments and suggestions will be removed in the AI response.
Broken images in the responses
The AI model, if asked directly, may return image elements linking to non-existing images, which will appear broken in the response and in the editor content after being inserted.
Integration with custom features
Due to the nature of the technology behind this feature, you may get unexpected results when processing content that includes custom features that you have developed.
The AI model will try to process the HTML data according to how it was trained. However, if your feature creates a complex HTML structure or custom HTML tags, there is a higher chance that these will not be correctly processed.
If you experience problems with your custom features, you might disable AI Assistant when they are selected by changing config.aiAssistant.disabledElements config property.
# Related features
Here are some more CKEditor 5 features that can help you boost productivity:
- Automatic text transformations – Automatically change predefined text fragments into their improved forms
- The productivity pack – A set of exclusive premium features for the CKEditor 5 WYSIWYG editor, that make editing faster, easier, and more efficient.
# Common API
The AIAssistantUI plugin registers:
- The
'aiCommands'UI dropdown component. - The
'aiAssistant'UI button component. - The
'showAIAssistant'command.
You can execute the command to display the AI Assistant:
editor.execute( 'showAIAssistant' );
Alternatively, you can display the AI Assistant and automatically submit the query to the AI service:
editor.execute( 'showAIAssistant', 'The query sent to the AI service', 'Label to display in query field' );
# Future ideas - share your feedback!
AI Assistant is just our first step in enhancing CKEditor 5 with AI capabilities. We are committed to bringing you “the rich-text editor of tomorrow,” and below are some of our ideas on how AI can improve the content creation process:
-
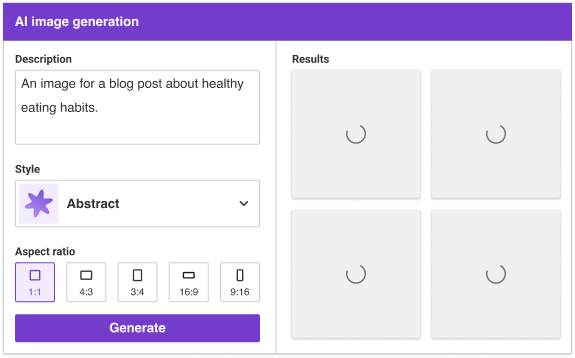
Generate images based on custom prompt or the content in your document.
-
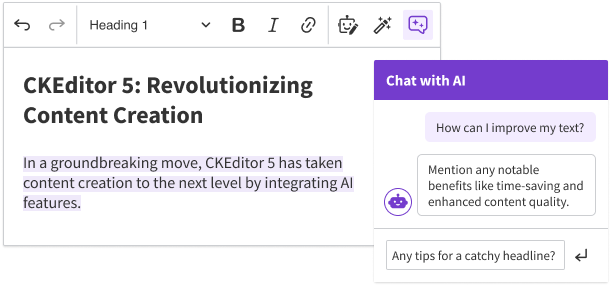
Chat with AI about the document, using a convenient UI.
-
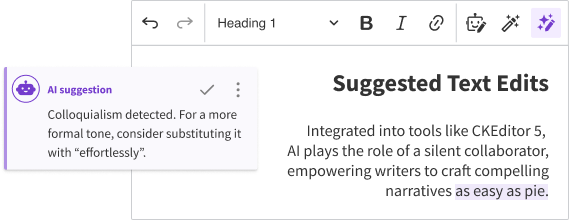
Analyze your document with AI and get results as in-content comments.
-
Generate content using templates - customizable UI dedicated for content generation.

-
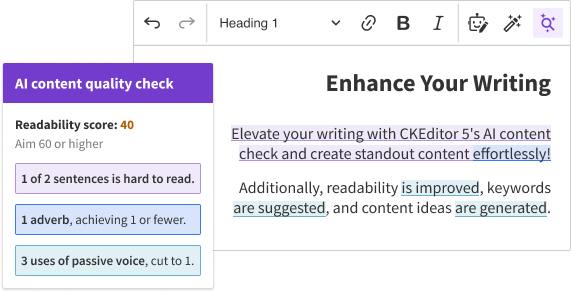
Check content quality with AI to get a summary on the quality of your writing.
If any of the potential features listed above sound interesting to you, or you have a different idea of how the AI could enhance the editing experience, let us know!
We recommend using the official CKEditor 5 inspector for development and debugging. It will give you tons of useful information about the state of the editor such as internal data structures, selection, commands, and many more.
Every day, we work hard to keep our documentation complete. Have you spotted outdated information? Is something missing? Please report it via our issue tracker.