|
CKFinder 3 – ASP.NET Connector Documentation
|


|
|
CKFinder 3 – ASP.NET Connector Documentation
|
|
Have a look at the System Requirements section to make sure that your server meets all the application requirements. Check the Troubleshooting section for more information on how to adjust some IIS server settings such as JSON MIME type support (needed for language files), ASP.NET support or request length limit.
When you are sure that your server configuration is correct, complete the steps below to start using CKFinder.
The CKFinder ASP.NET connector can be installed in two ways:
Important: The installation methods described below assume that the CKFinder server-side connector will be running as a standalone application. If you want to integrate the connector with an existing application, refer to the Integration section.
Important: Paths to content files (such as
ckfinder.js,ckfinder.html, the connector files) differ between ZIP and NuGet packages:
- For ZIP package all content files are located in the
ckfinderfolder in the root of the project.- For NuGet packages content files are added to the
CKFinderScriptsfolder.Most examples used in the documentation assume the usage of the ZIP package and its default paths.
Web.config file (see Configuration) or through the Startup.cs file (see Configuration by Code).With CKFinder up and running you can now focus on adjusting some configuration options to your needs. Alternatively, you may edit the configuration in your Startup.cs file.
wwwroot directory of your web server. This will place all files in the ckfinder directory. Please note that the name of this directory is important, because it will be used as a virtual path to the CKFinder connector application (by default CKFinder expects it to point to /ckfinder/connector). If you decide to use a different directory name, you will have to define an appropriate connector path for the CKFinder JavaScript client side (see connectorPath). You also need to take care to keep the route pointed by ckfinderRoute in sync with the CKFinder JavaScript client connectorPath.InetMgr.exe)./ckfinder/ directory, open the context menu and choose Convert to Application. 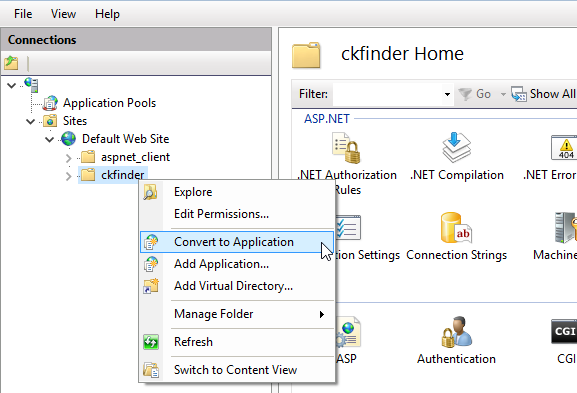
Almost done! If you open the CKFinder samples page (located in /ckfinder/samples/), you will now see some working CKFinder samples. Depending on server permissions you may even be able to create a folder or upload files without further actions — if not, read more.
After you installed CKFinder, some configuration is needed in order to make it work.
By default the CKFinder configuration is stored in the Web.config file. Please refer to the Configuration section to find out more about available configuration options.
If you want to configure the connector through code to support dynamic configuration changes, please refer to Configuration by Code.
Note: If CKFinder was installed using the ZIP package, you can define your dynamic configuration in the App_Data/ConnectorConfig.cs file. This file has a special purpose and does not require manual compilation — the configuration defined here will be compiled and applied during runtime.
By default, the CKFinder server connector is disabled. If you open the CKFinder full page sample (located in /ckfinder/samples/full-page-open.html for the ZIP package and /ckfinder/CKFinderScripts/samples/full-page-open.html for the NuGet package) you will see the following error message:
The file browser is disabled for security reasons. Please contact your system administrator and check the CKFinder configuration file.
In order to enable it, you should set the mask for allowed roles in the ckfinderAllowedRole setting in the <appSettings /> section of the Web.config file so that it matches users that should have access to CKFinder.
The simplest way to enable CKFinder (insecure, though):
If you would like to use a different authentication method, you have to implement the IAuthenticator interface and pass its instance to the ConnectorBuilder.SetAuthenticator method.
For more details please refer to the Implementing Authenticator HOWTO section.
The CKFinder connector is listening for commands under the route defined in the ckfinderRoute setting in the <appSettings /> section of the Web.config file.
By default is should be configured to /ckfinder/connector:
If you want CKFinder to listen under a different route, remember to adjust the JavaScript configuration's connectorPath, too.
The connector requires the Modify permission to be set for two folders:
/ckfinder/userfiles/ — The directory where user files will be stored (defined as a root option for the default backend)./ckfinder/App_Data/ — The directory for private application files (like logs and thumbnails).The above are default locations that can be changed in the Configuration.
To add the Modify permission to the folder, proceed as follows:
IIS (for example IIS_IUSRS).Modify permission from the list at the bottom of the dialog window.Apply and OK to close the dialog window.In case when the files managed by CKFinder are served through the web server, it is recommended to perform some server configuration fine-tuning to make sure the files are served in a secure manner. To read more, please have a look at the following article: Securing a Publicly Accessible Folder.
If you have trouble installing and running CKFinder on IIS, check the following tips on how to adjust some server settings in order to resolve your issues. If CKFinder does not work as intended after the initial configuration and your server settings adjustments, please have a look at the Debugging and Logging section.
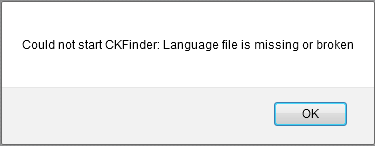
If you are using IIS Express as your web server, you will need to make sure that JSON is an allowed MIME type. By default it is not allowed which may cause issues with CKFinder language files being unavailable, and you will see the following alert in CKFinder:
You will thus need to add JSON as a new MIME type in your IIS configuration.
Set the following options in the Add MIME Type dialog:
.json.application/json.Click OK to accept and restart the server to apply your changes.
In some versions of IIS, .NET Framework 4.5 is not registered by default. If you get an error like this one:

it means you will need to register the .NET Framework manually. To do this run aspnet_regiis.exe -i. You can find aspnet_regiis.exe in %WINDIR%\Microsoft.NET\Framework64\v4.0.30319.
If you are using IIS for hosting your application, the default upload file size is 4MB. In order to change it, modify these two attributes in your Web.config file to suit your needs:
Note: If you already have the these sections in your configuration, add only the required attributes.